Old-Fashioned Blackberry Cake

Blackberry Cake on plate

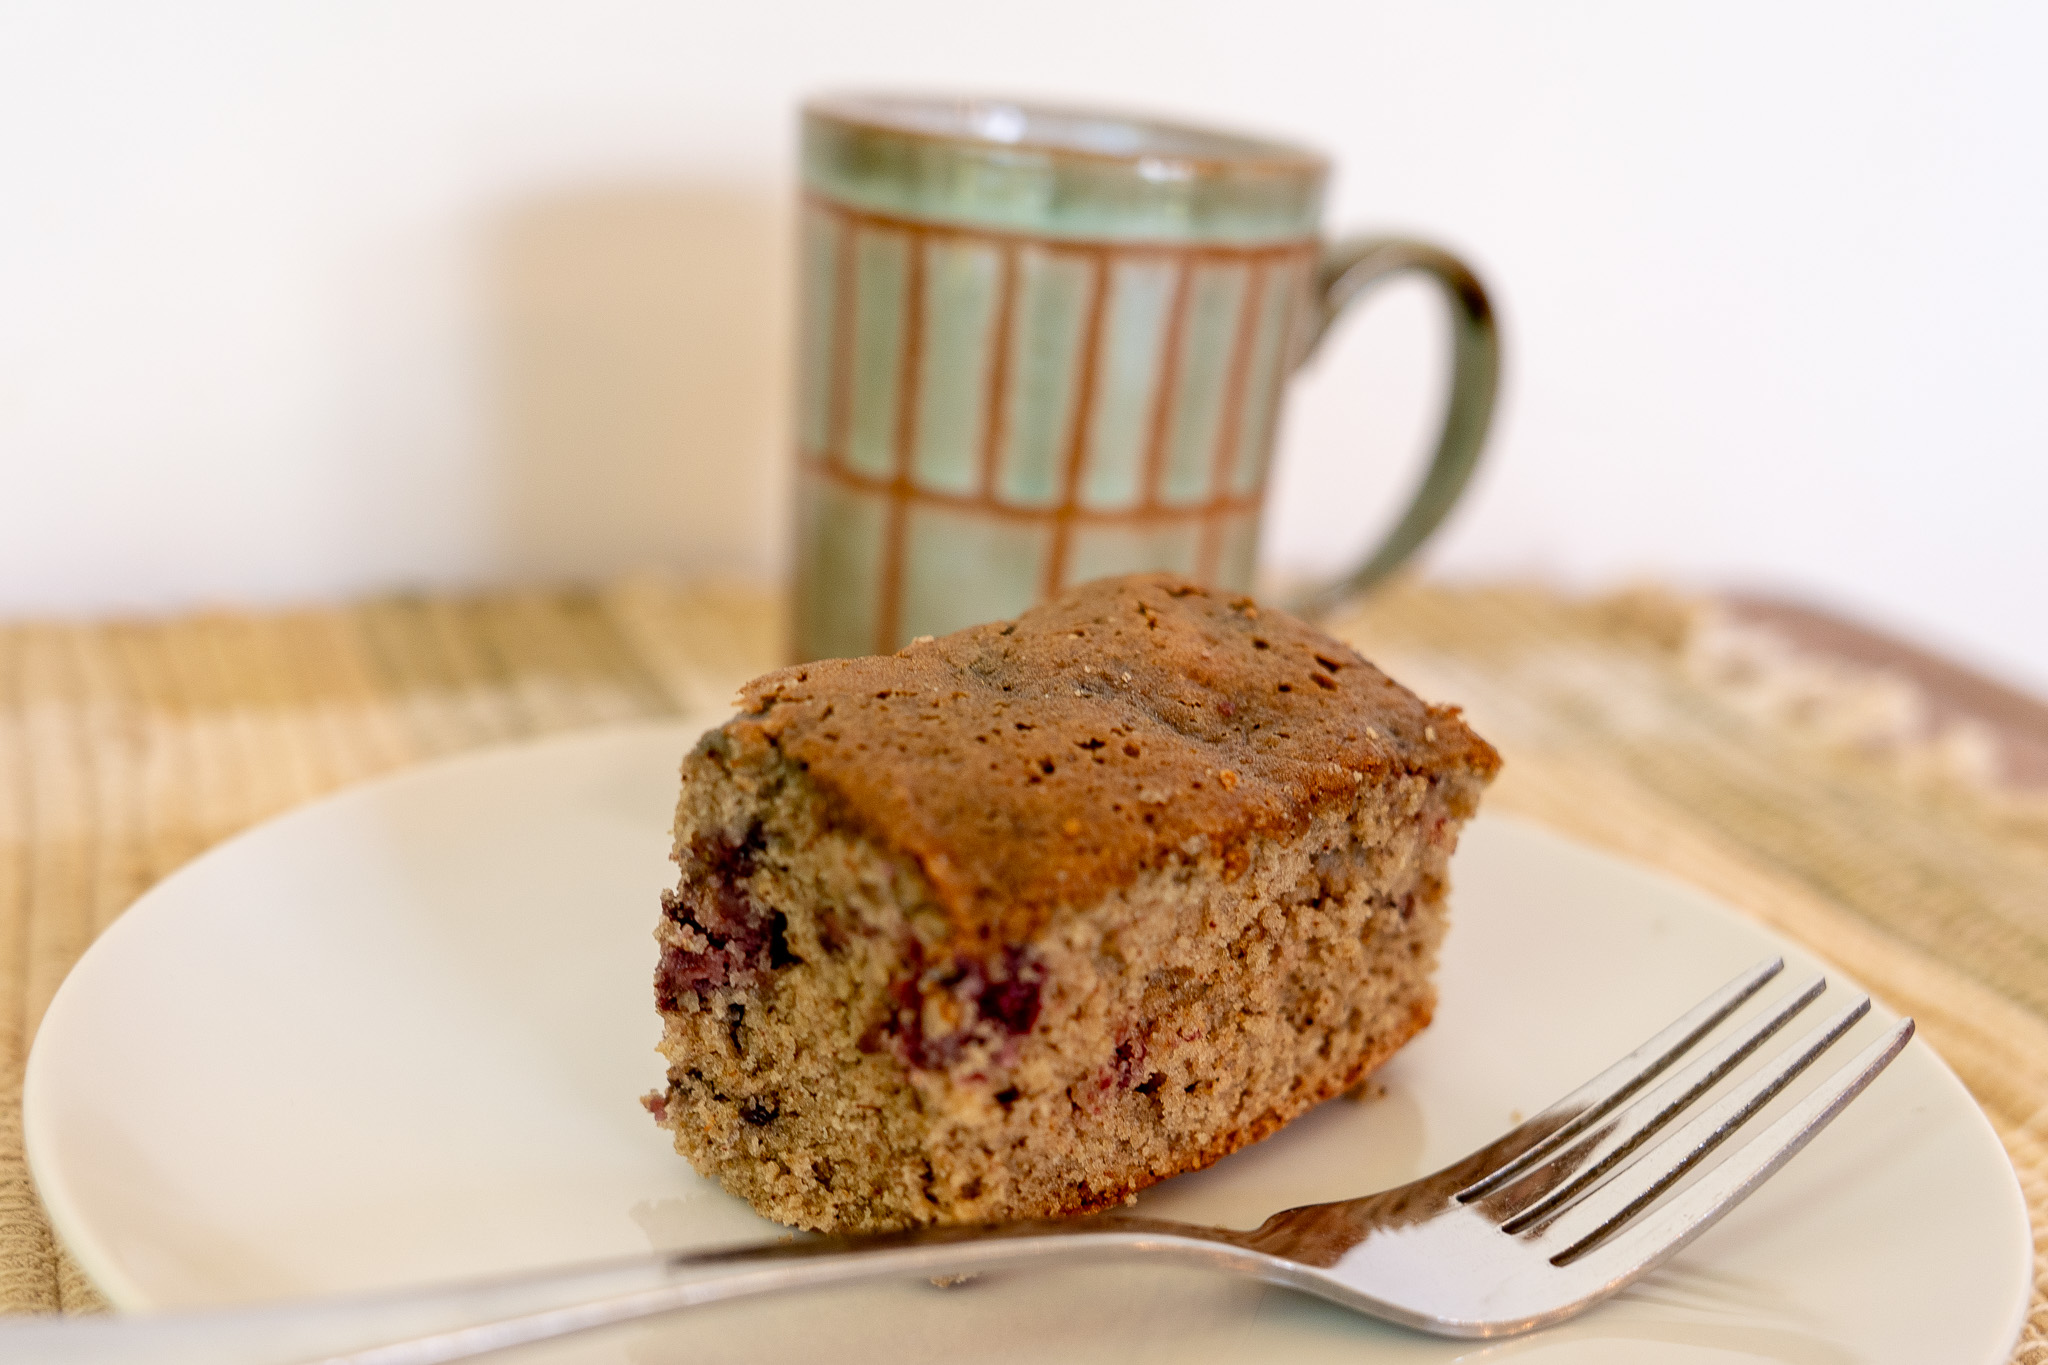
Berries, berries everywhere. I flipped through a hundred-year-old cookbook to see if there were any berry recipes, and came across a lovely recipe for Blackberry Cake.

Blackberry Cake is a spice cake that contains blackberries. The combination works really well, and the cake was delicious. It makes a lovely summer dessert.

Here’s the original recipe:

Recipe for Blackberry Cake
Source: Pennsylvania State Grange Cook Book (1926)

A hundred years ago, canned blackberries were readily available. In those days, before home freezers, many cooks canned blackberries to preserve them. Commercially canned blackberries were also sold in many stores.

Since it’s difficult to find canned blackberries today, I substituted fresh blackberries for canned ones when I made the recipe. I used a pint package of blackberries and cooked them with a little sugar prior to using in this recipe. The blackberries I used were very large, so I cut each berry into 2 or 3 pieces before cooking. After they were cooked, they had a consistency (and liquid) similar to canned blackberries.

Here’s the recipe updated for modern cooks:

Blackberry Cake

  • Servings: 8 - 10
  • Difficulty: moderate
  • Print

1 cup canned blackberries, including liquid (or use 1 pint (8 ounces) fresh blackberries + 1/4 cup sugar)

1 cup sugar

1/2 cup butter, softened

1/4 cup water

2 eggs

1 teaspoon baking soda

2 cups flour

1 teaspoon cinnamon

1/2 teaspoon cloves

1/2 teaspoon allspice

Step 1. If using fresh blackberries, put blackberries in a saucepan. (If the blackberries are very large, first cut each one into 2 or 3 pieces.) Stir in 1/4 cup sugar. Let sit for 5 minutes to allow time for juice to be drawn out of the berries, then heat, using medium heat until the liquid begins to boil; reduce heat and simmer until the berries are soft (about 5 minutes). Remove from heat.

Step 2. Drain the blackberries. Reserve both the berries and liquid. (Regardless of whether canned or cooked berries are used, they will need to be drained.)

Step 3. Preheat oven to 350°  F.

Step 4. Grease and flour a loaf pan or a 9-inch square baking pan. (I used a square pan.).

Step 5. Cream butter and 1 cup sugar. Add water, and eggs; beat to combine. Add flour, baking soda, cinnamon, cloves, and allspice; beat until thoroughly mixed.  Add blackberry juice; beat until well blended.

Step 6. Then stir in the cooked blackberries. Pour into prepared pan.

Step 7. Bake 40 to 45 minutes, or until wooden pick inserted in center comes out clean.

http://www.ahundredyearsago.com

Old-Fashioned Jellied Rhubarb

Can a recipe failure be a success? I think that I have a case where the dish I made didn’t turn out as expected, but I absolutely love the food I ended up with.  Let me explain.

I decided to make a hundred-year-old recipe for Jellied Rhubarb. To illustrate the post, I planned to show a picture of a beautifully molded gelatin ring with the piped whipped cream on top. Instead, I ended up with a bright, sunny rhubarb sauce that contained delightful notes of lemon.

I think that this is the first time that I’ve ever made a recipe that called for both rhubarb and lemon juice (and lemon rind). The combination works! Both the rhubarb and the lemon are tart and tangy, while the lemon brings an additional subtle sweetness and refreshing citrus taste. I can’t figure out why it’s not a common combination.

Each spring and early summer, I make lots of rhubarb dishes, and I’m certain I’ll make this recipe again.

Recipe for Jellied Rhubarb (Rhubarb Gelatin)
Source: Ladies Home Journal (May, 1926)

I’m still trying to figure out why the gelatin did not firmly set. As I go over how I made the recipe in my head, I think that there might be several factors that caused the problems. First, I took some short cuts when making the recipe. To cook the rhubarb, the recipe calls for mixing the rhubarb pieces, sugar, and water, and then baking for 50 minutes. This seemed like an odd (and very slow) way to get cooked rhubarb, so I put the rhubarb, sugar, and water in a pan and cooked it for a few minutes until the rhubarb was soft.

Second, I may have inadvertently not used as much unflavored gelatin as the recipe called for.  It calls for 2 1/2 tablespoons of gelatin; I used 2 packets of gelatin. At the time, I thought that 2 packets contained a lot of gelatin and that it must contain at least 2 1/2 tablespoons. In hindsight (and after I researched it following my recipe failure), I realized that each 0.25 ounce packet only contains about a tablespoon of gelatin. (Note to self: Measure don’t guess when making recipes.)

Third, the recipe is a bit vague. It mentions straining the rhubarb juice at one point in the recipe, but at a later point, it mentions that the jellied rhubarb can be an excellent tart filling if it is not strained too thoroughly. This led me to decide to strain the cooked rhubarb, put the juice back in the pan, add the gelatin, and reheat until the gelatin was dissolved. I then stirred the rhubarb that I’d strained out back in. Perhaps I shouldn’t have done that. The recipe mentions the tart filling in connection with “not thoroughly strained” rhubarb, not molded gelatin. In any case, adding the rhubarb back in would have increased the volume of the mixture, and it may have required additional gelatin if I wanted a firmly molded gelatin.

Bottom line, the series of mistakes and shortcuts that I took resulted in the recipe not turning out as the recipe author intended. After the rhubarb and gelatin mixture failed to properly jell, I considered reheating the mixture, straining it, and adding additional gelatin; but, in the end, I decided that I was happy with the dish that I got and didn’t do that.

Here’s the recipe updated for modern cooks:

Jellied Rhubarb

  • Servings: 5 - 7
  • Difficulty: moderate
  • Print

4 cups red rhubarb cut into 1-inch pieces

2 cups sugar

2 cups water

juice and grated rinds of 2 lemons

2 packets (0.25-ounce packets) unflavored gelatin

1/2 cup cold water

Step 1. Put the diced rhubarb, sugar, and 2 cups of water in a large saucepan. Using medium heat, bring to a boil; reduce temperature and simmer until tender (about 5 minutes); stir occasionally. Remove from heat.

Step 2. In the meantime, put the 1/2 cup cold water in a small bowl. Sprinkle the gelatin on top of the water, and let soak for 15 minutes.

Step 3. Strain the cooked rhubarb. Keep both the rhubarb and the juice.

Step 4. Put the rhubarb juice back in the pan; add the gelatin that has been soaked in water.

Step 5. Bring back to a boil while stirring constantly.

Step 6. Remove from heat, and stir in the lemon juice, grated lemon rind, and the cooked rhubarb that previously had been strained out.

Step 7. Put in a bowl and put in the refrigerator; chill for at least 3 hours.

http://www.ahundredyearsago.com

Old-Fashioned Chicken Roll (Chicken and Olive Roll)

A recipe for Chicken Roll in a 1926 magazine intrigued me. The roll was made using Baking Powder Biscuit dough, then filled with a chopped chicken and olive mixture and rolled similarly to how a jelly roll is made.

The roll can be cut into rounds prior to baking. After it is baked, it is served with White Sauce.

The recipe turned out well. The Chicken Roll rounds made a nice presentation and were tasty. The tangy, briny olives provided the predominate flavor, with the taste of the chicken being much more nuanced. If I had been the recipe author, I would have called this food a Chicken and Olive Roll.

Chicken Roll Recipe
Source: Ladies Home Journal (June, 1926)

One-half teaspoon of scraped onion did not seem like very much, so I used 2 tablespoons of finely chopped onions.

I assumed that “olives” in the recipe referred to green stuffed olives.

I have made White Sauce so many times over the years that I didn’t need a recipe for it, but I did need a recipe for Baking Powder Biscuits. Here’s a hundred-year-old that I found for them:

Recipe for Baking Powder Biscuits
Source: Pennsylvania State Grange Cook Book (1926)

As directed in the original Chicken Roll recipe, I doubled the amount of shortening when making the Baking Powder Biscuit dough.

After I added the milk, I mixed the dough with a fork rather than a knife.

When I rolled the dough to 1/3-inch thickness, it seemed rather thick, so I rolled it a little more to make it about 1/4-inch thick.

I cut the roll into rounds prior to baking. Two-inch thick rounds are very thick, so I cut them into 1-inch rounds.

My husband and I ate half the rounds one day, and I reheated the remainder the next. I made a half recipe of white sauce each day that we poured over the baked rounds of Chicken Roll.

Here’s the recipe updated for modern cooks:

Chicken Roll (Chicken Olive Roll)

  • Servings: 3 - 5
  • Difficulty: moderate
  • Print

Filling

1 1/4 cups cold cooked chicken, finely chopped

1/3 cup chopped stuffed green olives

2 tablespoons finely chopped onion

1/8 teaspoon paprika

Baking Powder Biscuit Dough

2 cups flour

4 teaspoons baking powder

1/2 teaspoon salt

1/4 cup shortening

2/3 cup milk

White Sauce

1/4 cup butter

1/4 cup flour

1 teaspoon salt

2 cups milk

Step 1. Preheat oven to 450° F.

Step 2. Put the chopped chicken, olives, onions, and paprika in a bowl. Stir to combine. Set aside.

Step 3. Make the Baking Powder Biscuit dough by combining the flour, baking powder, and salt in a mixing bowl, then cut in the shortening; add milk, and stir with a fork until the dough forms.

Step 4. Put the biscuit dough on a prepared surface, and roll the dough into a rectangle about 1/4 inch thick (approximately 9″ X 12″).

Step 5. Spread the chicken and olive mixture on the dough, then roll the dough starting at one of the short edges (similarly to how a jelly roll is rolled).

Step 6. Cut the roll into 1-inch thick rounds, then place the rounds on a lightly greased backing sheet.

Step. 7. Put in oven and bake for 12 – 15 minutes or until the rounds are lightly browned.

Step 8. In the meantime, make the White Sauce. In another pan, using medium heat, melt butter, then stir in the flour and salt. Gradually, add the milk while stirring constantly. Continue stirring until the white sauce begins to thicken.

Step 9. To serve, put the baked Chicken Roll rounds on a plate, and serve with the White Sauce (or, if desired, pour the White Sauce on the baked rounds prior to serving).

http://www.ahundredyearsago.com

Hundred-Year-Old Recipe for Egg Foyung (Egg Foo Young)

I recently was surprised to find several recipes for Asian foods in a hundred-year-old U.S. cookbook. The introduction to the chapter on luncheon and supper dishes in a 1926 cookbook called Mrs. Peterson’s Simplified Cooking says:

So many persons have asked for some reliable recipes for Chinese dishes that I have included some favorite ones here. These dishes are unusual and delicious in flavor. The bamboo shoots, water chestnuts, and sauces called for may be purchased canned from any grocer who imports.

The cookbook included recipes for Chop Suey, Chinese Rice, Fried Rice, Chow Mien, and Egg Foyung. The cookbook author spelled both the Chow Mein and Egg Foo Young differently than we spell them today. I am not sure if she was uncertain how to spell them and tried to spell the words the way they sounded to her, or whether they are archaic spellings.

I have no idea how authentic the recipes are, but am guessing that they are different from foods actually served in China. In any case, I decided to give the Egg Foyung (Egg Foo Young) a try.

The old recipe calls for many of the same ingredients that modern Egg Foo Young recipes call for (eggs, bamboo shoots, water chestnuts, pork or chicken); however, the process for making the dish is a little different from most modern recipes. Many modern recipes call for pouring a soy sauce mixture on egg pancakes (or omelet), while this recipe calls for coating the cooked egg pancakes with a soy-based gravy by putting them in a skillet with the hot gravy, and then flipping to coat the other side.

The verdict: The Egg Foyung (Egg Foo Young) was fun to make and tasty.

Here’s the original recipe:

Recipe for Egg Fuyung
Source: Mrs. Peterson’s Simplified Cooking (1926)

This recipe makes a lot of Egg Foyung, so I halved the amount of batter that I made, but used the amount of vegetable oil that the original recipe called for to ensure that the oil was an adequate depth. I also made the original amount of the gravy; however, when I started putting the egg pancakes into the gravy to absorb some of the liquid, I quickly ran out of it and had to make more. So, when I updated the recipe, I doubled the ingredients used to make the gravy.

When I halved the batter-portion of  the recipe, I used half of an 8-ounce can of sliced water chestnuts and half of an 8-ounce can of bamboo shoots. I refrigerated the extra water chestnuts and bamboo shoots. To use the remaining water chestnuts and bamboo shoots, I made the recipe a second time several days later.

I assumed that “Chinese sauce” referred to soy sauce. I reduced the amount of salt when I made the recipe. It seemed like the old recipe called for too much, especially since the gravy contained substantive salt because of the soy sauce in it.

Here’s the recipe updated for modern cooks:

Egg Foyung (Egg Foo Young)

  • Servings: 3 - 4
  • Difficulty: moderate
  • Print

1/2 cup bamboo shoots (I used half of a 7-ounce can.)

1/2 cup sliced water chestnuts (I used half of a 7-ounce can.)

1/2 cup cooked pork or chicken, cut into thin 2 inch strips (I used pork.)

6 eggs, slightly beaten

1/2 teaspoon salt

1/2 cup vegetable oil

2 tablespoons corn starch

4 teaspoons water

2 tablespoons soy sauce

1 cup broth or water (I used beef broth.)

Step 1. Cut the water chestnuts and bamboo shoots into thin strips. If the bamboo strips are longer than two inches, cut them in half.

Step 2. Put the eggs, water chestnuts strips, bamboo shoot strips, and pork or chicken strips into a mixing bowl; stir to evenly distribute all the ingredients.

Step 3. Put the oil and salt in a large heavy skillet and stir, then heat until hot using medium heat.

Step 4. Drop the egg mixture from a tablespoon into the hot oil. Evenly space the spoonfuls of the mixture in the pan. Cook until the egg mixture thickens, then flip and cook the other side. Remove from pan and put on a warm oven (275° F.) while while making the remaining ones. The egg pancakes will need to be cooked in several batches.

Step 5. Once all the egg pancakes have been made, pour any remaining oil out of the skillet. Turn off heat until the soy gravy is mixed.

Step 6. To make the soy gravy, put the cornstarch in a bowl, add 4 teaspoons water, then stir until the mixture is smooth. Stir in the 1 cup of broth or water.

Step 7. Reheat skillet using medium heat, then add the gravy mixture. Heat until the mixture thickens, while stirring continuously.

Step 8. Place a few of the egg pancakes in the gravy, then flip, and remove from the skillet. Repeat until all of the pancakes are coated with the gravy. Serve immediately.

http://www.ahundredyearsago.com

Old-Fashioned Macaroni Chicken Salad

Macaroni Chicken Salad in bowl

The season for picnics, reunions, grilling outside, and potlucks is upon us. It is also the season for old-fashioned pasta salads. A hundred-year-old issue of Ladies Home Journal contained a recipe of Macaroni Chicken Salad, and I decided to give it a try.

The Macaroni Chicken Salad differed from many modern pasta salads in that it contained no celery or onion. Instead, the recipe called for a cucumber, as well as for two chopped pimentos (which I interpreted to mean red peppers), in a mayonnaise dressing.

The salad was creamy, colorful, and flavorful. The chopped cucumber added a refreshing crunch, with the chicken providing a slightly savory protein. It would be a perfect side dish at a pot luck or other gathering. It is also lovely as a light lunch or dinner main dish.

Here is the original recipe:

Macaroni Chicken Salad Recipe
Source: Ladies Home Journal (April, 1926)

The original recipe called for one cup of mayonnaise. If this much mayonnaise was used, the salad components would be thickly coated. I wanted a lighter dressing, so used ½ cup of mayonnaise.

I used a boneless chicken breast when making this recipe – though other parts of the chicken (or left-over rotisserie chicken) would also work well. If the water was not salted when making the macaroni (or if the diced chicken did not contain salt), a little salt might enhance the flavor.

I chopped an unpeeled cucumber rather than slicing it.

My sense is that red peppers were smaller a hundred years ago than what they are today, so I used just one red pepper.

I ignored the serving suggestions. I ate this salad for lunch, and it was sufficiently substantive without the addition of brown bread sandwiches. The salad was colorful with just the chopped red pepper and cucumbers, so I did not garnish with julienne strips of red pepper.

Here’s the recipe updated for modern cooks:

Macaroni Chicken Salad

  • Servings: 6 - 8
  • Difficulty: easy
  • Print

2 cups cold, cooked macaroni (approximately ¾ cup uncooked macaroni)

2 cups cold cooked chicken, coarsely chopped or shredded

1 cucumber, chopped or thinly sliced (about 2 cups)

1 medium red pepper

½ cup mayonnaise

½ teaspoon salt (optional)

Put the macaroni, chicken, cucumber, and red pepper in a bowl; stir gently to mix. Add mayonnaise (and, if desired, salt); stir gently to coat the other ingredients.

http://www.ahundredyearsago.com

“Grandmother’s” Strawberry Whips

Strawberry Whip on plate

The June, 1926 issue of Good Housekeeping magazine had a Crisco shortening advertisement that contained a recipe for Grandmother’s Strawberry Whips. Apparently Strawberry Whips were considered an old-fashioned dessert a hundred years ago.

These old-fashioned Strawberry Whips are sweet muffins that are filled with a whipped cream and mashed strawberry mixture, and then topped with a whole strawberry. The muffins are a cross between shortcake and cupcakes.

This recipe differs from modern Strawberry Whip recipes. (Usually, modern recipes do not include the “s” at the end of “whip.”) Today Strawberry Whip recipes generally make a creamy whipped dessert that does not contain a muffin or cake.

This recipe is a winner. The old-fashioned Strawberry Whips were fun to make, tasty, and made a lovely presentation.

Here’s the original recipe:

Strawberry Whips on tray

recipe for Strawberry Whips
Source: Good Housekeeping (June, 1926)

The old recipes says it makes 16 muffins. I only got 12 muffins. The muffin cups the recipe author used must have been smaller than the ones in my muffin tin.

It’s often difficult to find pastry flour, so I used all-purpose flour when I made this recipe. It worked fine.

Butter can be substituted for the shortening.

I used a 1-pound box of strawberries when I made this recipe, plus a few extra strawberries to garnish the Whips.

The recipe called for 1 cup whipped cream, which does not seem like enough to fill 12 muffins, so I assumed that the recipe meant 1 cup of whipping cream (which would make 2 cups of whipped cream).

I put paper liners in the muffin cups. After baking, I removed the paper liners prior to filling the muffins.

Here’s the recipe updated for modern cooks:

Strawberry Whips

  • Servings: approximately 12 muffins
  • Difficulty: moderate
  • Print

1 cup sugar

1/2 cup shortening or butter (softened)

1/2 teaspoon salt

1/2 cup milk

3 eggs, slightly beaten

2 teaspoons baking powder

2 cups all-purpose flour

1/2 teaspoon vanilla

1-pound strawberries + additional whole medium-sized strawberries to top the Strawberry Whips

1/2 cup confectioners’ sugar + 3 tablespoons confectioners’ sugar

1 cup heavy whipping cream

Step 1. Preheat oven to 375° F.

Step 2. Cream shortening or butter, sugar, and salt together until light and smooth.

Step 3. Add eggs, milk, and baking powder; mix until smooth. Then add flour; stir until combined. Add vanilla, and stir until evenly distributed.

Step 4. Put the batter in a prepared muffin tin. If desired, line the muffin cups with paper liners. (After baking, remove the paper liners prior to assembling the Strawberry Whips.) Fill each muffin cup 3/4th full.

Step 5. Bake for 25-30 minutes or until a wooden pick comes out clean. Remove from oven, and allow the muffins to cool.

Step 6. In the meantime, coarsely chop most of the 1-pound of strawberries. (A few medium ones can be reserved for topping the Strawberry Whips. Additional medium strawberries will be needed to get enough strawberries to garnish all the muffins.) Put the chopped strawberries in a bowl and stir in 1/2 cup confectioners’ sugar. Allow to sit for 15-30 minutes, so that the juice is drawn out of the strawberries, then slightly mash using a fork. Then, drain the strawberries using a strainer.

Step 7. Also, in the meantime, put the heavy cream in a bowl, and beat until stiff peaks form; then sprinkle the 3 tablespoons confectioners’ sugar on top of the whipped cream and beat a little more to combine the sugar with the whipped cream.

Step 8. To serve, remove the center of the muffins by cutting about 1/2-inch from the edge of each muffin. (Cut about 1/2-inch deep.) Remove the top, then scoop the center out of the muffins. Use care when removing the center, so that the muffin’s shell is not torn.

Step 9. Stir the drained strawberries into the whipped cream.

Step 10.  Fill the hollowed-out muffins with the strawberry whipped cream mixture. Heap it up a little so that it nicely tops the muffins. Remove stem and leaves from the medium-sized strawberries, and then press them upside down in the strawberry whipped cream.

http://www.ahundredyearsago.com

Old-Fashioned Rhubarb Meringue Pudding

Many fruits and vegetables are available in the dead of winter as a result of amazing modern transportation systems. However, sometimes I get bored with the produce that is available year-round, and crave foods that are available for just a few weeks each year. Rhubarb is one of those foods.

I love the tart, tanginess of rhubarb, and look forward to it each spring. It’s now peak rhubarb season, and I’m enjoying a variety of rhubarb dishes. When I saw a recipe for Rhubarb Pudding with Meringue in a 1926 issue of Good Housekeeping, I immediately knew that I wanted to give it a try.

The Rhubarb Pudding with Meringue was delightful and made a lovely dessert. It is basically a bread pudding topped with stewed rhubarb and meringue.

Rhubarb Pudding with Meringue

Here’s the original recipe:

Recipe for Rhubarb Meringue Pudding
Source: Good Housekeeping (May, 1926)

Borden advertised in Good Housekeeping, and that company’s evaporated milk is specifically listed in the recipe. When I made the recipe, I used evaporated milk and water, though it would work fine to instead use 2 cups of milk.

The recipe calls for stewed rhubarb. During the years when I was posting my grandmother’s diary entries, I posted an old family recipe for stewed rhubarb. I used a reformatted version of that recipe to make the stewed rhubarb.

The ingredient list calls for “1/2 lemon, grated rind.” The directions are unclear, but I interpreted this to mean that the recipe calls for both the juice and grated rind of 1/2 lemon. The recipe directions do not indicate when lemon juice should be added, so I just added it at the same time that I added the lemon rind.

Here’s the recipe updated for modern cooks:

Rhubarb Meringue Pudding

  • Servings: 6 - 8
  • Difficulty: moderate
  • Print

1 cup evaporated milk + 1 cup water (or use 2 cups milk)

1 1/2 cups bread crumbs (tear bread into 1/2-inch pieces)

1/2 cup sugar + 1/4 cup sugar

2 eggs, separated

1 tablespoon butter, melted

1/2 teaspoon salt

grated rind of 1/2 lemon

juice of 1/2 lemon

1 cup stewed rhubarb (See recipe below – or use left-over stewed rhubarb made using another recipe)

Step 1. Preheat the oven to 350° F.

Step 2. Put the bread crumbs in a bowl, then stir in the evaporated milk and water (or the milk if that is what is being used). Let soak for 5 – 10 minutes.

Step 3. Add 1/2 cup sugar, slightly beaten egg yolks, butter, salt, grated lemon rind, and lemon juice; stir just enough to evenly disperse the ingredients.

Step 4. Put the bread pudding mixture into a 9-inch by 9-inch (or similar-sized) baking dish.

Step 5. Put in oven and bake until firm in the center and lightly browned (about 1  hour – 1 hour 15 minutes).  Remove from oven.

Step 6. In the meantime, make the stewed rhubarb (see recipe below), or use left-over stewed rhubarb made using another recipe.

Step 7. Also, in the meantime, make the meringue. Place egg whites in a bowl, then  beat the egg whites until they form stiff peaks. Gradually add the 1/4  cup of sugar while continuing to beat.

Step 8. Spread the stewed rhubarb on top of the baked bread pudding, then spoon the meringue on top and swirl decoratively. Reduce oven temperature to 325° F. Return dish to oven and cook for an additional 12-15 minutes or until the meringue is lightly browned. Can be served hot or cold.

Stewed Rhubarb

This recipe makes approximately 1 cup of stewed rhubarb.

2 cups rhubarb (cut into 3/4 inch pieces)

1/3 cup sugar

1/4 cup water

1/2 teaspoon salt

Step 1. Mix all of the ingredients together in a saucepan.

Step 2. Using medium heat, heat to boiling, then reduce temperature and simmer until tender (about 5 minutes); stir occasionally. Remove from heat.

http://www.ahundredyearsago.com