Organizations often compile and then sell cookbooks as a fundraiser. A cookbook with an especially fascinating story is the Pennsylvania State Grange Cook Book. The Grange is an agricultural advocacy and social organization that was founded in 1867. The Grange is organized into four levels: community, county or district, state, and national. There are Grange halls located in many rural areas throughout the U.S. where Grange members hold meetings and events.
There were several editions of the Pennsylvania State Grange Cook Book published during the 1920’s that helped raise funds to build a women’s dormitory at Penn State University. The cookbooks contained recipes submitted by Grange members from across Pennsylvania. I have the 4th edition of the cookbook, which was published in 1926.
Grange members sold 42,000 copies of the cookbooks and donated 30¢ from each sale to Penn State toward the building of Grange Memorial Dormitory which was constructed in 1929-30. The building still exists and is now known as Grange Building. The Division of Undergraduate Studies is now located in it.
Both Penn State and the Pennsylvania Grange are strong advocates for rural areas and agricultural education. In October, 2025, at the 153rd Annual State Session of the Pennsylvania State Grange meeting in Williamsport, the president of the Pennsylvania State Grange, Matthew Espenshade, presented Penn State President Neeli Bendapudi with one of the hundred-year-old cookbooks as a memento of the long relationship between the two organizations.
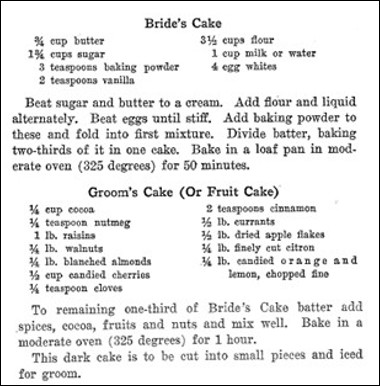
I have made several recipes from the Pennsylvania State Grange Cookbook this year. They include: