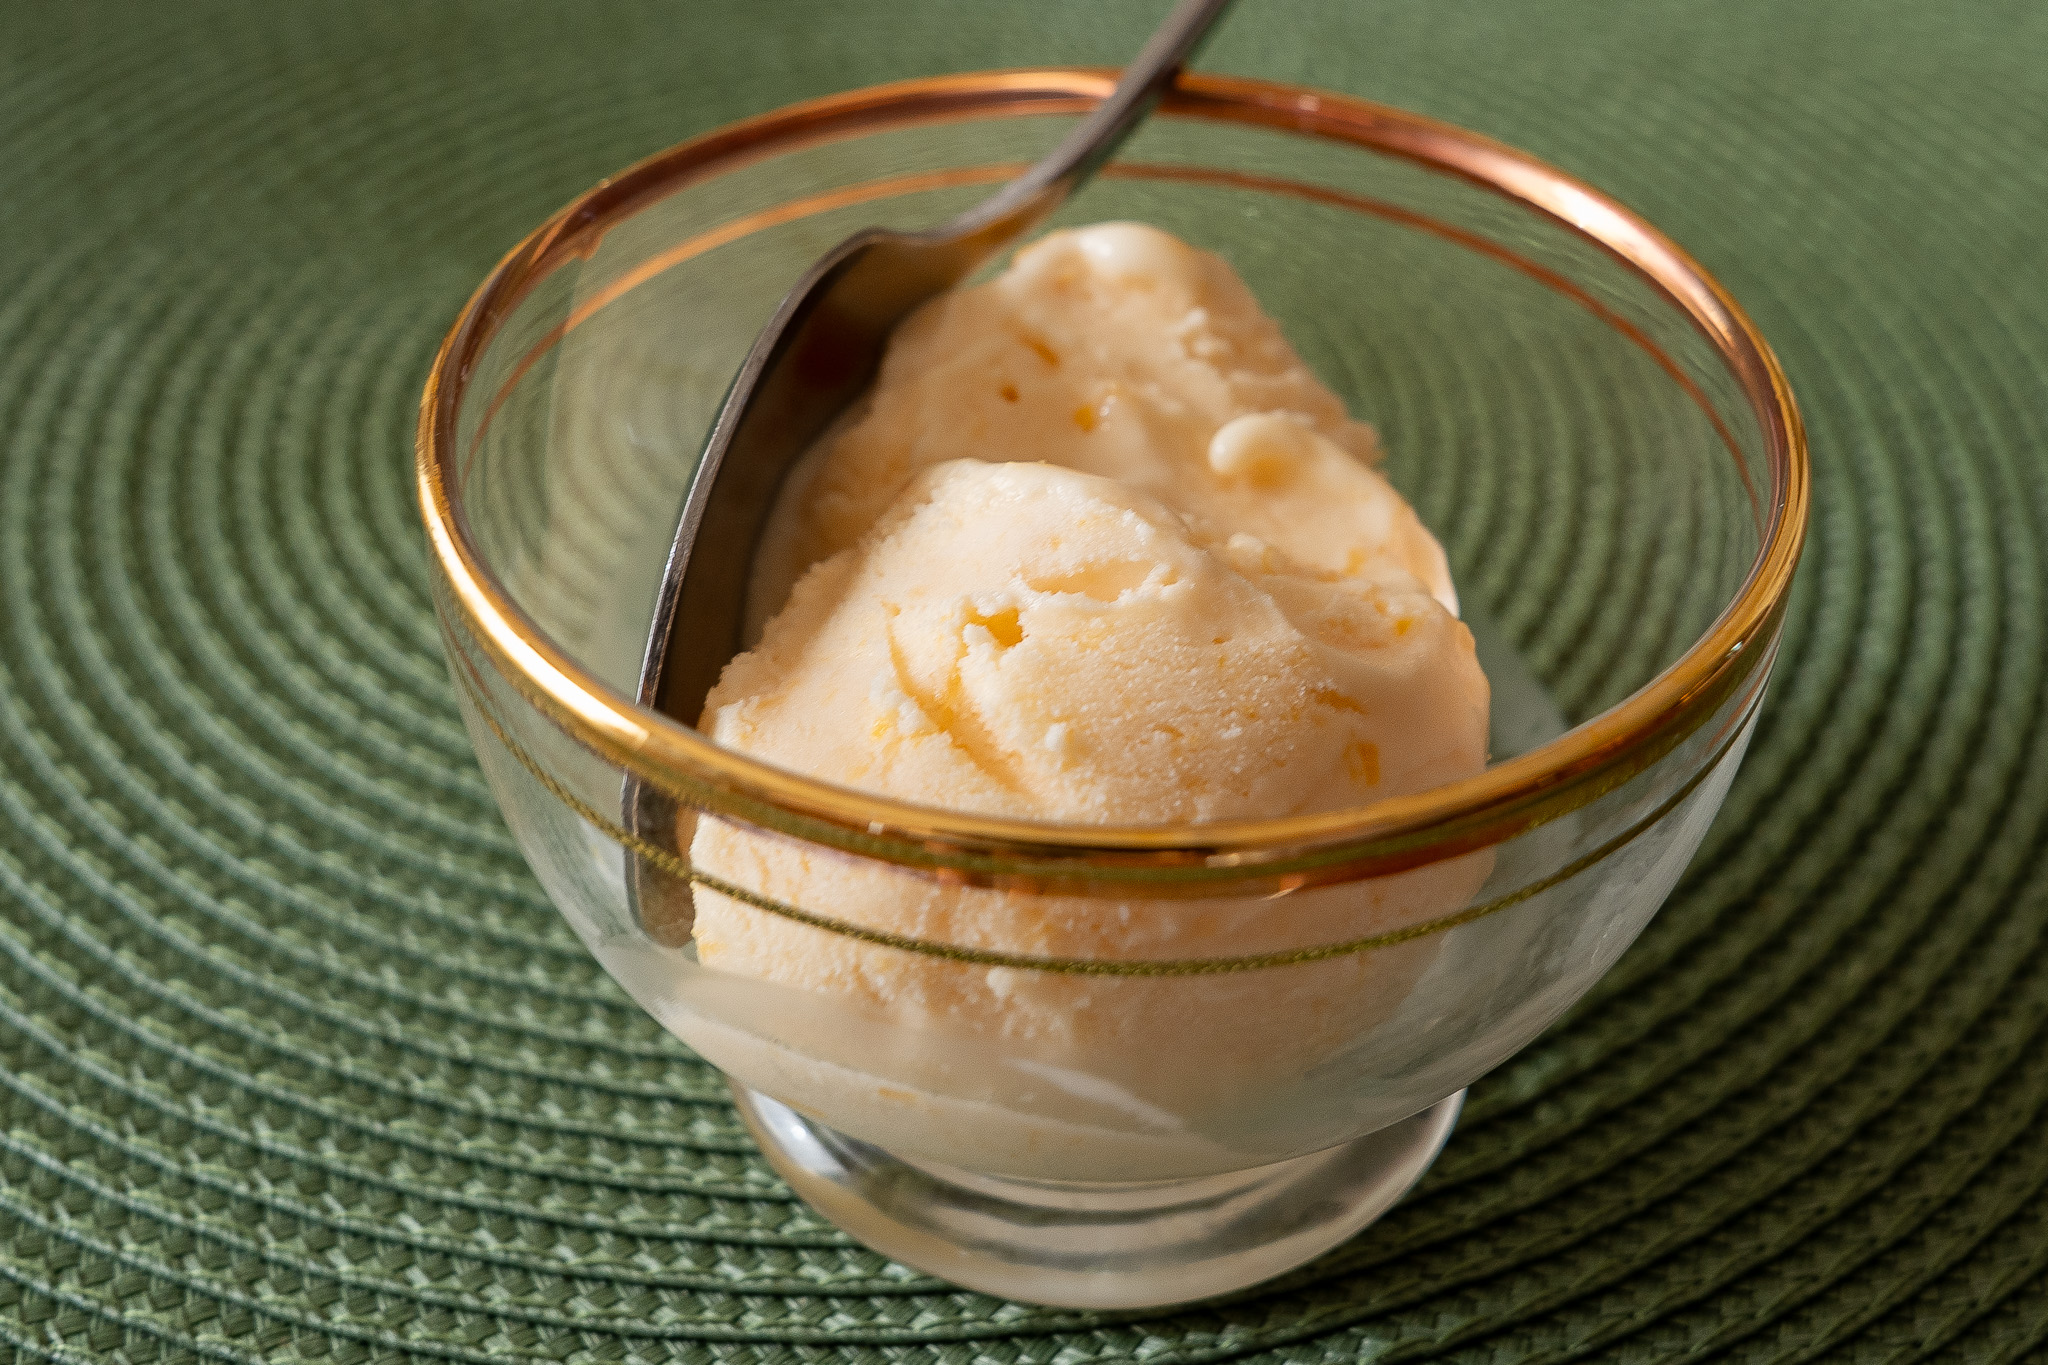
When I was a child, Peach Ice Cream was a favorite on hot sunny days. The sweetness of the ice cream combined with the refreshing tartness of the peaches always hit the spot during the dog days of summer. So, when I saw a hundred-year-old recipe for Peach Ice Cream, I decided to give it a try.
This Peach Ice Cream recipe is a winner. The ice cream was easy to make, and it had a lovely peach flavor. It tasted just like I remember, and made a recent hot day seem just a little cooler.
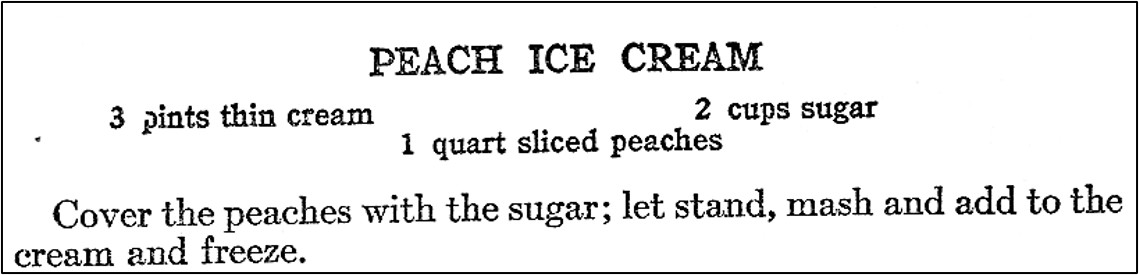
Here is the original recipe:
Source: The New Winston Cook Book of Guaranteed Recipes (1926)
I used a small automatic electric ice cream maker to make this recipe, so I halved the recipe when I updated it. If a large ice cream freezer is used, the amounts in the original recipe should be used.
I was concerned that the peach slices might discolor and begin to turn brownish while they sat after the sugar was added; so, even though the recipe didn’t call for it, I also stirred in a little lemon juice.
Step 1. Put peach slices, sugar, and lemon juice in a bowl; stir to mix ingredients. Let sit for 1/2 hour – 1 hour.
Step 2. Thoroughly mash the peaches. A potato masher can be used to mash the peaches into very small pieces, or the peaches can be briefly pulsed in a blender or food processor. (There should not be large peach chunks or they will harden like ice cubes in the ice cream; conversely, the peaches should not be totally liquified.)
Step 3. Put the mashed peach mixture and the half and half in a bowl; stir to combine. Thoroughly chill the mixture in the refrigerator.
Step 4. Put the chilled mixture in ice cream freezer, and freeze following freezer directions.
The number of cars in the U.S. rapidly increased during the 1920’s. By 1926, almost half of the households owned a car, and people were enjoying the freedom that it provided. A popular leisure activity was to have a motor car picnic. People packed elaborate meals into picnic hampers, and then drove to scenic spots for a picnic.
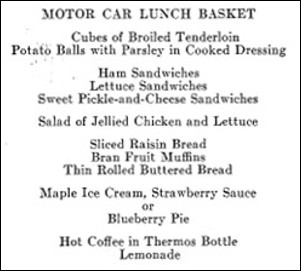
Motor car picnics were the latest fad at the time. I recently was surprised to see information about them in two different 1926 magazines. American Cookery had a menu for a motor car lunch basket, and Good Housekeeping had an article about equipment needed for picnics that contained a photo of a family enjoying a picnic with an auto in the background.
Source: American Cookery (October, 1926)
When I read the menu for the motor car lunch basket, I felt exhausted. It must have taken a lot of work for the cook to prepare all the food and other items needed for the picnic.
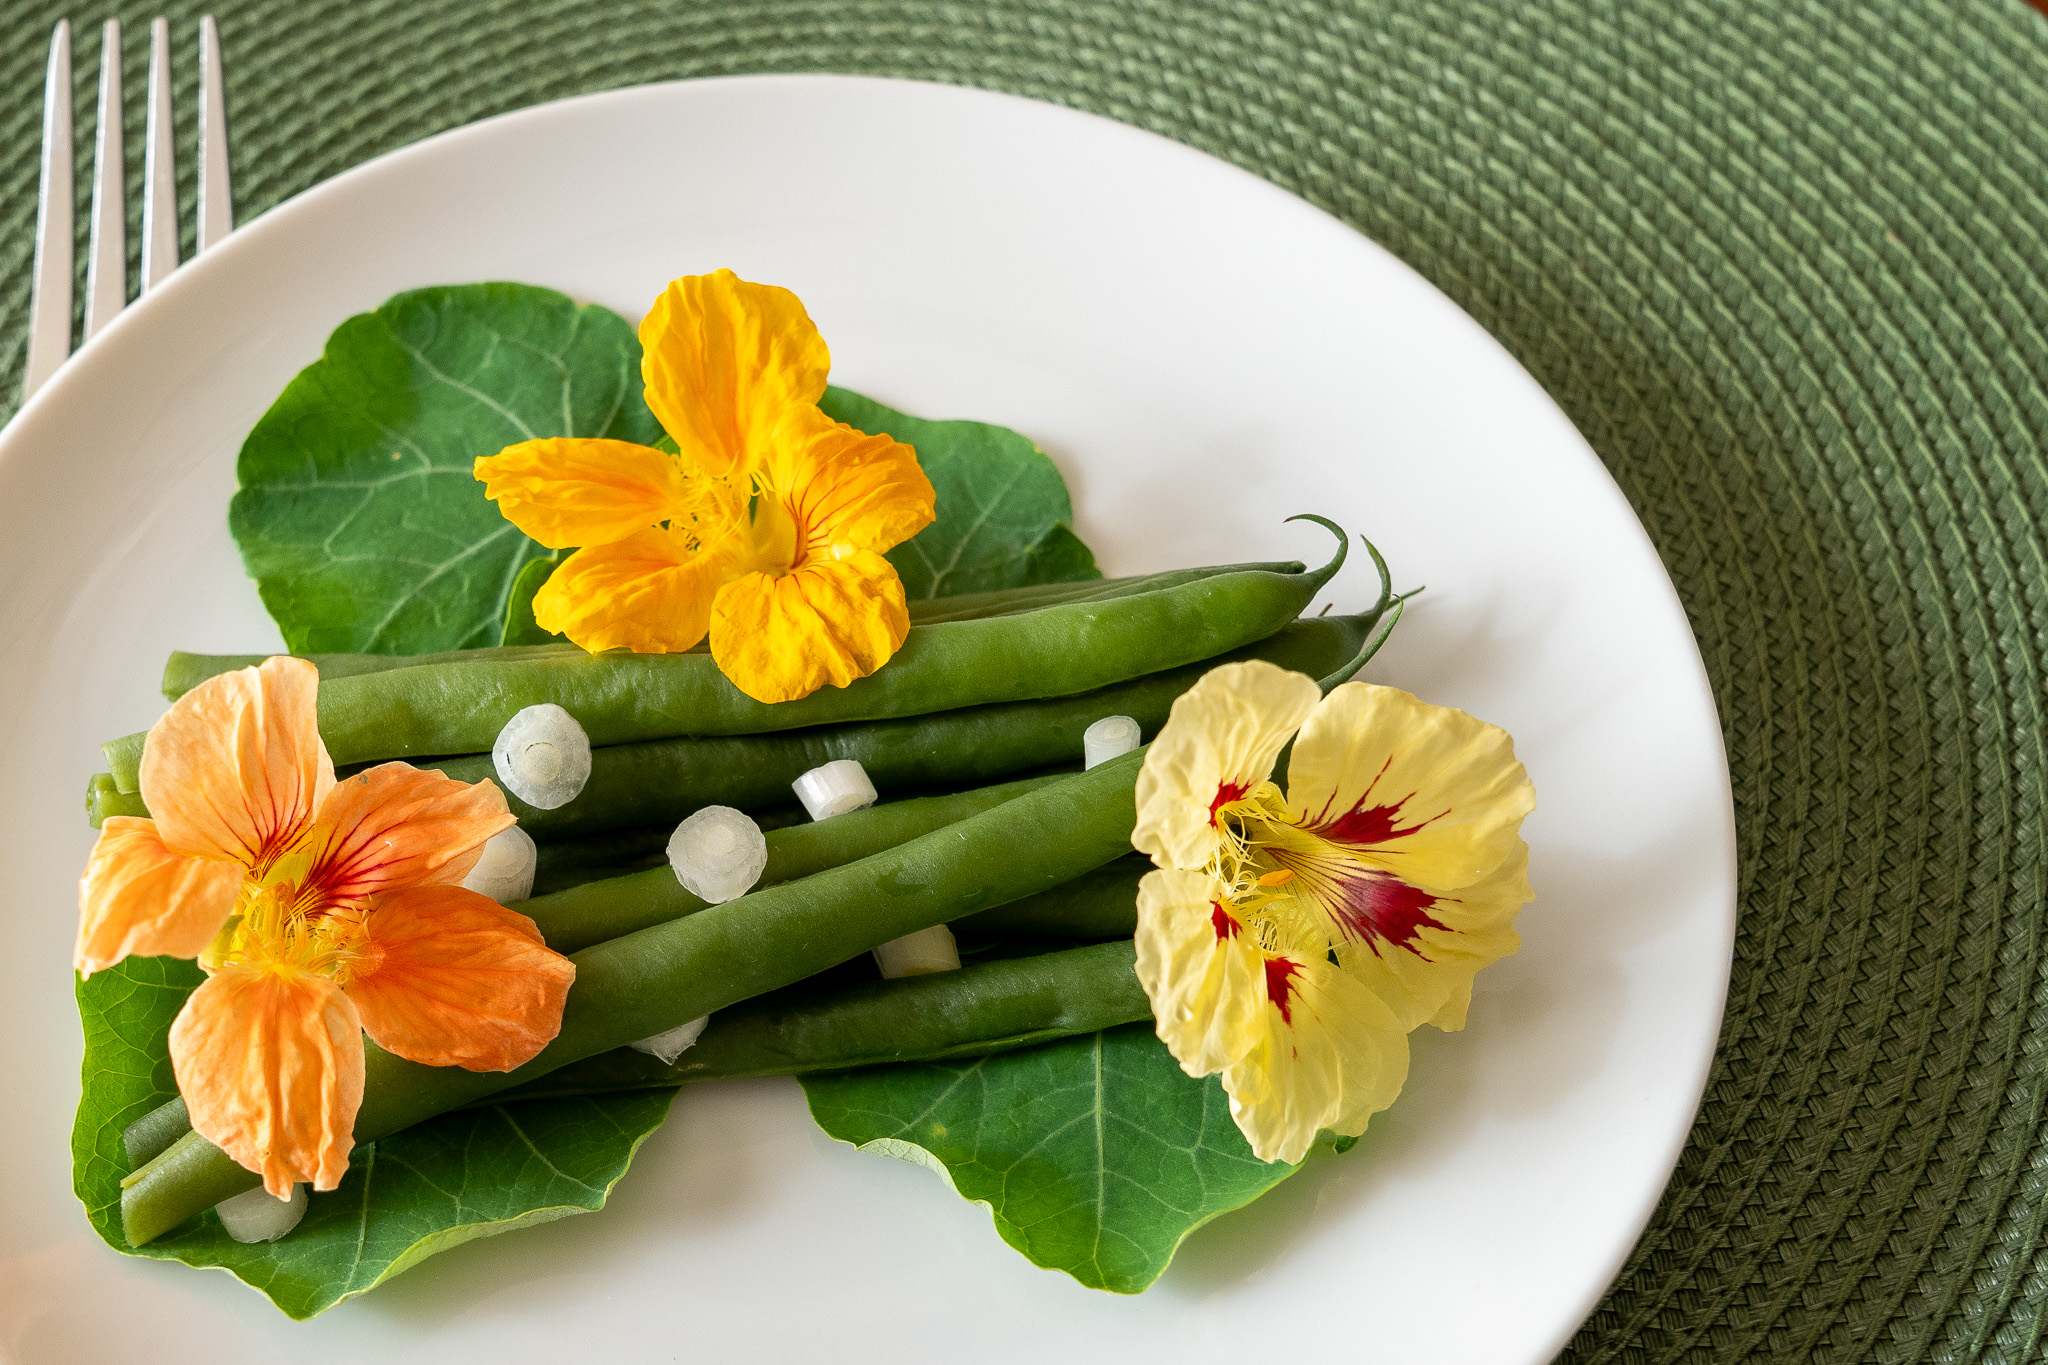
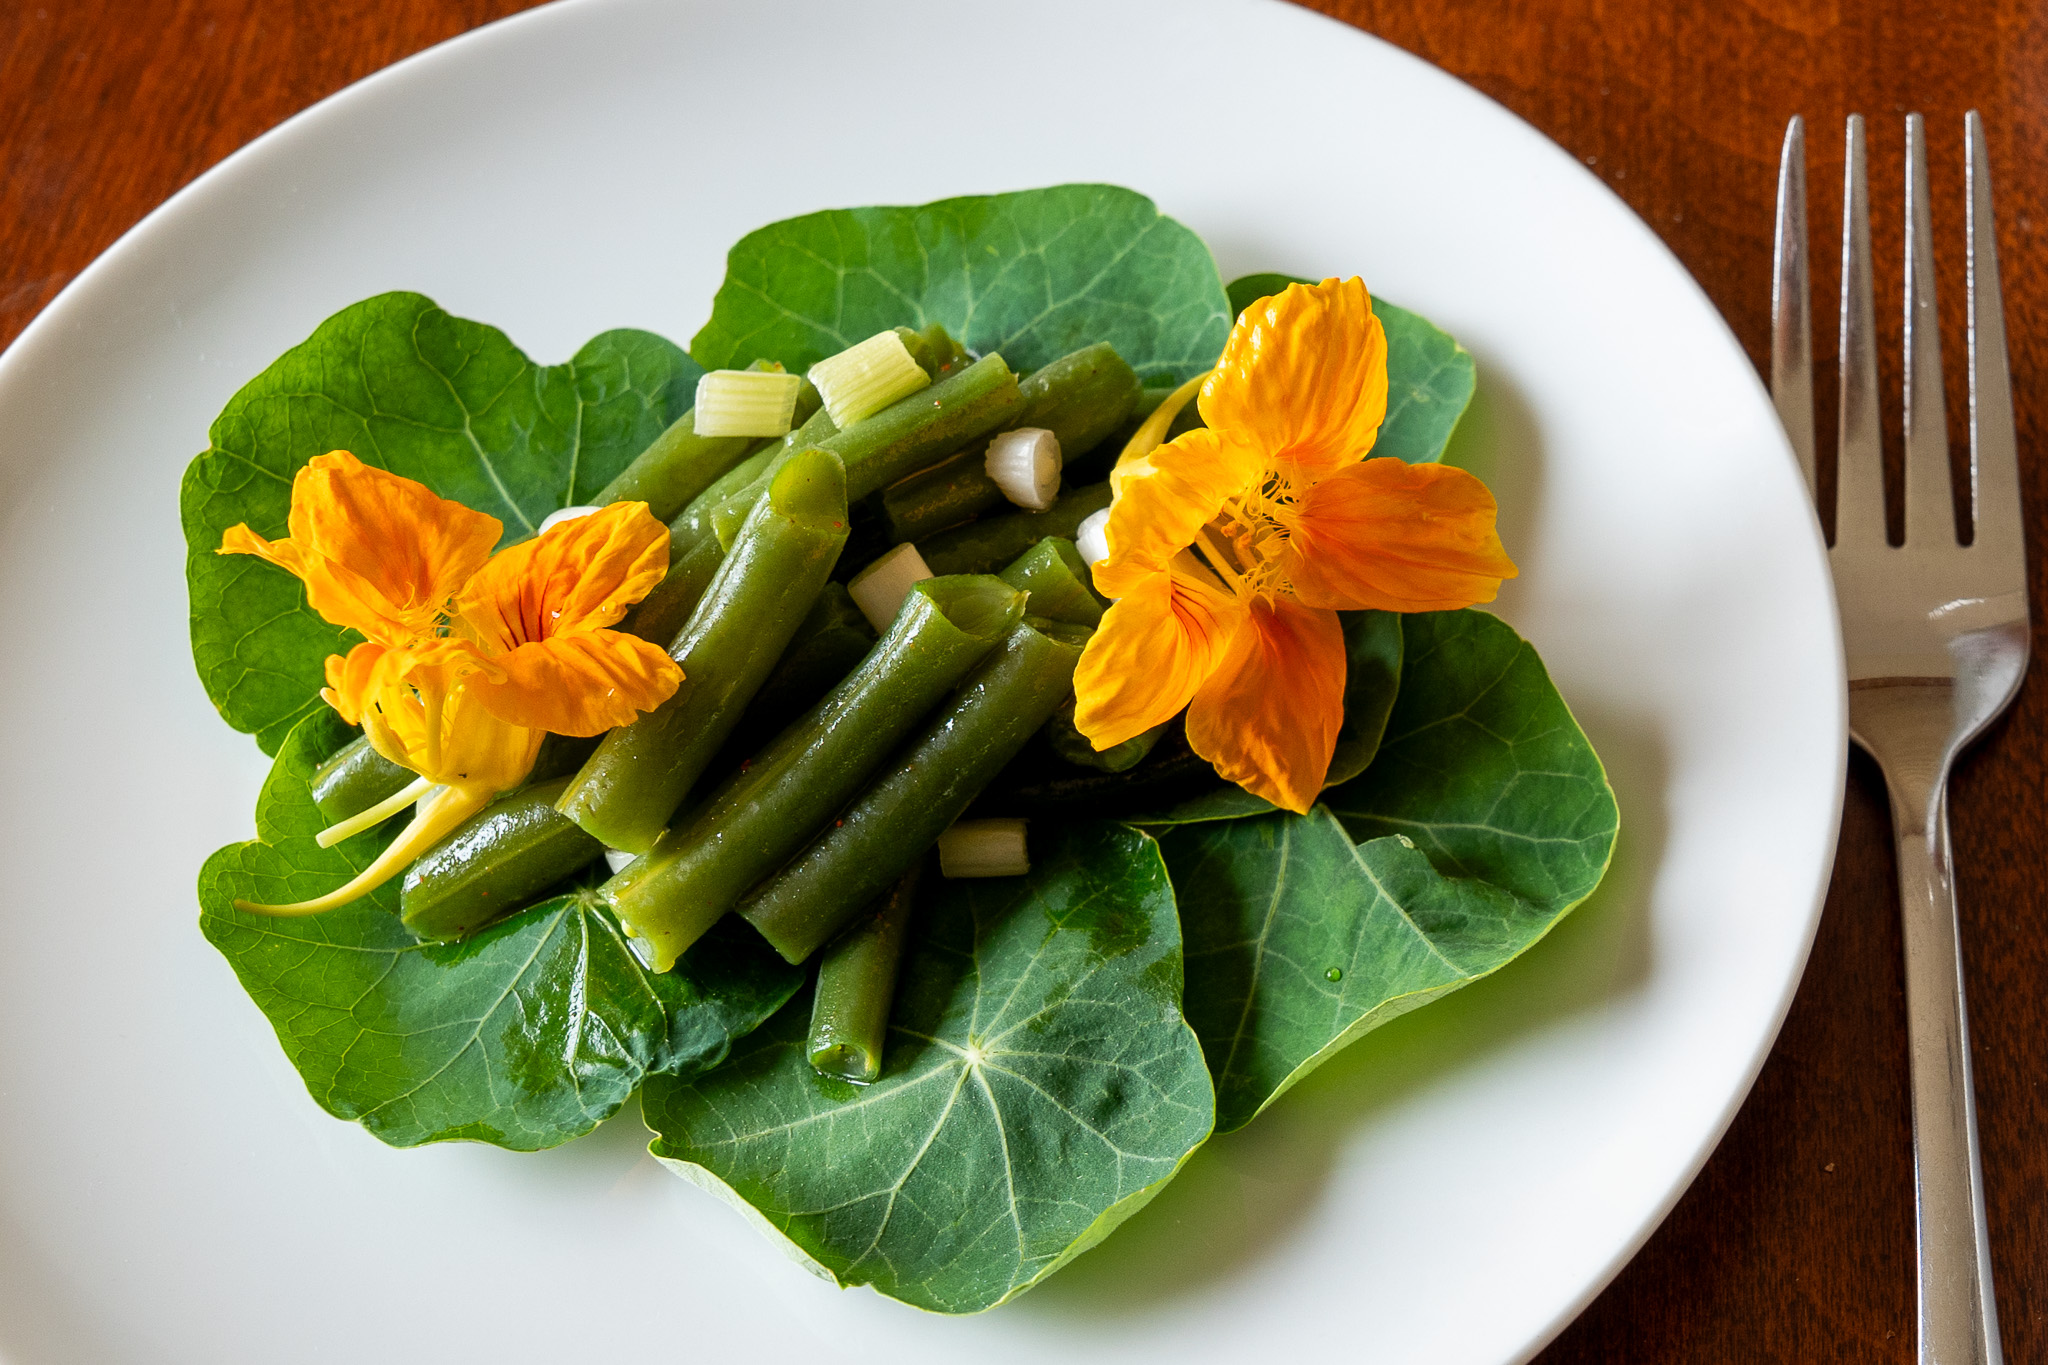
Cooking with edible flowers is a fun and playful way to change a mundane dish into a really special, beautiful dish that is a work of art.
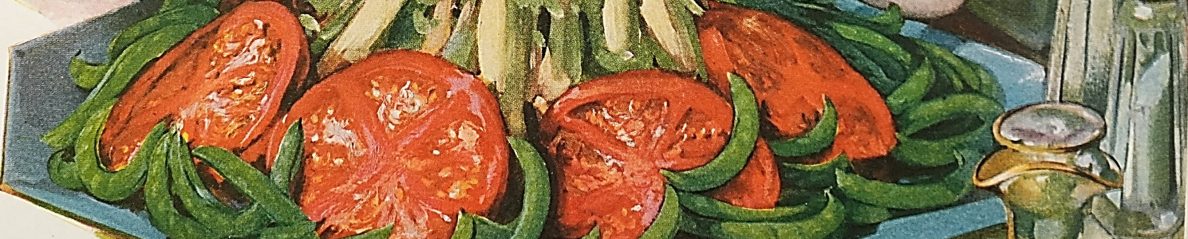
I planted nasturtiums this year for the first time in many years. The reason I planted them is because I saw a recipe in a hundred-year-old cookbook for a green bean salad that called for nasturtiums. I’ve been anxiously waiting for the nasturtiums to bloom, and, finally, they are blooming and I was able to make the recipe.
The Green Bean Salad (with Nasturtiums) was easy to make and tasty, and made a lovely presentation. The green beans are arranged on top of nasturtium leaves. Green onion slices are then sprinkled on top of the green beans, and the salad is garnished with nasturtium flowers. The green beans were lightly coated with a lovely vinaigrette dressing, and the nasturtium leaves have a nuanced sweetness, and mild peppery kick.
I made this salad twice. The first time I snapped the beans into short pieces, which is how I think cooks a hundred years ago would have made the salad. It looked lovely, but then I thought about how green beans often are left whole today, and decided to also make it that way. The salad with the unsnapped beans also looked great, and had a more modern look. (As you can see, I was having fun with this recipe.)
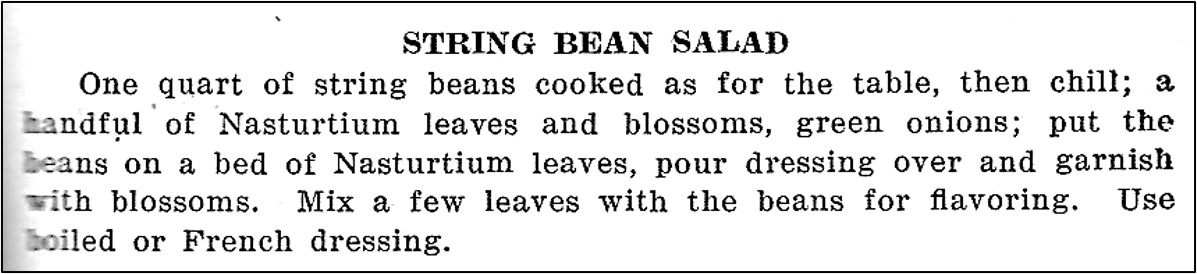
Here is the original recipe:
Source: Methodist Ladies Aid Cook Book: 1926 (Culbertson, Nebraska)
The original recipe was called String Bean Salad. Today we often refer to string beans as green beans (and they generally don’t even have strings anymore), so when I updated the recipe, I called it Green Bean Salad. I also included “with nasturtiums” in the recipe title since that is a unique part of this recipe.
I individually plated each serving, but the salad could be put in a serving bowl.
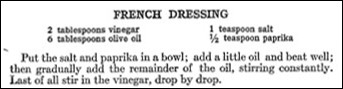
The old recipe called for serving the salad with French Dressing. A hundred years ago, French Dressing was a vinaigrette dressing, and quite different from the commercial, orange-colored French dressing that is common today. There was no recipe for French Dressing in the cookbook that contained the salad recipe, so I used a French Dressing recipe that was in another 1926 cookbook:
Source: The New Winston Cook Book of Guaranteed Recipes (1926)
The French Dressing made more dressing than I needed so I halved the recipe.
Step 1. Trim green beans. If desired, snap the beans (or they can be left whole). Lightly steam or boil the beans for about 5 minutes, then chill until cold.
Step 2. Pour French Dressing over the beans (see recipe below), and gently stir to coat beans with the dressing. (If desired, mix a few nasturtium leaves with the beans). If there is excess dressing on the beans, drain the beans to remove it.
Step 3. Arrange nasturtium leaves on individual serving plates (or they can be arranged in a serving bowl). Top with the green beans that have been coated with French Dressing.
Step 4. Sprinkle the sliced green onions over the green beans.
Step 5. Garnish with nasturtium flowers.
French Dressing (Vinaigrette Dressing)
1/2 teaspoon salt
1/4 teaspoon paprika
3 tablespoons olive oil
1 tablespoon vinegar
Step 1. Put the salt and paprika in a small bowl.
Step 2. Gradually add the olive oil while stirring constantly.
Step 3. Then slowly add the vinegar, a small amount at a time, while continuing to stir.
Organizations often compile and then sell cookbooks as a fundraiser. A cookbook with an especially fascinating story is the Pennsylvania State Grange Cook Book. The Grange is an agricultural advocacy and social organization that was founded in 1867. The Grange is organized into four levels: community, county or district, state, and national. There are Grange halls located in many rural areas throughout the U.S. where Grange members hold meetings and events.
There were several editions of the Pennsylvania State Grange Cook Book published during the 1920’s that helped raise funds to build a women’s dormitory at Penn State University. The cookbooks contained recipes submitted by Grange members from across Pennsylvania. I have the 4th edition of the cookbook, which was published in 1926.
Grange members sold 42,000 copies of the cookbooks and donated 30¢ from each sale to Penn State toward the building of Grange Memorial Dormitory which was constructed in 1929-30. The building still exists and is now known as Grange Building. The Division of Undergraduate Studies is now located in it.
Both Penn State and the Pennsylvania Grange are strong advocates for rural areas and agricultural education. In October, 2025, at the 153rd Annual State Session of the Pennsylvania State Grange meeting in Williamsport, the president of the Pennsylvania State Grange, Matthew Espenshade, presented Penn State President Neeli Bendapudi with one of the hundred-year-old cookbooks as a memento of the long relationship between the two organizations.
I have made several recipes from the Pennsylvania State Grange Cookbook this year. They include:
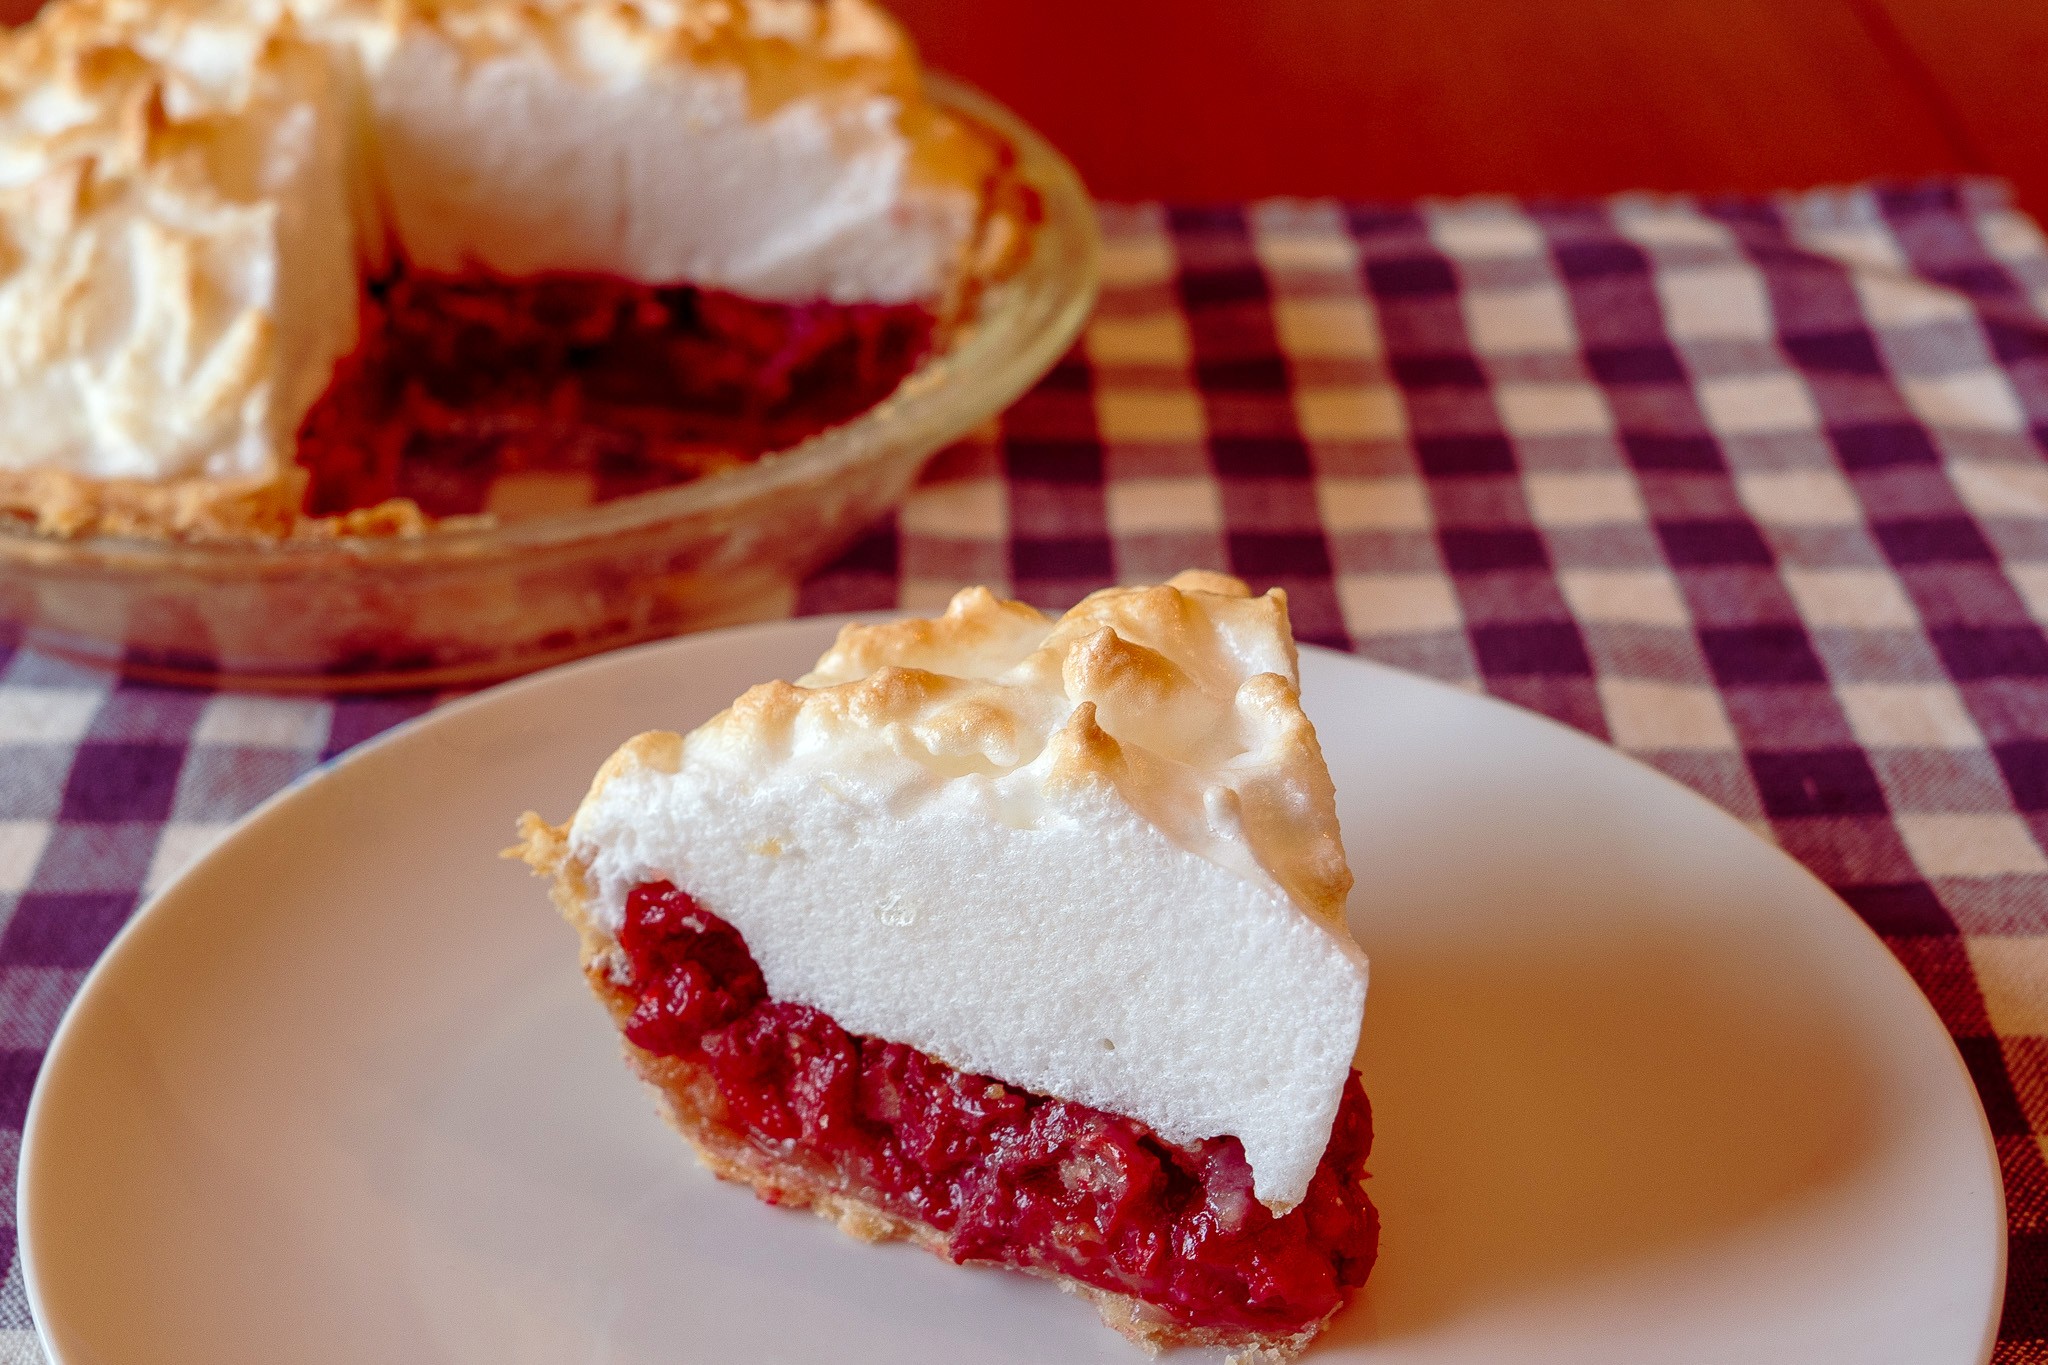
Several months ago, I saw a recipe for Raspberry Muffins in a hundred-year-old magazine, and have been anxiously waiting to try it. Finally, the black raspberries in my backyard are ripe, and I dug the recipe out and made it.
The recipe was a winner. The Raspberry Muffins were soft, moist, and tasty. They had just the right amount of sweetness, and a hint of cinnamon which worked perfectly with the sweet tartness of the berries.
I served these muffins with coffee to a group of friends. There was a discussion about whether I used blackberries (that are commonly sold in stores) or black raspberries (which are almost never seen in stores) when making the muffins. At least one person in the coffee group hadn’t even known that there was a fruit called black raspberries until I made the muffins.
The original recipe does not indicate whether red or black raspberries should be used. I used black raspberries, but red ones would also work well.
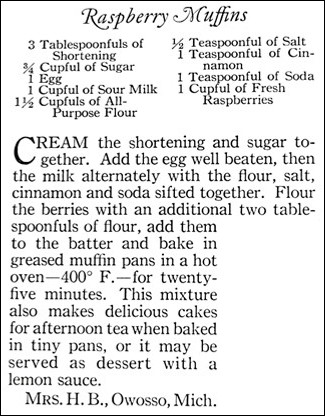
Here’s the original recipe:
Source: Ladies Home Journal (June, 1926)
A hundred-years-ago many families still lived on farms; and, even in towns, much of the milk that was sold was not pasteurized. Back then, if the non-pasteurized milk was not used quickly, the “good” bacteria in the milk would turn it into a sour milk suitable for use in recipes that used baking soda as the leavening agent. Today’s pasteurized milk can be turned into a sour milk by adding a little vinegar or lemon juice to create a slightly curdled acidic milk that results on bubbles of carbon dioxide gas when combined with the baking soda which causes the baked good to rise.
The raspberries are coated with flour to make them less likely to sink to the bottom of the batter while baking.
1 cup raspberries (either red or black raspberries can be used)
1 1/2 cups flour + 2 tablespoons flour
1 cup milk
1 tablespoon vinegar or lemon juice
3 tablespoons shortening or butter, softened
3/4 cup sugar
1 egg
1/2 teaspoon salt
1 teaspoon cinnamon
1 teaspoon baking soda
Step 1. Preheat oven to 400° F.
Step 2. Put the raspberries in a small bowl and sprinkle with the 2 tablespoons flour; gently stir/roll the berries to lightly coat with flour. Set aside.
Step 3. Put the milk in a small bowl and stir in the vinegar/lemon juice. Set aside.
Step 4. Put shortening/butter and sugar in mixing bowl, then cream them together.
Step 5. Add egg, soured milk, salt, cinnamon, and baking soda; stir to combine.
Step 6. Add 1 1/2 cup flour, and stir until just combined.
Step. 7. Add flour-coated raspberries; gently stir to distribute evenly throughout batter.
Step 8. Grease muffin tins (or use paper liners), and then fill each muffin cup 3/4th full with batter. Bake for approximately 25 – 30 minutes or until lightly browned.
Good to know that 94 out of every 100 husbands supposedly preferred home-canned fruits and vegetables in 1926. And, guess who was going to do the canning . . .
Advertisements from a hundred years ago, such as this Ball Jar advertisement, sometimes portrayed women (and men) in roles that were stereotypical at the time.
In addition to the illustration and the caption in the ad, there was a lot of smaller text, which said in part:
Some women say, “Oh, it is too much trouble to do your own preserving and canning.” But is it? Canning not only means the best preserves at the lowest cost, but the improved methods make it a pleasure.
Millions of women – from their own experience – will tell you that modern methods eliminate drudgery. They make home canning quick and easy. . .
Home preserved fruits and vegetables have that delicious home made taste. An actual investigation showed that 94 out of 100 men preferred fruits and vegetables canned at home. Your husband, undoubtedly, will like them much better, too.
And when you put up your own fruits and vegetables – you know what you are getting. You know they are the finest and choicest. For you choose them yourself. They are pure and safe for your children. . .
Use the Right Jars
Be sure to get Ball “Perfect Mason” or “Ideal” Fruit Jars. Your grocer has them handily packed by the dozen. They are strong and the sealing shoulder is true. For they are the only jars made by the “Owens Process” – a patented process which absolutely insures an even thickness of glass – this giving strength and durability.
For your own success in canning be sure to get Ball “Perfect Seal” Rubbers and Caps. We urge this because they are especially made to fit Ball Jars. Thus they are air tight and insure a perfect seal. This is the only way you can be sure you are taking no chances.
The cherries on the sour cherry tree in my back yard are ripe, so it’s time to make cherry pie. I found a recipe in a hundred-year-old cookbook for Cherry Custard Pie, and decided to give it a try.
I need to say right up front that I’m not sure this pie is actually a custard pie because the recipe didn’t call for any milk. The recipe called for thickening the pie filling using egg yolks (plus a little flour). The resulting cherry pie was richer and maybe a bit more custard-like then most cherry pies.
If I had been the recipe author, I would have called this pie Cherry Meringue Pie because the cherry filling is topped with meringue.
Regardless of the pie name, the pie was delicious, and I would make it again.
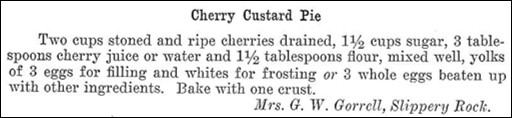
Here’s the original recipe:
Source: Pennsylvania State Grange Cook Book (1926)
This recipe makes a small 8-inch pie.
The recipe says to use the egg whites for “frosting.” I interpreted this to mean that the whites should be used to make a meringue to top the pie. I sweetened the meringue with a little sugar.
Step 2. Put 1 1/2 cups sugar and the flour in a mixing bowl; stir to combine. Add the egg yolks and stir until smooth. Then stir in the cherry juice or water, and finally add the cherries and stir.
Step 3. Place the cherry mixture in the pie shell, and put into the oven.
Step 4. Bake for 10 minutes, then reduce oven temperature to 350° F., and bake until the filling is set and the top of the pie is lightly browned (about an additional 30-35 minutes). Then remove pie from oven.
Step. 5. In the meantime, make the meringue. Place egg whites in a bowl, and beat the egg whites until they form stiff peaks. Then, gradually add 1/4 cup sugar while continuing to beat.
Step 6. Spoon meringue on top of the pie and swirl.
Step 7. Reduce oven temperature to 325° F., and return pie to the oven.
Step. 8. Cook for an additional 10 – 12 minutes or until the meringue is lightly browned.
* Canned or frozen (thawed) sour cherries can be substituted for fresh cherries. If they contain sugar, reduce the amount of sugar when making recipe.