Some foods memories are associated specific events. Others are much more scattered. For me, Coleslaw is one of those food where I have scattered memories – some wonderful; others not so great.
I have rich memories of eating Coleslaw at family reunions, at church potlucks, and at home. Some renditions had a light vinegar dressing; others had rich mayonnaise dressings. Occasionally the coleslaw had a hint of pepper or contained celery seed. And, sometimes there were additional ingredients – chopped onion, apple, or green and red pepper.
But I also associate coleslaw with fast food joints – often with a runny mayonnaise-based dressing.
Suffice it to say that I have mixed feelings about Coleslaw. But, I had a cabbage in the refrigerator so when I saw a hundred-year-old recipe for Coleslaw in a home economics textbook I decided to give it a try. The Coleslaw dressing had a very mild flavor with just a hint of sugar and vinegar, which allowed the flavor of the cabbage itself to shine. That said, I prefer Coleslaw dressings with a more pronounced sweet-sour flavor, so I probably won’t make this recipe again.
This process for making this recipe is similar to the method used to make custard. I got this recipe from a home economics textbook. The author seeks to build upon skills learned in previous lessons. So she often referred back to previous recipes that used similar processes – in this case to a recipe for soft custard. I previously posted the hundred-year-old soft custard recipe.
Here’s the recipe updated for modern cooks:
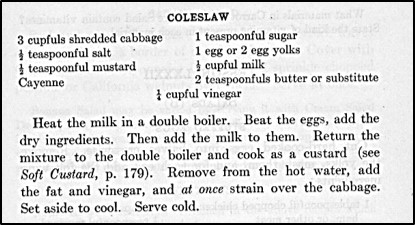
Coleslaw
3 cups shredded/grated cabbage
1 egg or 2 egg yolks (I used a whole egg.)
1/2 teaspoon salt
1/2 teaspoon dry mustard
dash cayenne (red) pepper
1 teaspoon sugar
1/2 cup milk
2 teaspoon butter, melted
1/4 cup apple cider vinegar
Put egg (or egg yolks), salt, mustard, cayenne (red) pepper, and sugar in a small mixing bowl; beat until combined. Set aside.
Put the milk in a heavy sauce pan (use a double boiler if available); then heat using medium heat. Stir constantly until the milk just barely begins to bubble, then remove from the heat.
Place a small amount (approximately 1 – 2 tablespoons) of hot milk into bowl with the egg mixture, stir quickly. Add this mixture to the hot milk and stir. (This helps prevent the egg from coagulating when the egg is introduced to the hot liquid.) Return to stove and cook, using medium heat while stirring constantly until the mixture just begins to thicken or coat a spoon. Remove from heat; stir in butter and vinegar Strain and then pour over the shredded cabbage. Chill at least 3 hours before serving. Stir before serving.
; URL: https://commons.wikimedia.org/wiki/File:And_Then_There_Were_Leftovers.jpg")