A hundred years ago, cooked celery was a commonly served vegetable. Today, not so much. But, when I saw I hundred year old recipe for Creamed Celery with Almonds, I decided to give it a try. The subtle sweetness of the celery was lovely, and sliced almonds added a bit of crunch. I feel certain that I’ll make this recipe again. Making this side dish reminded me how much I enjoy this tasty and nutritious vegetable.
Here’s the recipe updated for modern cooks:
Source: The Home Makers’ Cooking School Cook Book
I used half milk and half celery stock when I made this recipe. This made the sauce lighter and more flavorful.
1 cup celery stock (Reserve 1 cup of the liquid that the celery was boiled in.)
1/3 cup almonds, sliced
Put the sliced celery in a saucepan; barely cover with water. Bring to a boil using high heat, then reduce heat and simmer until the celery is tender (about 10 minutes). Remove from heat and drain, reserving 1 cup of the liquid.
In the meantime, melt butter in another saucepan, then stir in the flour, salt, and pepper. Gradually, add the milk and celery stock while stirring constantly. Continue stirring until the white sauce begins to thicken. Stir in the cooked celery and the almonds.
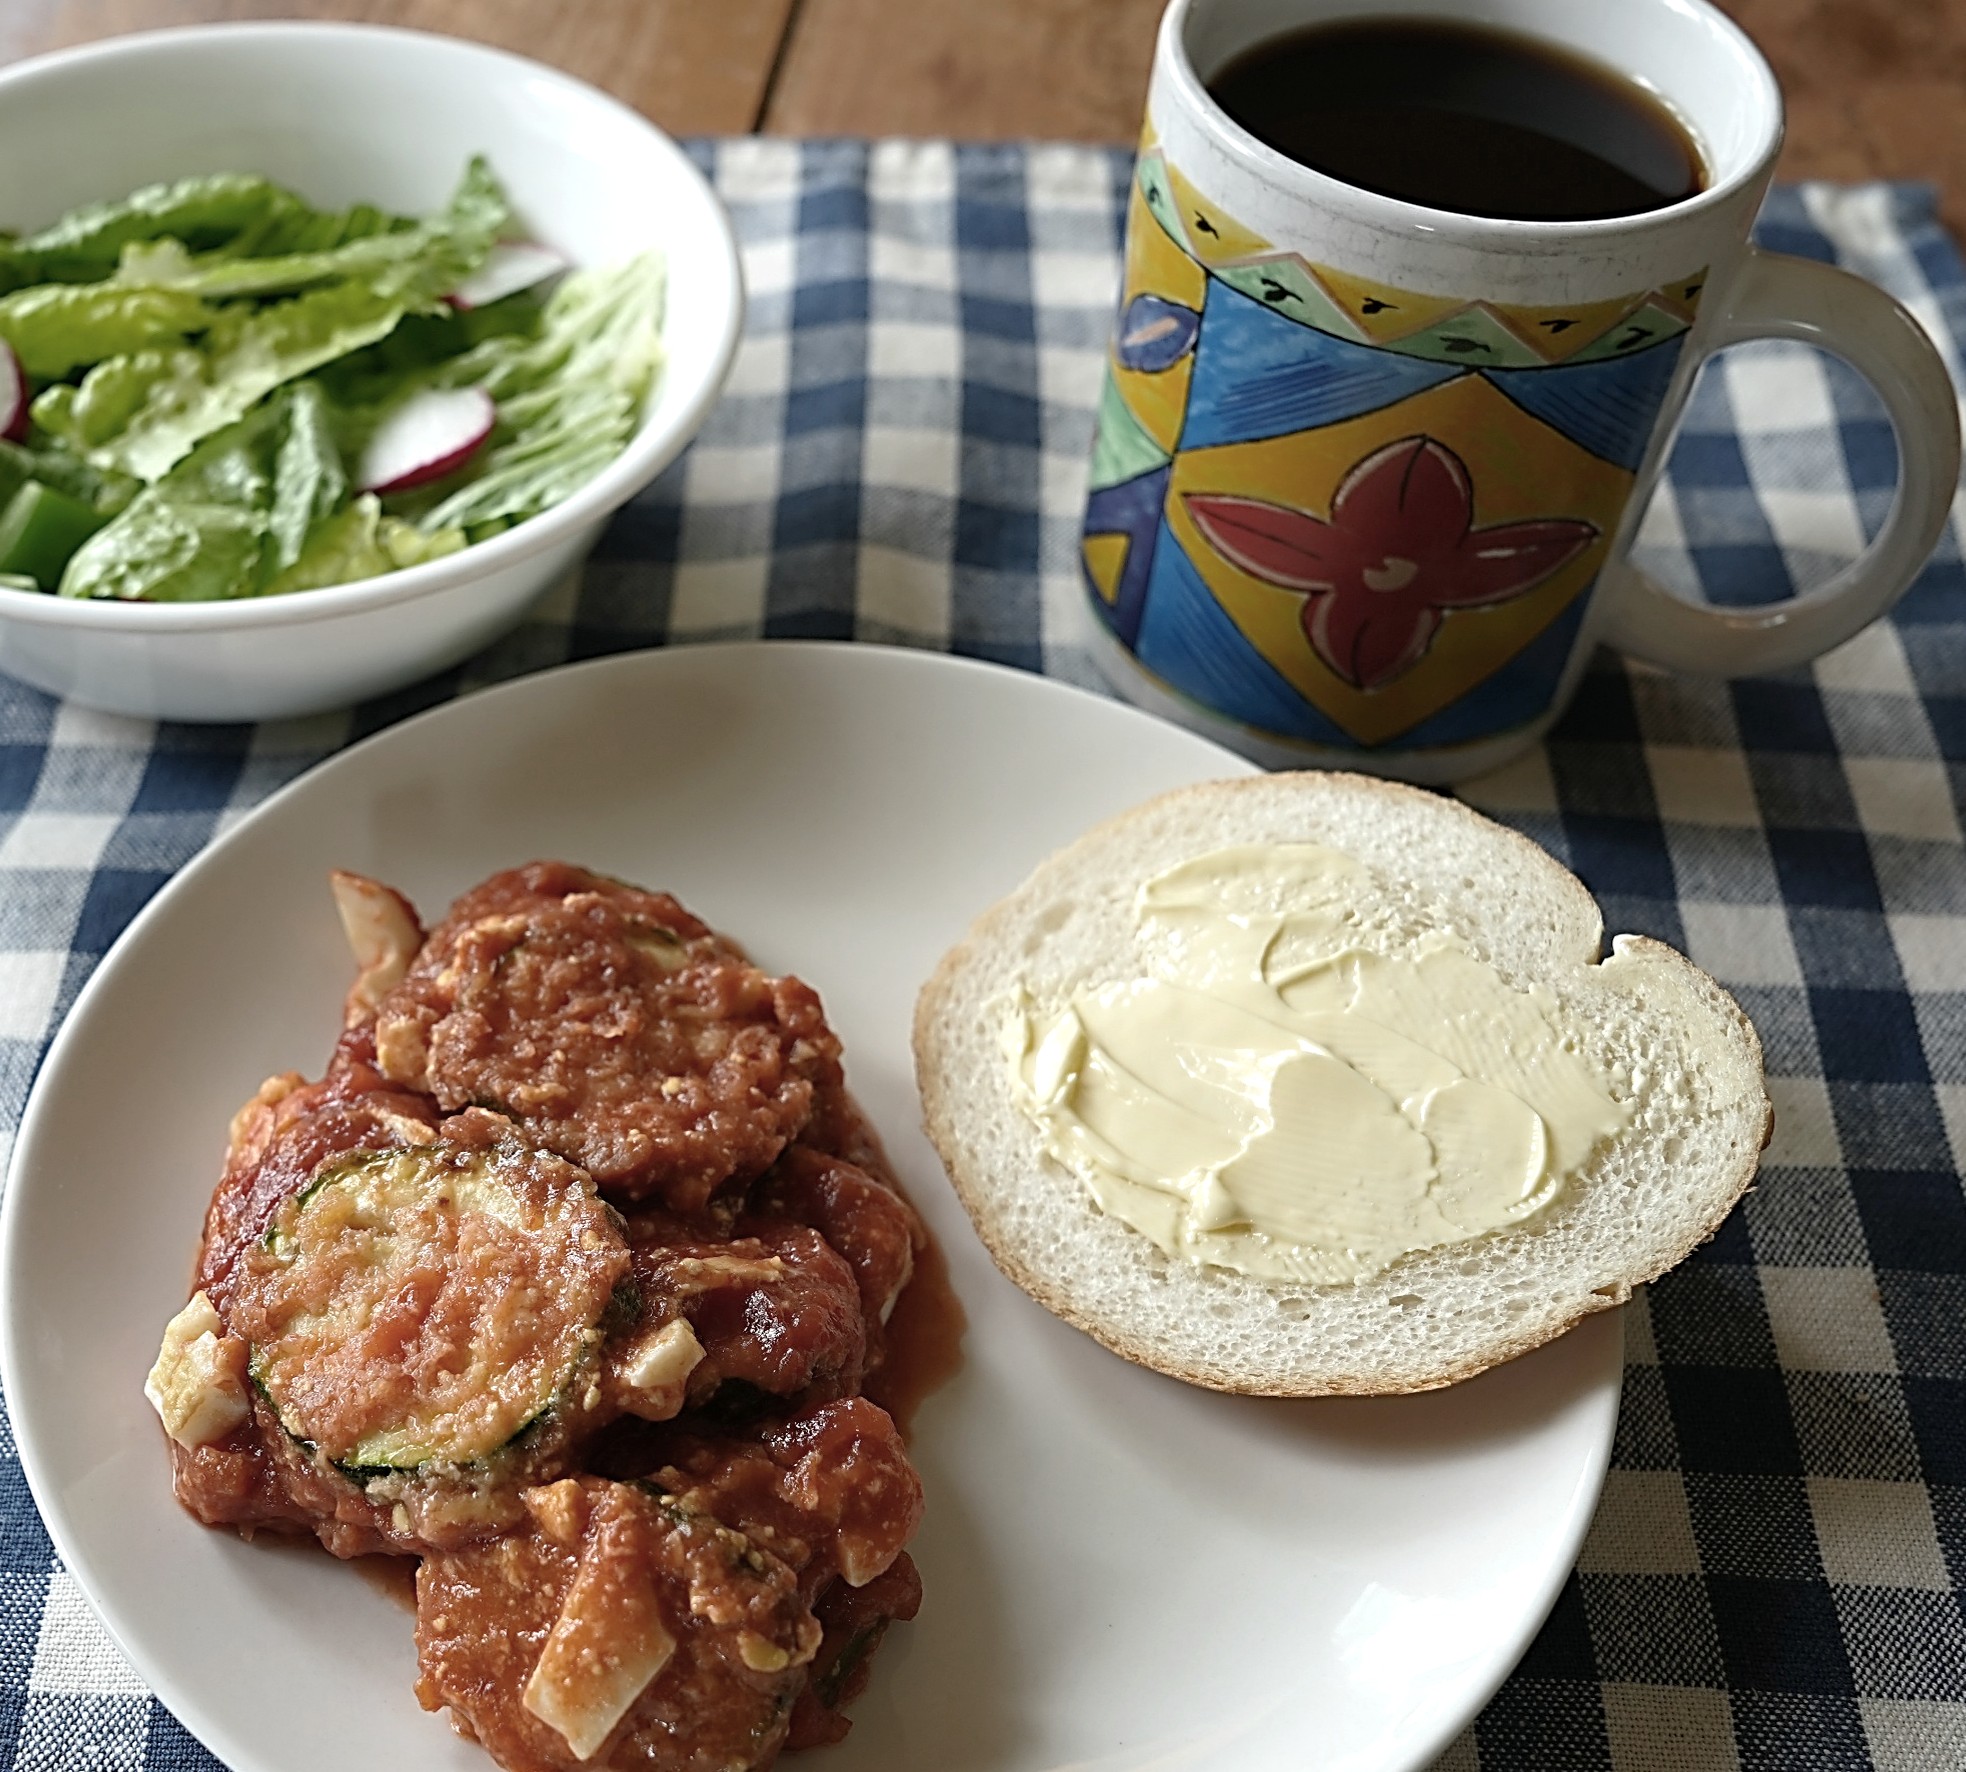
Whew – It’s zucchini season and I’m overwhelmed with the squash. So, I started looking through my hundred-year-old cookbooks for a summer squash recipe. I was pleased to find directions for making a Sautéed Summer Squash Casserole. It called for sautéed squash, grated cheese, chopped hard-boiled eggs, and tomato sauce. The casserole directions were part of a recipe for Sautéed Squash, which also contained a possible luncheon menu that included the squash dish.
I decided to make the suggested menu for lunch recently. My husband and I had the Sautéed Summer Squash Casserole, a green salad, bread with butter, and coffee. It was a nice lunch. The casserole was good, with the tomato flavor predominating. Personally, I might have liked the flavor better if the cheese and some of the other flavors had been more noticeable.
My mother-in-law had a zucchini casserole recipe that called for boiling sliced zucchini before adding to the casserole, while this recipe called for sautéing the slices. The squash slices are definitely firmer when sautéed rather than boiled, which makes a nice texture.
Here’s the original recipe:
Source: The Home Makers’ Cooking School Cook Book (1925)
When I updated the recipe, and throughout this post, I spelled “sauted” as “sautéed.” I believe that is the preferred spelling, though both spellings can be found on current websites.
Since the original recipe does not include amounts, I took a stab at guessing the amounts when updating the recipe.
2 small summer squash (zucchini, yellow squash, etc.)
1 egg, beaten
1 cup fine white bread crumbs (I tore up 2 slices of bread, and put them in a blender to pulverize them.)
shortening/oil
2 hard-boiled eggs, chopped
1 cup grated cheese (I used cheddar.)
1 1-lb. can tomato sauce
Preheat oven to 375° F. Wash and cut the squash into 1/2-inch slices; dip in the beaten eggs, and coat with bread crumbs. Set aside.
Heat 1/2 inch of shortening or oil in a large skillet. Carefully place the breaded squash slices in the pan in a single layer. Depending upon pan size, the slices may need to be cooked in several batches. Sauté for about two minutes or until the bottom side of each slice is lightly browned, then gently turn and fry until the other side is browned. Remove from pan and drain on paper towel.
Put a thin layer of tomato sauce in the bottom of a casserole dish. (I used a 1-quart dish.) Add a layer of the fried squash slices, then add layers of chopped hard-boiled eggs and grated cheese; cover with tomato sauce. Fill the casserole with additional layers of fried squash slices, chopped hard-boiled eggs, grated cheese, and tomato sauce. Bake in the oven until the mixture is hot and bubbly.
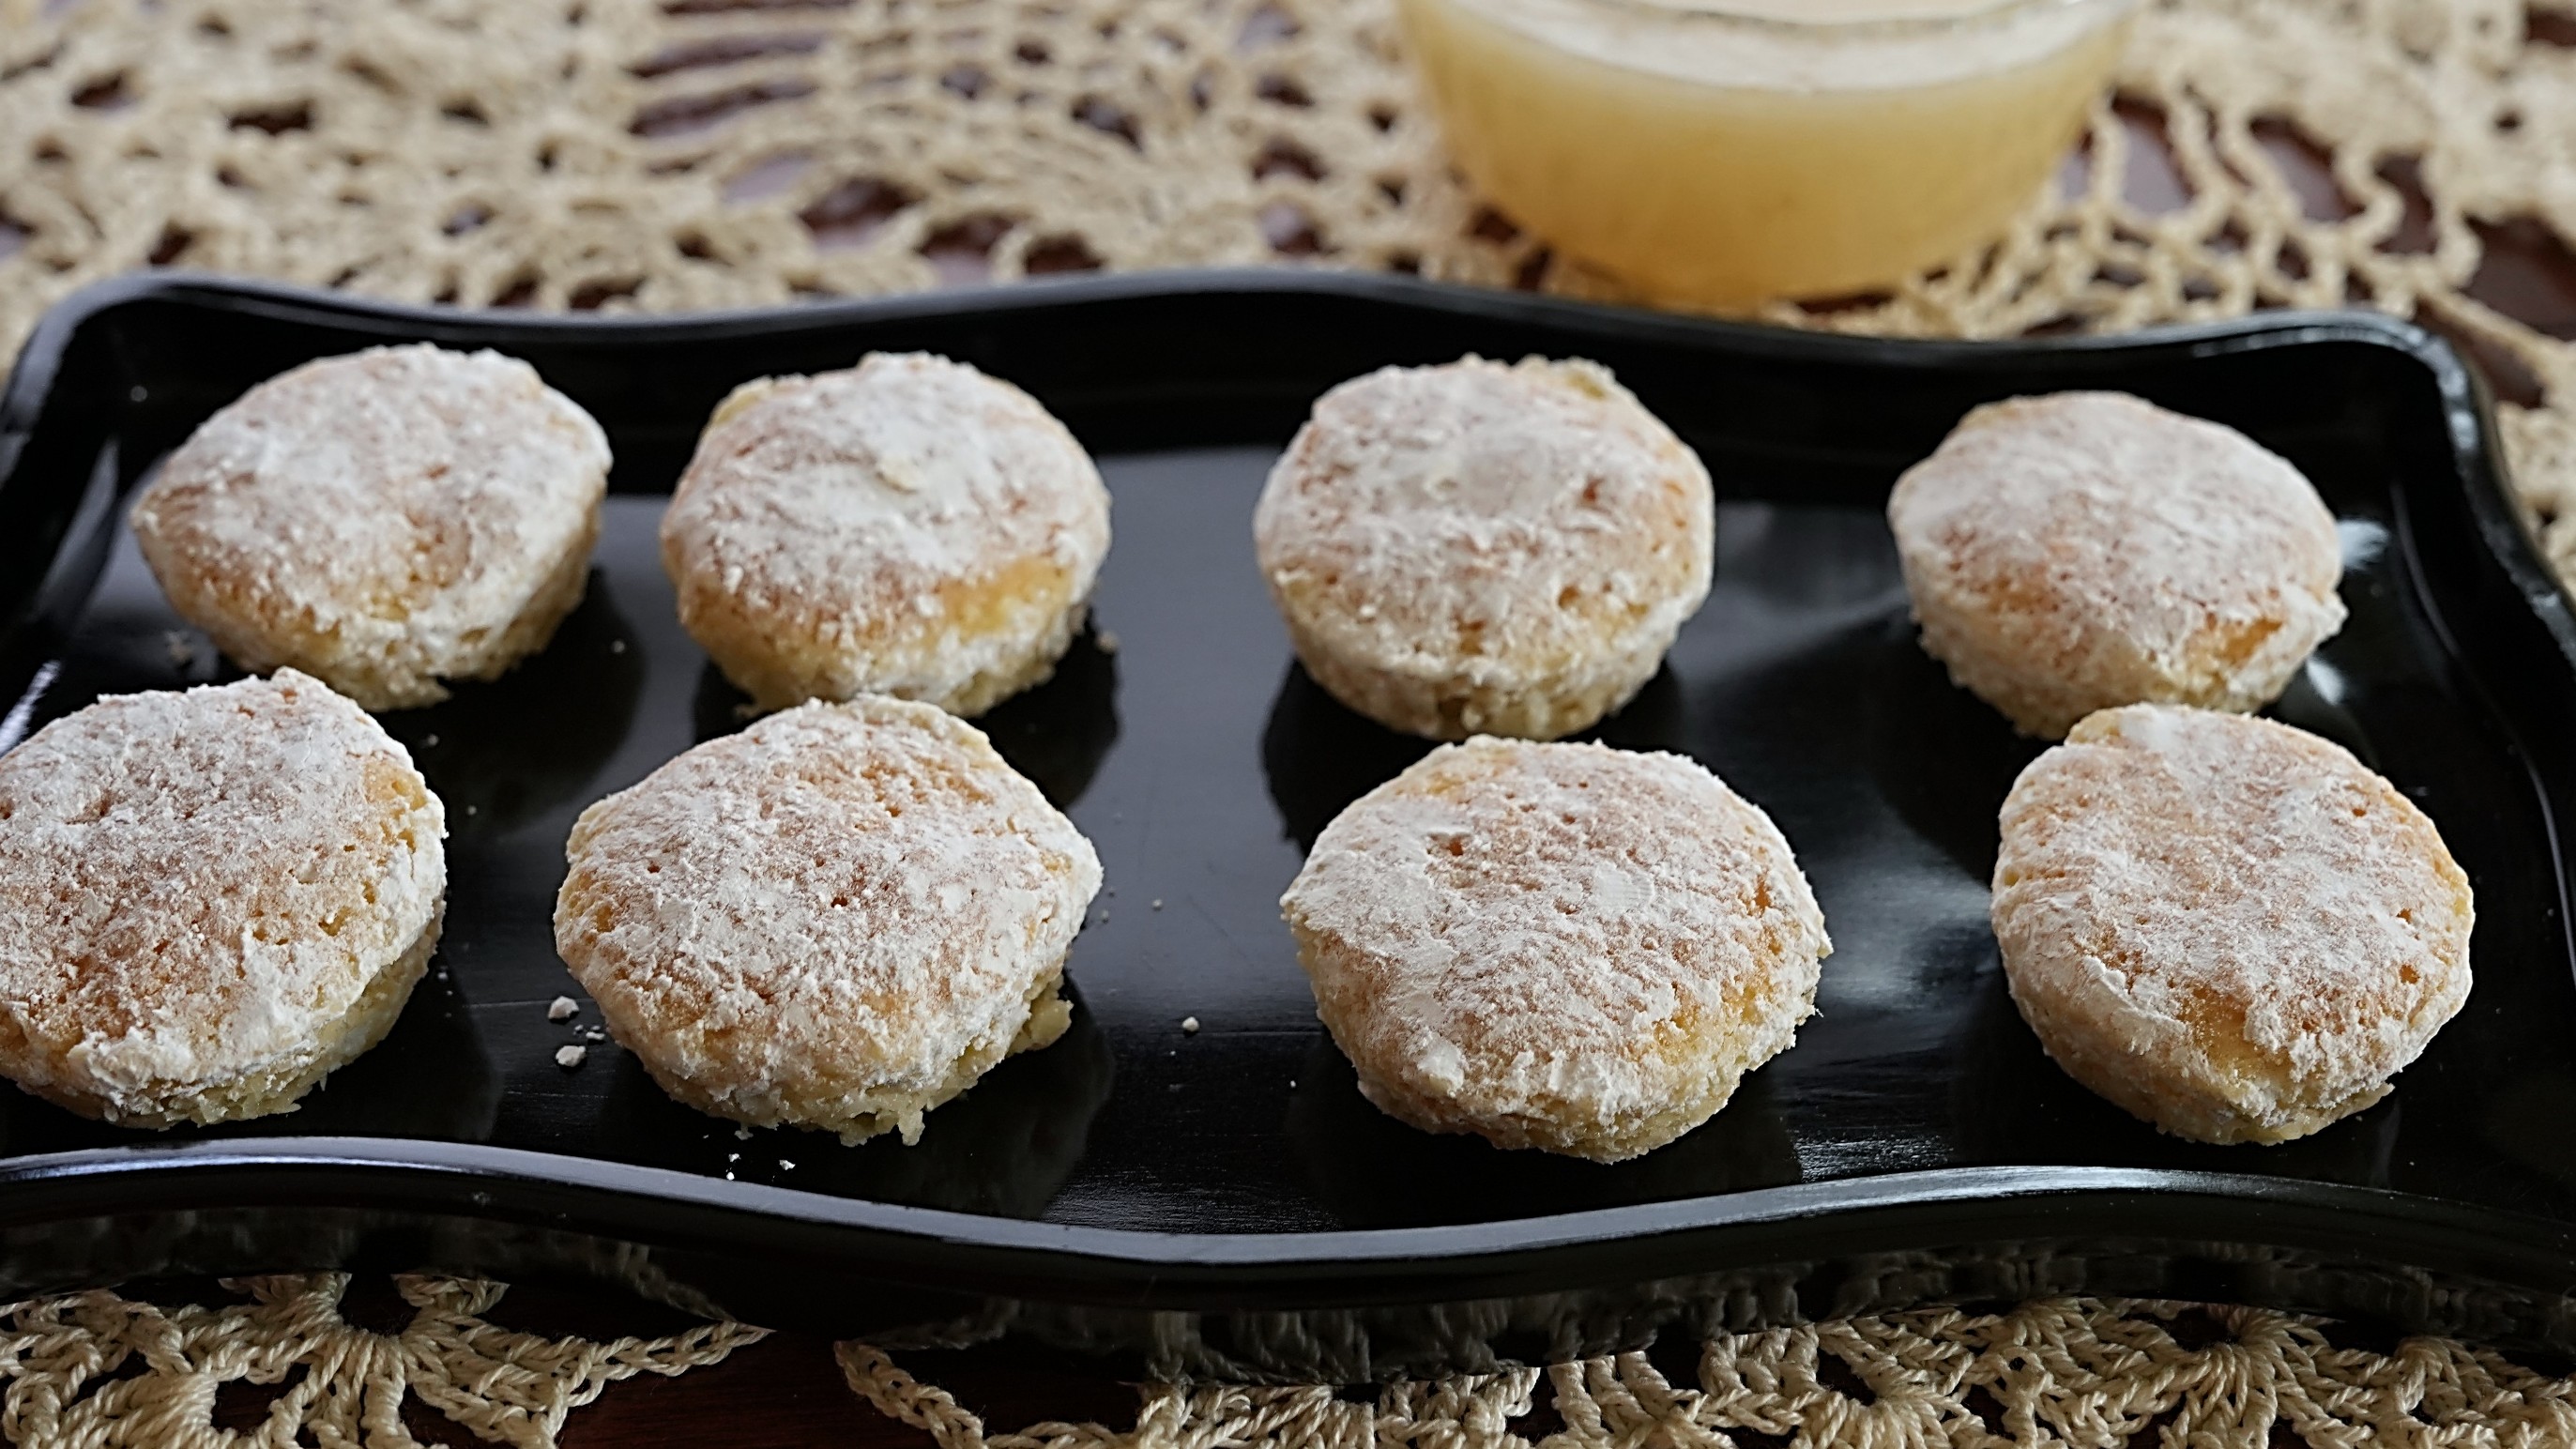
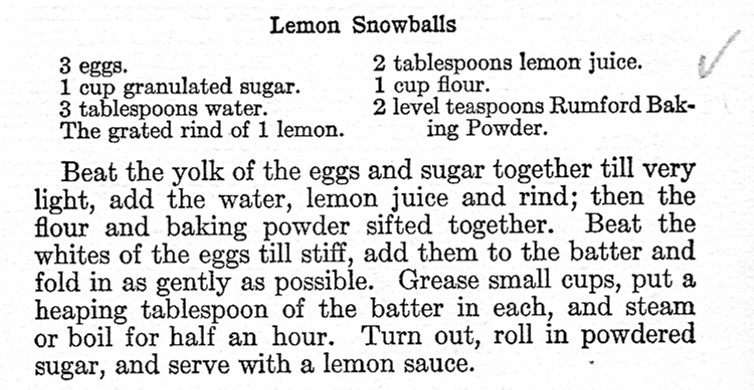
Lemon Snowballs were popular both a hundred years ago and now. They are a lemony dessert that is rolled in powdered sugar. Most modern Lemon Snowballs are a type of cookie that are made by making a dough and then rolling (or scooping) it into balls that are put on a baking sheet. Based on the information in a 1925 cookbook, a hundred years ago Lemon Snowballs were made using a different process. The old recipe called for making a batter, then folding in beaten eggs whites. The mixture is then put into mini-muffin cups that are set in a pan of hot water for baking (similarly to how custards are baked). The old-time Lemon Snowballs are served with a Lemon Sauce.
I decided to give the hundred-year-old recipe a try. The old-time Lemon Snowballs with Lemon Sauce were a delightful very light, lemony, cake-like dessert and the zesty Lemon Sauce was a lovely, flavorful addition.
Here’s the original recipe:
Source: Rumford Complete Cookbook (1925)
I bought the cookbook that contained this recipe off eBay. The Lemon Snowballs recipe appears to be recommended by a previous owner of the cookbook. There is a checkmark made with a pencil on the righthand side of this recipe.
This recipe makes about 48 small Snowballs. I didn’t have enough mini-muffin tins to make that many, so I put some of the batter in regular muffin tins – which worked fine, though those Snowballs were much larger.
Even though the recipe calls for serving with a Lemon Sauce, there was no Lemon Sauce recipe in the Rumford Cookbook. Maybe the Rumford Cookbook author assumed that the recipe for Lemon Sauce was so basic that there was no need to include it in the book. I found a Lemon Sauce recipe in an old home economics textbook:
Source: School and Home Cooking (1925) by Carlotta C. Greer
Preheat oven to 350° F. Put egg whites in a mixing bowl and beat until firm peaks form. Set aside.
Put egg yolks and sugar in another mixing bowl; beat until thoroughly mixed. Add water, lemon juice, and grated lemon rind; beat to combine. Add flour and baking powder and continue beating until thoroughly mixed, then gently fold in the beaten egg whites.
Grease mini-muffin cups, then put a heaping tablespoon of batter in each. Place the muffin tin in a pan that contains hot water that is about 1-inch deep. Place the pan (with the muffin tins) in the oven. Bake about 30 minutes or until a pick inserted in center of the Snowballs comes out clean. Remove the muffin tin from pan with the water and let cool slightly for a few minutes, then remove the Snowballs from the muffin cups. Roll the warm Snowballs in powdered sugar. If desired, serve with Lemon Sauce (see recipe below). May be served warm or cold.
Lemon Sauce
3/4 cup sugar
2 tablespoons flour
2 cups boiling water
1 lemon (juice and grated rind)
1 tablespoon butter
In a saucepan, mix the sugar and flour thoroughly, then slowly add the boiling water while stirring constantly. Bring to a boil using medium heat, then reduce heat and simmer for 10 minutes. Remove from the heat and stir in the lemon juice, grated lemon rind, and butter; continue stirring until the butter is melted.
Summer has arrived and temperatures are soaring. On hot days, nothing hits the spot like ice cream. I came across a hundred-year-old recipe for Praline Ice Cream and decided to give it a try.
The ice cream was delightful with small pieces of pecans and crunchy caramelized sugar brickle.
Here’s the original recipe:
Source: The Daily Argus-Leader Home Economics and Cook Book, Sioux Falls, South Dakota (1925)
I think that there is a typo in the title of this recipe, and that it is for “Praline Ice Cream” and not “Prauline Ice Cream.”
The recipe called for chopped nuts. Of course, I used chopped pecans. (It just wouldn’t seem like Praline Ice Cream with any other kind of nut.) I did not combine the chopped pecans with the caramelized sugar prior to breaking the caramelized sugar into very small pieces. Instead, I spooned the caramelized sugar onto a buttered plate to cool, then put the pecans in the pan (which still contained a little melted sugar), and stirred for a minute or two. A mortar and pestle could be used to break the cooled praline mixture into very small pieces. I actually used the “pulse” feature on my blender to create the small pieces. I then combined the pecans and the praline pieces. I’m not sure exactly what was meant when the recipe said to sift the praline mixture after it is broken apart, so I skipped sifting.
I did not use a double boiler, and instead just stirred the milk mixture constantly, which worked fine. I always have difficulty with ice cream recipes that call for adding egg yolks to the hot milk. No matter how hard I stir, I end up with small clumps of cooked egg yolk in my mixture, so I strained it after cooking to remove them.
I did not stir the praline mixture into the milk mixture until the ice cream began to harden in the ice cream freezer. My ice cream freezer directions say that nuts, fruits and other additives should be added about 5 minutes prior to the completion of the churning.
Caramelize 1/2 cup sugar by putting in a small cast iron skillet; put over low heat and stir constantly until the sugar turns light brown. Spoon the caramelized sugar onto a lightly buttered plate and let cool. There will be a little sugar that has liquified still in the skillet; add the chopped pecans and stir for 1-2 minutes to lightly toast the pecans and to coat with the sugar. Once the caramelized sugar has cooled, break into very small pieces using a mortar and pestle (or the pulse function on a blender), then combine with the chopped pecans. Set aside.
In a bowl, combine 1/2 cup sugar, the egg yolks, and salt. Stir until thoroughly mixed and smooth. Set aside.
In a saucepan, scald the milk using medium heat while stirring constantly. Slowly pour the hot milk over the egg yolk and sugar mixture while stirring briskly. Return the mixture to the saucepan, and using medium heat, cook while stirring constantly until the mixture thickens. Remove from heat and strain to remove any small pieces of egg yolk that clumped together during cooking. Chill in the refrigerator.
Shortly before churning the milk mixture into ice cream, whip the cream to the firm peak stage. Stir the vanilla into the chilled milk mixture, then fold in the whipped cream. Freeze following freezer directions. Add the small pieces of caramelized sugar and pecans about 5 minutes before churning is completed. Continue churning until the caramelized sugar and pecans are distributed throughout the ice cream.
(When I made this recipe, I used a 1 1/2 quart automatic ice cream maker that with a bowl which is frozen in the freezer overnight, but a regular ice cream maker would also work.)
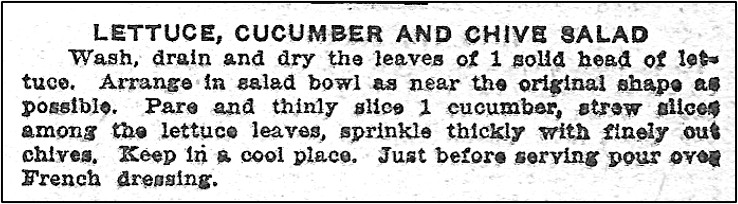
I’m enjoying making various summer salads, so when I saw a recipe in a hundred-year-old cookbook for Lettuce, Cucumber, and Chive salad, I decided to give it a try. The salad had a light vinaigrette-style dressing on it and was lovely.
Here’s the original recipe:
Source: The Daily Argus-Leader Home Economics and Cook Book, Sioux Falls, South Dakota (1925)
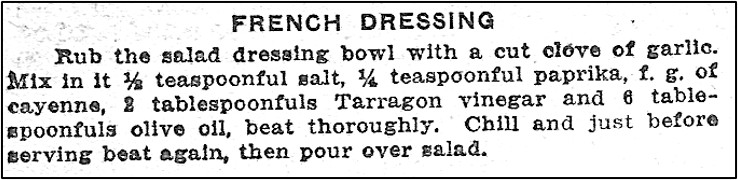
And, here is the original recipe for French Dressing:
Source: The Daily Argus-Leader Home Economics and Cook Book, Sioux Falls, South Dakota (1925)
I had a lovely bunch of leaf lettuce that I used to make this recipe. I’m not sure what type of lettuce the recipe author anticipated cooks using, but I did not try very hard to arrange the leaves as near as possible to the original shape. I thought that it was more important to have the lettuce in bite-size pieces than to worry about the shape.
The recipe called for serving this salad with French Dressing. I used a French Dressing recipe that was in the same cookbook as the salad recipe. It is a vinaigrette-style recipe and is quite different from the modern commercially-produced, orange-colored French Dressing. I’ve seen many French Dressing recipes in various hundred-year-old cookbooks over the years, and they have all have been vinaigrettes. I’m not sure when the shift occurred to the orange-colored type of French Dressing.
The French Dressing recipe called for a f.g. of cayenne (red pepper). I have no idea what unit of measure an “f.g.” is, but assumed that it wasn’t calling for much, so I interpreted it to mean a dash.
Wash and dry the lettuce, then tear into pieces and arrange on plates or in a bowl. Put the chopped chives on top of the cucumber slices. Just before serving, top with the dressing.
To make dressing, cut the garlic clove in half, then rub a small bowl with the cut garlic. Put the salt, paprika, cayenne pepper, tarragon vinegar and olive oil in bowl and stir vigorously to combine.
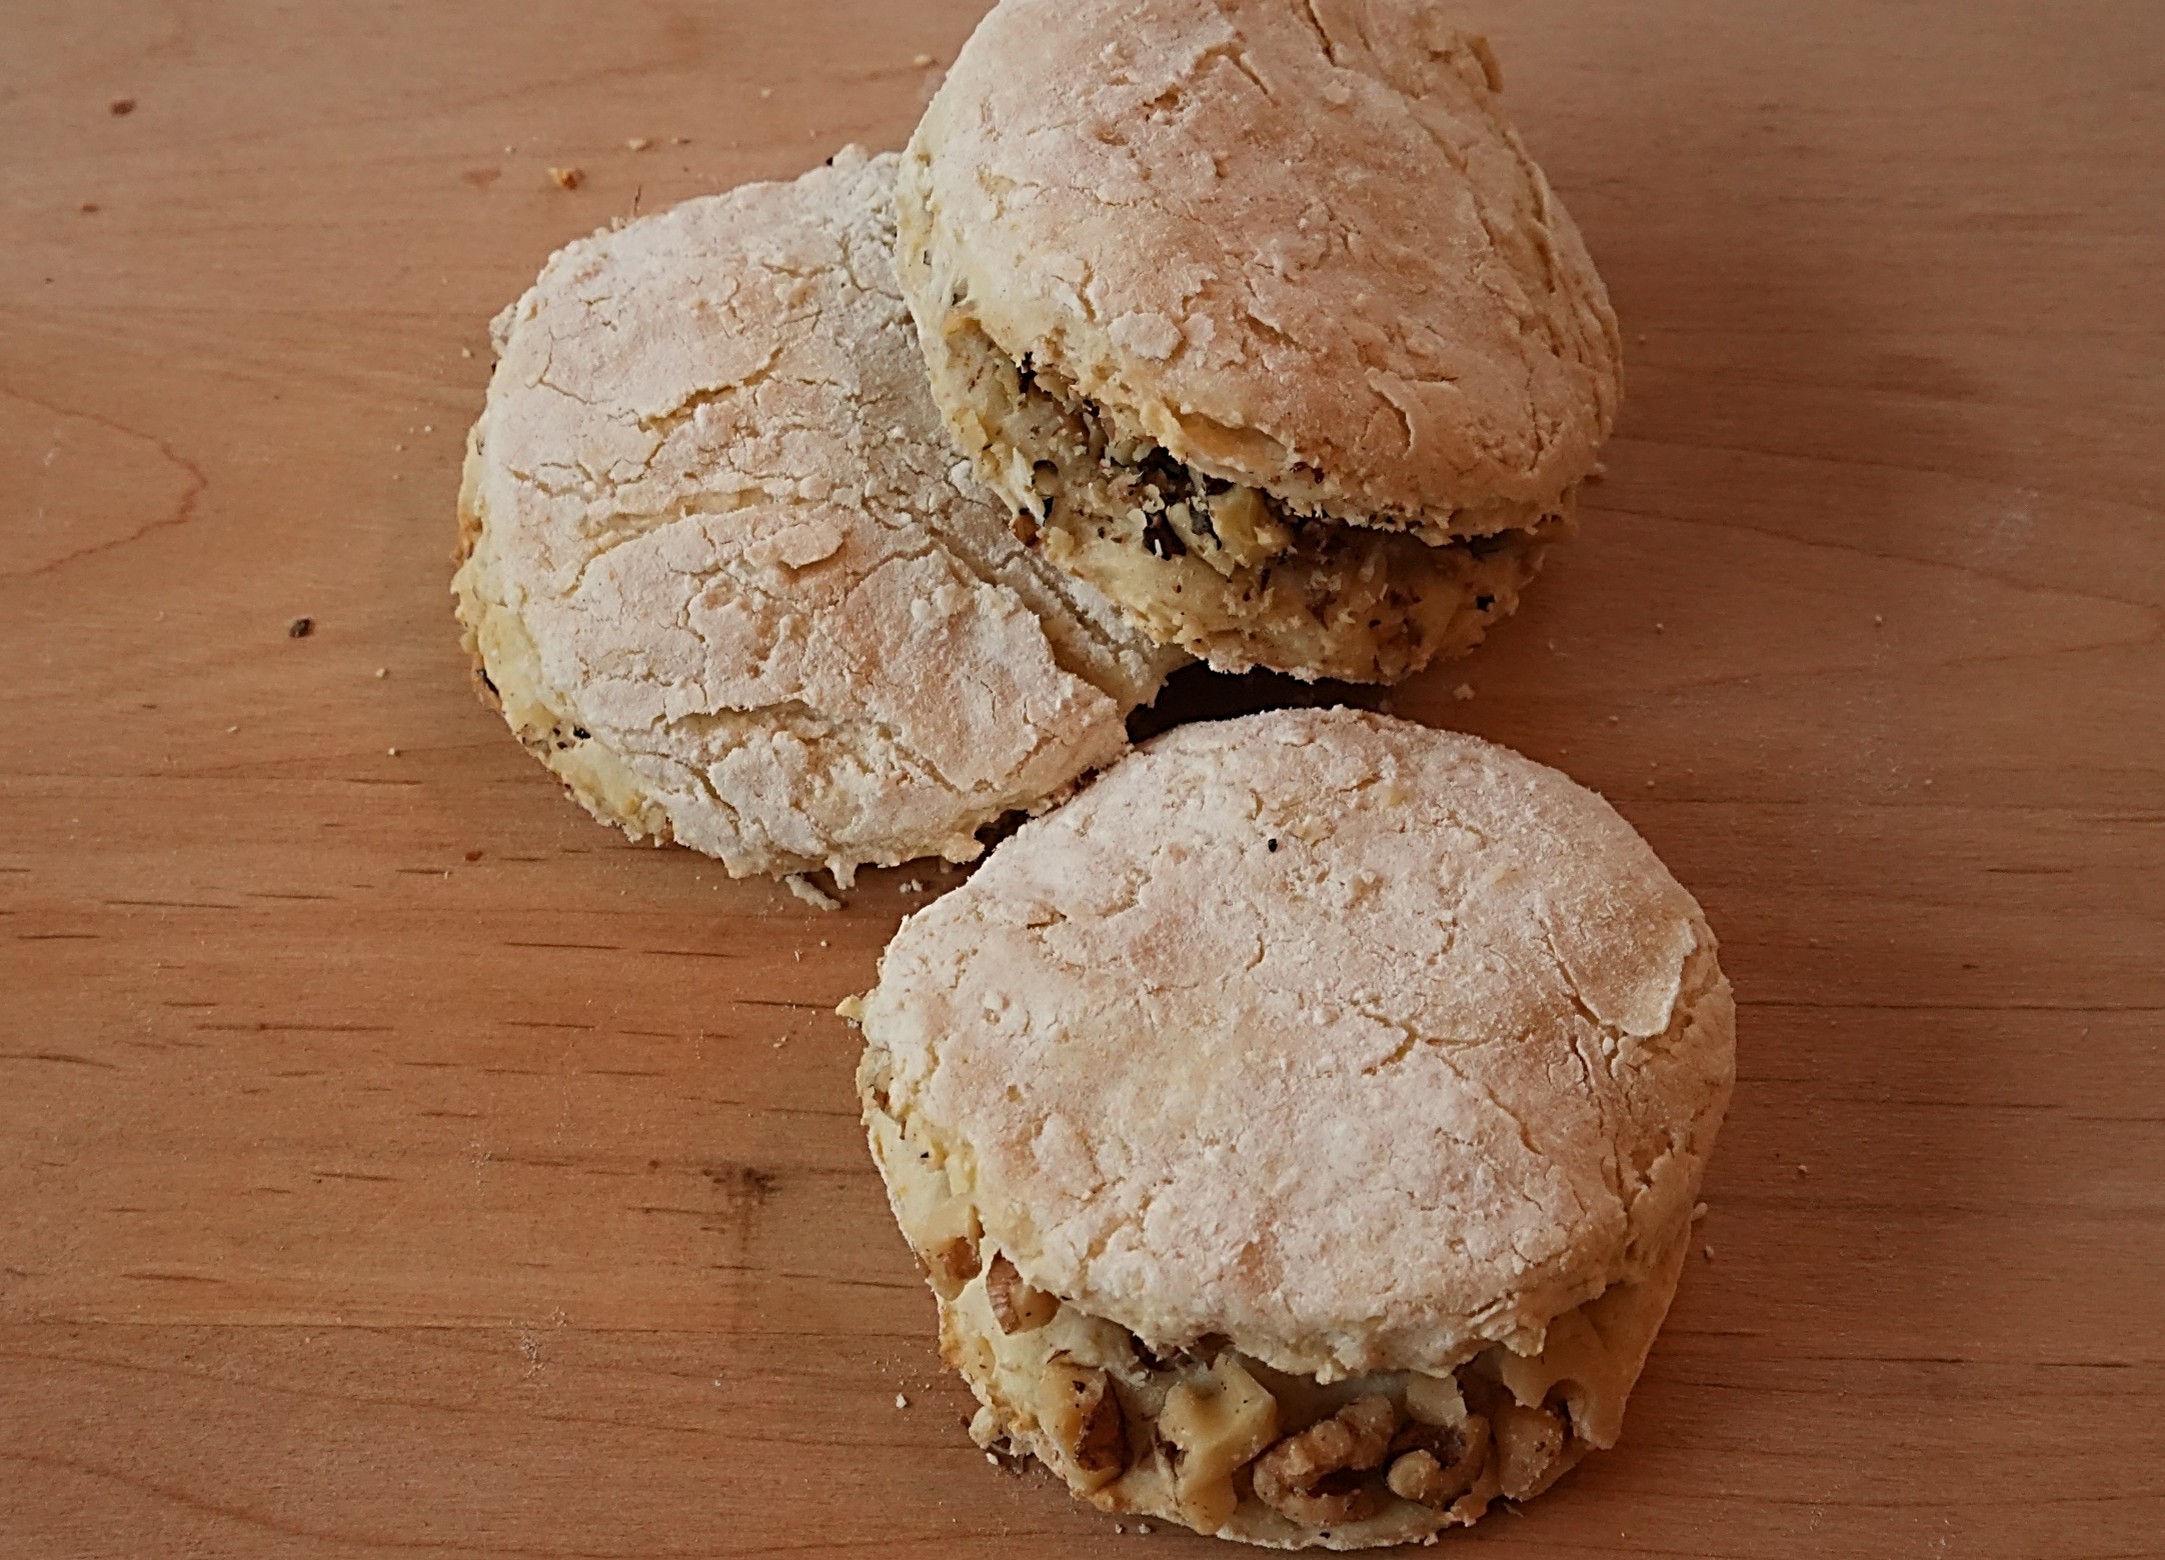
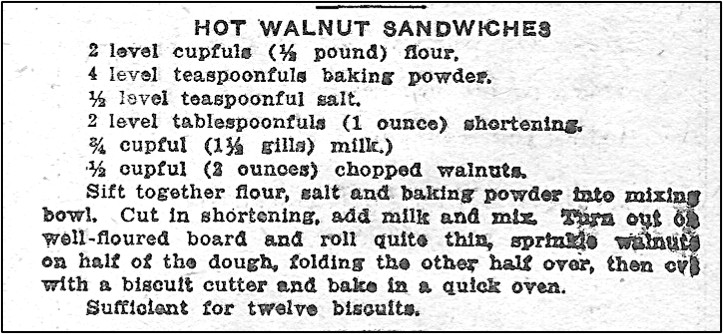
I was intrigued by a recipe in a hundred-year-old newspaper recipe supplement. The recipe title was Hot Walnut Sandwiches, but it was labeled as a biscuit recipe. The recipe called for making baking powder biscuit dough, then putting chopped walnuts between two biscuit rounds, and baking.
This recipe does not call for any sugar, so the Hot Walnut Sandwiches were not sweet and definitely tasted like a baking powder biscuit, but the walnuts were a nice twist and a fun addition. The Hot Walnut Sandwiches were tasty. I especially liked them when I smeared a little butter on them.
Here’s the original recipe:
Source: The Daily Argus-Leader Home Economics and Cook Book, Sioux Falls, South Dakota (1925)
The recipe calls for putting the chopped walnuts on top of half of the dough, then folding the other half over it, and cutting with a biscuit cutter. This results in a lot of scraps of dough embedded with walnuts. I found that it worked better to cut all the circles first (and re-roll the dough as needed), then put the walnuts on half of the circles and top with the remaining circles of dough.
It’s interesting that the recipe indicated that 3/4 cup of milk should be used, but that it also stated in parentheses that this is 1 1/2 gills of milk. Gills are more commonly used today as a measure for alcohol when making mixed drinks, but apparently a hundred years ago it also was still occasionally used when measuring other ingredients.
Preheat oven to 425° F. Sift together flour, baking powder, and salt in a mixing bowl. Cut in the shortening, then stir in the milk until combined. On a lightly floured surface, roll the dough until 1/4-inch thick. Cut with a round biscuit cutter. (I used a drinking glass as the cutter.) Sprinkle chopped walnuts on half of the circles, then put the remaining circles on top of the walnuts. Lightly press together. Place on a baking sheet, and bake for 10-12 minutes, or until lightly browned. Serve warm.
Since seafood is very healthy, I try to make it several times a week, but I tend to get into a rut and make the same few recipes over and over. So when I came across a hundred-year-old recipe for Parsley Sauce, I immediately thought about making it to serve over some perch that I had in my refrigerator.
The Parsley Sauce turned out well, and was delightful when served with the fish. It only took a few minutes to make. It is basically white sauce with chopped fresh parsley and a bit of lemon juice added. Parsley Sauce would also be tasty on meat or other foods.
My daughter called while I was working on this post, and she asked what recipe I made. I told her, “Parsley Sauce.”
She said, “Oh, that sounds so good. I went to a fancy restaurant last week and had a similar sauce on my steak.”
I said, “Really? I didn’t think that white sauce-type sauces were very popular now.”
She said, “They’re very popular. Many dishes use white sauce as a basis.”
I clearly am behind the times (which I guess shouldn’t be a surprise), but it’s good to hear that some of the foods that were common a hundred years ago are once again popular.
Here’s the original recipe:
Source: Rumford Complete Cook Book (1925)
I thought that the sauce would get too thick if I boiled it for five minutes, so I removed it from the heat just as it came to a boil and began to thicken.
I used 1/2 teaspoon of salt and a dash of pepper, and that worked well.
The old recipe gave lots of details about how to prepare the chopped parsley to ensure that any green liquid created by the chopping process was removed so that the sauce would not be discolored. The recipe called for putting the chopped parsley in a cloth and then holding it under a water faucet. Instead, I put the chopped parsley in a tea strainer and ran water over it; I then dried the parsley by putting on paper towels that I rolled and squeezed.
2 tablespoons chopped parsley (Stems and stalks should be removed before chopping.)
2 tablespoons butter
2 tablespoons flour
1 cup milk
1 teaspoon lemon juice
1/2 teaspoon salt
dash pepper
Put the chopped parsley in a strainer (I used a tea strainer.), then run water over it to wash away the green liquid created during the chopping process. Gently press the parsley to remove some of the water, then put the washed, chopped parsley on paper towels. Roll the paper towels then squeeze to remove the water. Set aside.
Melt butter in a saucepan, then stir in the flour. Gradually, add the milk while stirring constantly. Continue stirring until the white sauce begins to thicken. Stir in the lemon juice, salt, and pepper. Remove from heat and stir in the parsley.


 Since seafood is very healthy, I try to make it several times a week, but I tend to get into a rut and make the same few recipes over and over. So when I came across a hundred-year-old recipe for Parsley Sauce, I immediately thought about making it to serve over some perch that I had in my refrigerator.

