Old-fashioned Minced Potatoes


minced potatoes on plateOccasionally I make a hundred-year-old recipe that is lovely – but that seems to be misnamed. This is one of those times. The name of the recipe is Minced Potatoes – yet recipe directions call for either cutting the potatoes into 3/4th inch chunks or slicing them — I sliced them — which resulted in pieces which seemed much larger than what I’d expect for Minced Potatoes.

To make this recipe, potatoes are first boiled, the cut into pieces and put into the oven to brown. Then they are stirred and 1/2 cup of cream is poured over them. They are then returned to the oven to brown a second time. Most of the cream evaporated, but a delicate creaminess remained.

Minced Potatoes reminded me a bit of Scalloped Potatoes – but they were not nearly as creamy. But I’m saying this in a good way. The Minced Potatoes made a tasty side dish.

Recipe for Minced Potatoes
Source: The New Cookery (1921) by Lenna Frances Cooper

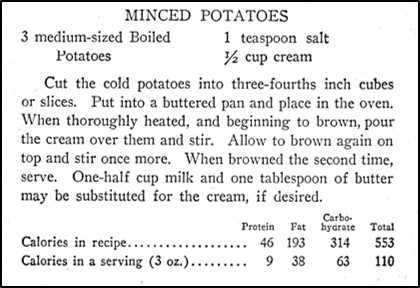
The recipe does not say when to add to the salt. It is not clear whether it should be added to the water that is used to boil the potatoes, or to the cream that is poured over the potatoes. I decided to add the salt to the cream – though I only used 1/2 teaspoon of salt instead of the teaspoon called for in the old recipe. A teaspoon seemed like too much. (If I’d instead added the salt to the water used to boil the potatoes, 1 teaspoon would have been an appropriate amount of salt to add.)

The recipe called for “cream.” I was uncertain whether this meant heavy cream or a lighter cream. I decided to use half and half rather than heavy cream.

Here’s the recipe updated for modern cooks:

Minced Potatoes

  • Servings: 2 - 3
  • Difficulty: moderate
  • Print

3 medium potatoes

1/2 teaspoon salt

1/2 cup half and half

Peel potatoes and put in a saucepan; cover with water. Bring to a boil using high heat; then reduce heat and cook until the potatoes are tender (25-30 minutes). Remove from heat, drain, and put the potatoes in the refrigerator to cool.

Pre-heat oven to 400° F. Cut the cold boiled potatoes into 3/4th inch cubes or slice the potatoes. (I sliced them.). Put the potatoes in a 1-quart buttered baking dish. Place in oven.

Put the cream and salt in a small bowl. Stir to combine. Set aside.

When the potatoes begin to brown, gently stir the potatoes to turn them. Pour the cream mixture over the potatoes. Return to the oven and allow to lightly brown a second time. Remove from oven and gently stir, then serve. (If desired, put the potatoes in a serving bowl. After I stirred the potatoes, they didn’t look particularly attractive in the casserole dish that I cooked them in – but they looked very nice in a serving dish.)

http://www.ahundredyearsago.com

1921 Fleischmann Yeast Advertisement

Advertisement for Fleischmann Yeast
Source: The Boston Cooking-School Cook Book (1921 Edition)

It’s always fun to read old advertisements. Both then and now ad writers knew how to promote products in ways that would increase sales. The slogan used in a 1921 Fleischmann Yeast advertisement, “Eat More Bread” doesn’t quite work for me, but maybe it sold yeast back in the day.

Raspberry Nectar Recipe

Glass of Raspberry Nectar

It’s so much fun to go to “pick-your-own” berry farms, but I always pick lots of berries and end up searching for new recipes to use them. Yesterday, I picked some lovely red raspberries, and was pleased when I found a hundred-year-old recipe for Raspberry Nectar. It’s a winner.

The Raspberry Nectar contains both red raspberry juice and lemon juice so the nectar was fairly tart with the delicate essence of raspberry. My husband said that it looked like Kool-Aid – but once we tasted the Raspberry Nectar, we immediately knew that there was no comparison.  Raspberry Nectar has the rich nuanced taste of the fresh fruits,  and is refreshing on a hot summer day.

Here’s the original recipe:

Recipe for Raspberry Nectar
Source: The New Cookery (1921) by Lenna Frances Cooper

I’m surprised that the old recipe indicates that the serving size is only 3 1/2 ounces. Somewhere I have some very small juice glasses that I got as a shower gift many year ago – and they may have been about this size. The small serving size makes we wonder if the recipe author considers Raspberry Nectar to be a breakfast drink. Both raspberries and lemons are chock-full of vitamin C, so it would be a good substitute for orange juice. That said, I served this drink mid-afternoon over ice; and, it was a nice change from my usual summer drinks (iced tea and lemonade).

Here’s the recipe updated for modern cooks:

Raspberry Nectar

  • Servings: 3 - 5
  • Difficulty: moderate
  • Print

1 cup red raspberry juice (Can be made with about 1 1/2 pints red raspberries)

1/4 cup lemon juice

4 tablespoons sugar

1 3/4 cups water

To make the red raspberry juice, put the red raspberries in a bowl and mash with a fork. Put the pulp in a strainer and strain to get the juice. Set the juice aside.

Combine the lemon juice, sugar, and water. Stir until the sugar is dissolved; then add the raspberry juice and stir to combine. Chill and serve.

http://www.ahundredyearsago.com

What Do Drawings and Pencil Marks Tell Us About a Book’s Original Owner?

drawing in old textbookSometimes old books provide clues about the original owner. For example, I have a 1921 home economics textbook called Elementary Home Economics. It was written by Mary Lockwood Matthews. The book itself is fascinating. It’s fun to see what students learned a hundred years ago – as well as to see how recipes, and cooking techniques and equipment, have changed across the years. Drawing in old textbook

But what I really enjoy about this book are the drawings and pencil marks made by a girl (and back then it would have been a girl) who once used the book. Whenever I open the book I spend many minutes lingering over the drawings. Where did the girl live? What was her family like? Was she a good student? Did she sometimes frustrate her teacher? Was she quiet?. . . or perhaps a very popular student?

pencil marks in old textbook

Lemon Snow with Custard Sauce

Lemon Snow with Custard Sauce

During the summer heat, cool desserts are the best. So when I saw a hundred-year-old recipe for Lemon Snow, I decided to give it a try. The Lemon Snow is served with Custard Sauce, and, if desired, could also be topped with Whipped Cream. I skipped the whipped cream.

The Lemon Snow was light and had a sunny, lemony flavor. The creamy Custard Sauce paired nicely with the Lemon Snow.

Here are the original recipes:

Recipe for Lemon Snow
Source: The Science of Food and Cookery (1921)
recipe for custard sauce
Source: The Science of Food and Cookery (1921)

I put the Lemon Snow in custard cups. It may be possible to remove the chilled Lemon Snow from the cups (molds) for serving, but I served the chilled dessert in the cups.  When I made this recipe, I served the Lemon Snow with Custard Sauce, but I skipped the whipped cream.

Since hot liquid is stirred into the beaten egg whites, the egg whites may be largely cooked, but I used a pasteurized egg for extra safety.

Here’s the recipe updated for modern cooks:

Lemon Snow with Custard Sauce

  • Servings: 2 - 3
  • Difficulty: moderate
  • Print

Lemon Snow

1/2 cup sugar

2 1/2 tablespoons cornstarch

1 egg white

dash of salt

3/4 cup water

3 tablespoons lemon juice

grated rind of 1/2 lemon

Custard Sauce, if desired

whipped cream, if desired

Put the sugar and cornstarch in a bowl; stir to combine. Set aside.

Put the egg white  and the dash of salt in a bowl; beat until stiff. Set aside.

Put the water, lemon juice, and lemon rind in a sauce pan. Using medium heat, bring to a boil. Remove from heat and strain the hot liquid.

Slowly pour the strained liquid over the sugar and cornstarch mixture. Stir until smooth. Return this mixture to the saucepan, and bring to a boil using medium heat while stirring constantly.

Remove from the heat and slowly pour over the beaten eggs whites while using a whisk to combine.

Rinse 2 or 3 custard cups with water. Pour the Lemon Snow mixture into the wet cups. Put in the refrigerator to chill (at least 2 hours).

If desired, serve with Custard Sauce or Whipped Cream.

Custard Sauce

2/3 cup milk

1 egg yolk

1 teaspoon sugar

3-4 drops (a dash) of vanilla

Put the egg yolk and sugar into a small bowl; beat until smooth. Set aside.

Put milk in a saucepan. Using medium heat, heat until hot and steamy while stirring constantly. Put a small amount of the lot liquid in the bowl with the egg yolk mixture while rapidly stirring. Then slowly add the egg mixture into the hot milk while stirring constantly. Continue cooking, while stirring, until the hot mixture thickens slightly and coats a spoon. Remove from heat and stir in the vanilla. Strain and then put into a bowl; chill in the refrigerator.

http://www.ahundredyearsago.com

Why Lemon Pies Become Watery

slice of lemon meringue piePies sometimes don’t turn out quite as intended, and cooks both today and a hundred years ago try to figure out why. In a question and answer column in the November, 1921 issue of American Cookery, a reader asked:

Will you tell me in your paper why my Lemon Pies become watery when I return them to the oven to brown the meringue?

The answer was:

A lemon pie may become watery when put in the oven to brown the meringue, if it is left in the oven too long; or it may water because the filling was not sufficiently cooked before putting into the pastry shell, or it may be from an insufficiency of flour being used in making the filling. If you had told us just how your pies are made, we would be better able to answer your question.


Old-fashioned Bread Griddlecakes

Bread griddlecakes on plate

Food was a major expense for many families a hundred years ago, and cooks tried to minimize food waste. Bread – often homemade – sometimes went stale before it was eaten, and rather than just throwing the stale bread out, they looked for ways to use it.

I recently came across a hundred-year-old recipe for Bread Griddlecakes that called for using stale bread crumbs (and relatively little flour), and I just had to give it a try. The Bread Griddlecakes turned out well. This recipe made relatively thin pancakes that had a nice flavor. If I hadn’t made them myself, I never would have guessed that they contained breadcrumbs. Maybe I shouldn’t have been surprised since bread is made out of flour – so at some basic level this recipe contains similar ingredients to may typical recipes.

Here’s the original recipe:

Recipe for Bread Griddlecakes
Source: The Boston Cooking-School Cook Book (1921 Edition)

Modern bread (at least store-bought bread) doesn’t seem to go stale, so I just used bread that wasn’t stale when I made this recipe.

I’m not sure why the old recipe called for scalded milk, so I used milk that I didn’t scald. It worked fine.

It’s fascinating how words change across the years. The original recipe title had a hyphen between “griddle” and “cake.” Today “griddlecake” is generally written as one word – or people just call them pancakes.

Here’s the recipe updated for modern cooks:

Bread Griddlecakes

  • Servings: 2 - 3
  • Difficulty: easy
  • Print

1 1/2 cups fine bread crumbs (I tore 3 bread slices into very small pieces.)

1 1/2 cups milk

2 tablespoons butter, melted

2 eggs

1/2 cup flour

1/2 teaspoon salt

4 teaspoons baking powder

Put the bread crumbs and milk in a mixing bowl, then soak until the crumbs are soft (10 – 15 minutes). Add butter, eggs, flour, salt, and baking powder; beat to combine.

Heat a lightly greased griddle to a medium temperature, then pour or scoop batter onto the hot surface to make individual griddlecakes. Cook on one side, then flip and cook other side.

http://www.ahundredyearsago.com