Source: Cement City Cook Book (1922, Compiled by First Baptist Church, Alpena, Michigan)
Who were “New Women” a hundred years ago? — flappers,?
A hundred-year-old church cookbook from Alpena, Michigan had a different definltion. This fun poem was at the beginning of the Desserts and Puddings chapter. Alpena is on Lake Huron in northeastern Michigan.
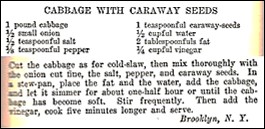
1 pound cabbage (about 1/2 of a medium cabbage), shredded
1/2 small onion, finely chopped
1/2 teaspoon salt
1/8 teaspoon pepper
1 teaspoon caraway seeds
1/2 cup water
2 tablespoons fat (I used butter.)
1/4 cup vinegar
Put cabbage, onion, salt, pepper, caraway seeds, butter and water in a large saucepan. Bring to a boil using medium heat, then reduce heat and simmer until the cabbage is tender; stir frequently. If needed, add additional water. After the cabbage is soft (about 30 minutes), add the vinegar and cook an additional 5 minutes.
You might enjoy this 1922 article that gave definitions for several terms associated with the day-to-day operation of a home. The article was written in response to a reader’s request for definitions.
Definitions Wanted
We find that these terms are variously defined, sometimes they are all taken to mean pretty much the same thing, sometimes the distinctions are quite arbitrary and neither included nor connoted in the common significance of the word. We are glad to define them as they appear to us to be distinguished one from another:.
Domestic Science. The application of scientific methods of thought and work to the problems of the house, or to household problems.
Domestic Art. The application to the house, in its exterior and interior, of the artistic principles of form and color, also of materials used. Building, decorating, tinting, and furnishing are included also – but properly by no means chiefly – artistic clothing. The term is very much a misnomer when applied to work in plain sewing.
Household Economy. Following the Greek word from which “economy” is derived, this means the “running” of the entire household, with regard to division of labor, expenditure of incomes, provision of food, care in sickness, and provision of amusement and recreation. In our modern use of the term, a careful thrift is connoted.
Household Management. The direction and care of the household, as in the foregoing, but not necessarily, with any implication of thrift. The house of a millionaire can be “managed” without thought of the cost.
Household Engineering. Here we have a more mechanical ordering of the house. Both “economy” and “management” seem to us to include the human element in all its phases, as co-dwellers in the house. “Engineering” appears to consider the human element only as a means to an end, the end of the mechanical ordering of the dwelling.
Household Administration. This includes both the economy, and also the management and engineering – but, as though it were done by a ruler who sits aloft and directs the activities without either sharing them, or giving his heart to them. He does it all with brains like the administrator of an estate. At least, it sounds like that to us.
Home Economics. The new word, “home,” in this term, introduces an ethical and even spiritual element which all the others lack. It signifies economics as under definition (3), but with one whole eye on higher, rather than material values. It means running the house with common sense, but also with uncommon sense, and always subordinating the common and the uncommon. This means that the spirit of the home will be the first and chiefest, and most important thing to be considered, and will always come before the mere care of the house.
I am so fortunate to have such wonderful readers, and am humbled by their kindness and thoughtfulness. Recently one reader, Judy L., gave me a special hundred-year-old cookbook out of her collection. The book is called For Luncheon and Supper Guests by Alice Bradley. Judy is not sure, but the cookbook may have belonged to her grandmother. The small book has 10 menus and more than 100 recipes that are:
Suitable for company luncheons, Sunday night suppers, afternoon parties, automobile picnics, evening spreads, and for the tea room, lunch room, coffee shops, and motor inns.
The book’s author dedicated it to:
The thousands of women who like to entertain their friends and prepare for them something new and delicious to eat.
The book is a joy to browse through, and I can picture cooks a hundred years ago using it to plan lovely events. Judy, thank you!
The first recipe I made out of the book was the recipe for Cream of Mushroom Soup. I tend to associate Cream of Mushroom Soup with the condensed canned soup and think of it as more of a recipe ingredient than something to eat on its own. Yet the old cookbook recommended it as a special dish to serve guests, so I decided to give it a try.
This recipe is for a delicate, velvety smooth mushrooms soup that was perfect on a cold winter day – and that would be delightful for a light lunch with friends.
Here’s the original recipe:
Source: For Luncheon and Supper Guests (1922) by Alice Bradley
When I made this recipe I bought an 8-ounce box of whole button mushrooms – and chopped the entire mushrooms rather than buying more mushrooms and only using the stems and skins. (By the way, what is a mushroom skin?)
The old recipe says to serve the soup in bouillon cups which made me think about presentation. How would a hostess in days gone by serve this soup to her lunch guests? I then remembered some vintage luncheon plates way in the back of the top shelf of my kitchen cabinets. They have an indentation for a small matching bowl. I pulled my step stool over, climbed up and got one of the plates and bowls out. I then made a sandwich to go with my soup. And, suddenly, with just a little imagination, my boring Saturday lunch was transformed into a beautifully presented luncheon in a different time and place.
1 1/2 teaspoons salt (Use less if the chicken broth contains salt.)
1/4 teaspoon pepper
Put milk in a saucepan, and using medium heat, heat until it is scalded (just begins to boil); stir occasionally. Remove from heat and set aside.
Put the mushrooms, onions, and chicken broth in another saucepan, and bring to a boil using high heat. Reduce heat and simmer for 20 minutes. Remove from heat, and strain; keeping the liquid. (The vegetables can be discarded or served separately.
In the meantime, melt the butter in a large saucepan. Stir in the flour, salt, and pepper, then gradually add the mushroom broth while stirring constantly, Using medium heat bring to a boil while continuing to stir occasionally; then stir in the scalded milk and reheat until hot and steamy.
Note: This recipe is for a silky smooth mushroom soup, but if desired, the cooked chopped mushrooms and onions that were strained out when making the mushroom broth, can be stirred back into the soup for a more robust chunky soup.
I was intrigued by a hundred-year-old recipe for Grapefruit Pie, and decided to give it a try. The pie was bursting with a sunny grapefruit flavor. It reminded me of lemon meringue pie, but was a little less tart.
Here’s the original recipe:
Source: American Cookery (March, 1922)
Rather than squeezing a grapefruit to get juice to make the pie, I purchsed a bottle of grapefruit juice. A typical grapefruit contains about 3/4 cup of juice.. When I made this recipe, the pie filling was a little juicy, so when I updated the recipe I added an additional egg yolk, (The original recipe called for 2 yolks and 3 egg whites. Using an additional yolk eliminates the need to figure out what to do with an extra yolk.). I also added an additional 1/2 tablespoon of cornstarch when I updated the recipe to further thicken the filling.
Place water, sugar, cornstarch, salt, and grapefruit juice in a saucepan, stir until thoroughly mixed and smooth. Using medium heat, bring to a boil while stirring occasionally. Reduce heat and simmer for 5 minutes. Add a small amount of the hot mixture to the beaten egg yolks, while stirring constantly, and then slowly add to the contents in the saucepan while stirring constamtly. Remove from heat. If not smooth, stain the mixture. Allow the mixture to cool.
In the meantime, preheat oven to 400 ° F. and make the meringue. Place egg whites in a bowl, and beat the egg whites until they form stiff peaks. Gradually add 6 tablespoons sugar while continuing to beat; add the 2 teaspoons of grapefruit juice and beat. Then spoon on top of the pie and swirl. Place pie in the oven and bake for 8 – 10 minutes or until the meringue is lightly browned.
Some recipes don’t change across the years; others do. As tastes and preferences change, recipes are updated. In other cases, lack of availability of an ingredient might lead to tweaking of an old recipe. Also, for commercially-prepared foods, government regulations can affect their composition. Last week I was amazed to discover that the government regulated French Dressing for many years.
On January 13, the Wall Street Journal had an article titled “The U.S. Federal Government Deregulates French Dressing.” The government established the standard for French Dressing 72 years ago, and “according to the original 1950 standard, a French dressing should include vegetable oil, and a vinegar and/or lemon or lime juice, and could be seasoned with ingredients such as salt, sugar, tomato paste or puree, and spices such as mustard are paprika.”
This article made me remember the many French Dressing recipes that I’ve seen in hundred-year-old cookbooks over the years, and how those recipes differed from today’s seemingly ubiquitous creamy orange dressing. Back then the dressing was often more of a vinaigrette. Here are two French Dressing recipes from 1922 cookbooks:
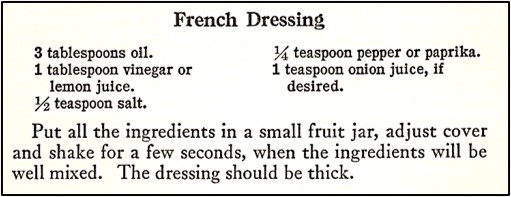
Source: Mrs. DeGraf’s Cook Book (1922)
Source: Good Housekeeping’s Book of Menus, Recipes, and Household Discoveries (1922)
I made the French Dressing in the photo using the first recipe.
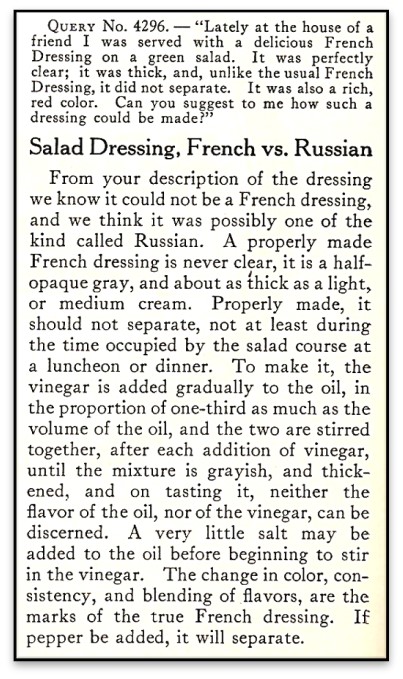
And, here is a 1922 magazine article that responds to a reader’s question about French Dressing. The response differentiates between French Dressing and Russian Dressing -though it is mostly focused on French Dressing:
Source: American Cookery (June/July, 1922)
Whew, my head is spinning. Who would have guessed that for a least a hundred years people have been giving lots of thought to exactly what comprises French Dressing?


 Some recipes don’t change across the years; others do. As tastes and preferences change, recipes are updated. In other cases, lack of availability of an ingredient might lead to tweaking of an old recipe. Also, for commercially-prepared foods, government regulations can affect their composition. Last week I was amazed to discover that the government regulated French Dressing for many years.