Hundred-Year-Old Chocolate Blancmange Recipe

cocoa-blanc-mange

There is an old saying that Blancmange should be wobbly but not as rubbery as a rubber ball.  I recently made a hundred-year-old recipe for Chocolate Blancmange, and using the criteria in the old saying, it was excellent. The Blancmange was rich and decadent, and trembled just a little.

Even though Blancmange is an old dessert, it was new to me; and this was the first time that I ever made this lovely molded dessert.

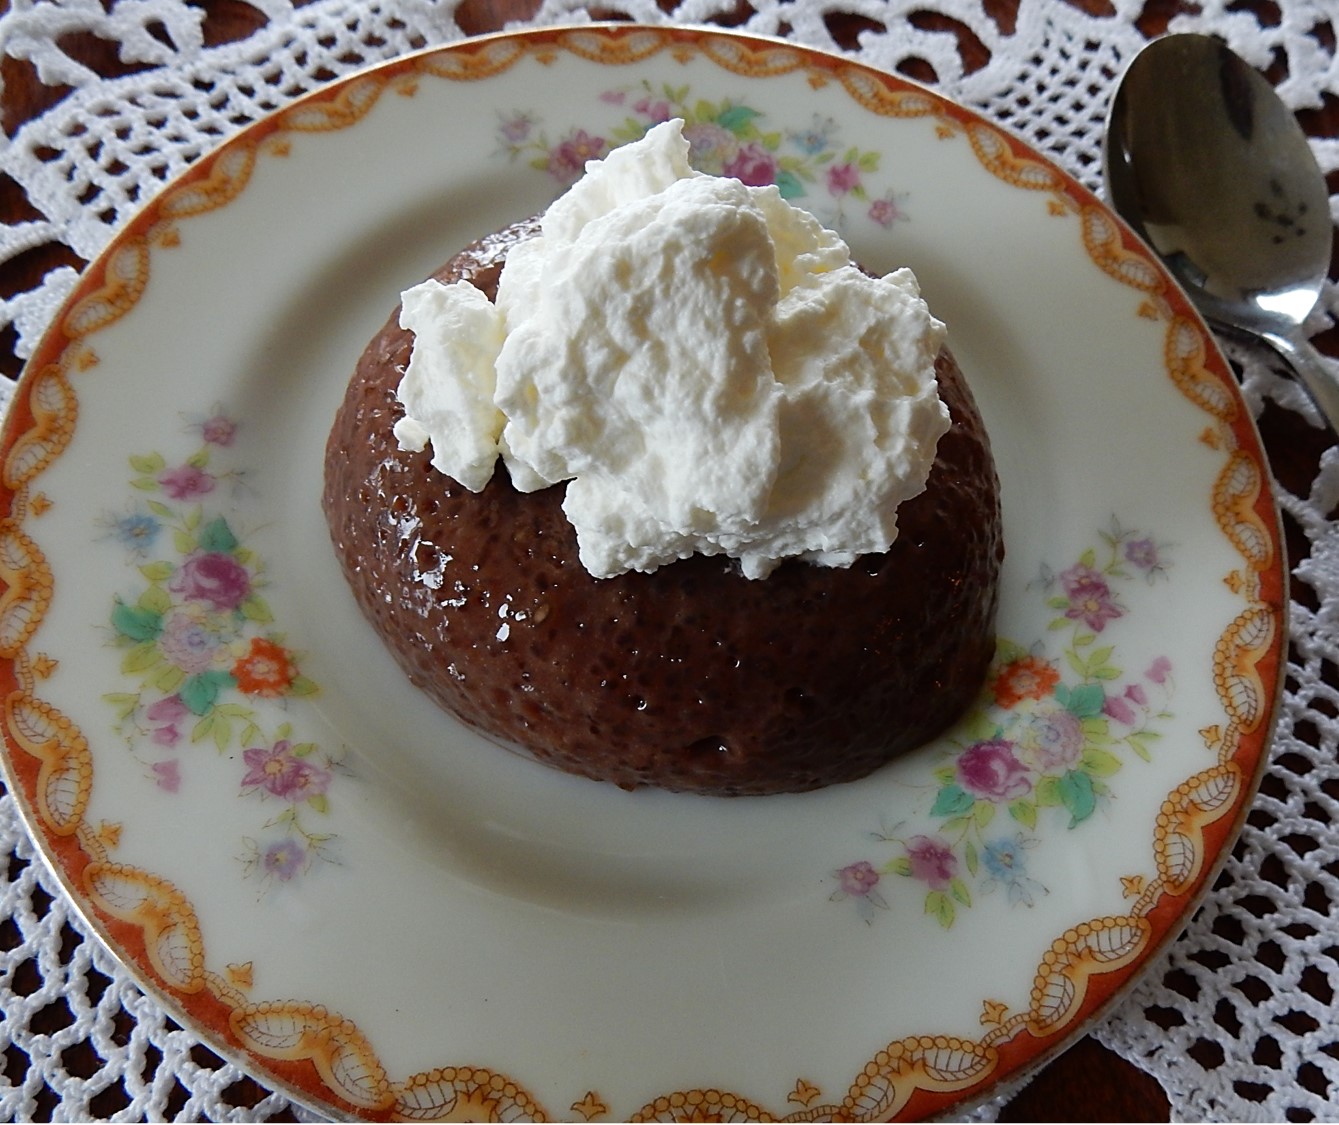
This recipe is a keeper. As my husband finished the Blancmange, he asked, “When are you going to make this again.?”

The old recipe was part of an  advertisement for Minute Tapioca.  (Yes, Minute Tapioca as been around for more than a hundred years).

Here’s the original recipe:

Source: Ladies Home Journal (May, 1916)

When I saw the illustration for the Blancmange, I realized that I actually owned some old dessert plates that once belonged to my grandmother that looked very similar to the ones in the picture. I hadn’t seen the plates in years, but I pulled a chair over to my highest kitchen cupboard, and climbed up. A few minutes later I’d found the plates. They weren’t identical to the ones in the drawing, but I had a lot of fun trying to semi-replicate the old picture.

The old recipe called this dessert “blanc mange.” I think that today, the two words are generally combined into one (blancmange),  so that is the way that I’ve spelled it.

Here’s the recipe updated for modern cooks:

Chocolate Blancmange

  • Servings: 5 - 6
  • Difficulty: moderate
  • Print

1/2 cup minute tapioca

1 cup sugar

1/4 cup cocoa

1/8 teaspoon salt

3 cups milk

1 teaspoon vanilla

whipped cream, optional

In a medium saucepan stir together the tapioca, sugar, cocoa, and salt. While stirring, slowly add the milk. Using medium heat, and while stirring constantly, bring to a boil. Reduce heat so that there is a slow rolling boil. Cook for an additional 5 minutes while stirring constantly. Be sure to stir to the very bottom of the pan because this mixture will easily burn. Remove from heat and stir in the vanilla.

Pour into individual molds. Custard cups work well as molds. Refrigerate for at least 3 hours.

To serve, set the molded dessert in a pan of hot water for a few seconds; then run a table knife around the edge of the mold to loosen and turn upside down on serving plate to unmold.

If desired, serve with whipped cream.

To make homemade whipped cream, Put 1 cup whipping cream in a mixing bowl. Add 2 tablespoons confectioner’s sugar. Whip until there are stiff peaks.

Cook’s note: I did not make the cocoa (hot chocolate) prior to making this recipe. It seemed unnecessary to use a two-step process.  Instead, I found a recipe for hot chocolate on a can of cocoa. I combined the dry ingredients in that recipe with the dry ingredients called for in the hundred-year-old Blancmange recipe. I then stirred in three cups of milk.  This streamlined process worked just fine.

1916 Jello Advertisement

Source: American Cookery (October, 1916)

They sure knew how to package Jell-O a hundred years ago. The “Safety Bag” would keep it “as pure and sweet” as the day it was made for years.

I checked the “best used by” date on a package of Jell-O in my cupboard. The date was November 16, 2014.  Time flies, and I don’t remember when I bought it, but I don’t think that it was real long ago.  In any case, I discarded the package . . .  sigh . . . I wish that modern Jell-O would keep for years like the old-time Jell-O in its Safety Bag.

Old-Fashioned Squash (Yeast) Bread

squash-bread

Have you ever “hidden” vegetables in food to get your kids to eat healthier? I thought that hiding vegetables was a recent trend, but when I made a hundred-year-old recipe for Squash Bread, I discovered that cooks have been hiding vegetables for a long time.

The Squash Bread had a rustic artesian look, a nice texture, and a sunny yellow tinge – but I couldn’t taste the squash in it. It just tasted like the typical homemade bread.

The verdict: If you want to hide vegetables in bread this recipe is worth a try; otherwise, just stick with your usual bread recipe.

Here’s the original recipe:

Source: Lowney's Cook Book (1912)
Source: Lowney’s Cook Book (1912)

Here’s the recipe updated for modern cooks:

Squash Bread

  • Servings: 2 loaves
  • Difficulty: moderate
  • Print

2 cups milk

2 packages dry yeast

5-6 cups flour

1 cup pureed winter squash (Butternut squash works well in this recipe.)

1 tablespoon shortening (or lard)

1 tablespoon butter

1 tablespoon sugar

2 teaspoons salt

Scald milk by heating in a sauce pan until the milk begins to steam and form bubbles; use medium heat and stir occasionally. Remove from heat before it comes to a boil. Let the scalded milk cool until it is lukewarm, then dissolve the yeast in the milk.

Put 2 cups flour, squash, shortening, butter, sugar,  salt, and the water and yeast mixture in a large mixing bowl. Beat until smooth. Add enough additional flour to make a soft dough. Turn out onto a lightly floured surface and knead until smooth and elastic (about 10 minutes).

Place in a greased bowl. Cover; let rise at room temperature until doubled in size (about 1 hour). Turn onto lightly floured surface and knead for an additional 5 minutes. Divide dough into two equal parts and shape into loaves. Place in 2 greased loaf pans, 9″ X 5″ X 3″, and cover. Let rise until doubled in size (about 30 minutes).

Bake loaves in 400° F. oven for 35 minutes or until lightly browned.

I always find old-time bread recipes particularly difficult to interpret because modern yeast is so different from what it was a hundred years ago. Back then it was not dried like the yeast that we generally use today. I guessed that 2 packages of dried yeast would be the equivalent of 1/2 cup (1/2 yeast cake) back then. This substitution worked just fine when I made this recipe.

100-Year-Old Church Supper Menu and Costs

Source: American Cookery (June/July, 1916)

Did you ever plan the menu for a meal with 200 people? . . . and ended up getting sticker shock at how much it would cost? According to a hundred-year-old magazine, a church supper for 200 people in 1916 would cost only $74.58. To keep the costs down, the menu did have a few limitations. For example, canned peas were listed as the main vegetable. But, on the other hand,  the person planning the menu did budget $3.50 for “help”.

We really should factor in inflation when looking at this old menu. According to an online inflation calculator, a dollar in 1916 is worth $22.22 today. So in today’s dollars, the total meal cost $1,657.17 or $8.29 per person – which, at least in my book, is still a very reasonably priced meal.

Hundred-Year-Old Bavarian Cabbage Recipe

bavarian-cabbage

I found a delightful Bavarian Cabbage recipe in a hundred-year-old magazine. This traditional German dish was refreshingly sweet-sour (more sour than sweet), and would be lovely served with sausages, roast beef, or pork. It tasted very authentic; and if I closed my eyes and listened hard enough, I could almost see myself sitting at an outdoor cafe on the banks of the Rhine on a cool October day while listening to merry Octoberfest music.

Here’s the original recipe.

Source: Ladies Home Journal (February, 1916)

Here’s how I updated the recipe for modern cooks:

Bavarian Cabbage

  • Servings: 4 - 5
  • Difficulty: easy
  • Print

1/2 head cabbage (6 cups) shredded cabbage

1 tablespoon bacon drippings or butter (I used bacon drippings.)

1 tablespoon onion, finely chopped

1/2 cup vinegar

1 tablespoon sugar

1 teaspoon salt

1/4 teaspoon white pepper

Using medium heat, melt  the bacon drippings (or butter) in a frying pan; add onions and cook until tender (but not browned). Add the vinegar, sugar, salt, and pepper, and stir to combine. Then add the shredded cabbage and stir; cover the pan and gently simmer for 20 minutes. Remove pan cover once or twice during cooking to make sure there is enough liquid; if too dry add enough water to keep from burning. (I did not need to add any water.)

I used less salt than the original recipe called for. One tablespoon of salt seemed like a lot – so I decided that it probably was a typo and instead used 1 teaspoon of salt. I also didn’t quite understand the last part of the old recipe about cold water (though I’m guessing that it was directing the cook to wash the cabbage prior to cooking).

Hundred-year-old Grapefruit Serving Suggestion

grapefruit-1

There’s a lovely suggestion for serving grapefruit in a hundred-year-old magazine. The membrane between the segments is removed, and a maraschino cherry (or other fruit) is added as a garnish.

When two of my children visited recently, I tried serving  grapefruit this way. The feedback very positive. Both agreed that the grapefruit was attractive and easy to eat.

Source: American Cookery (Boston Cooking School Magazine), March, 1916
Source: American Cookery (Boston Cooking School Magazine), April, 1916

Updated directions for modern cooks: Halve the grapefruit with a small paring knife; next cut around the edge of the grapefruit and around each segment, and then carefully remove several segments. With the knife cut the center membrane near where it is attached to the grapefruit rind, and then gently remove all of the membranes. After the membranes are removed, replace previously removed segments, and garnish with a maraschino cherry.

Interpreting a Hundred-Year-Old Peanut Butter Cutout Cookie Recipe

peanut-butter-cut-out-cookies

I love peanut butter cookies, so when I found a hundred-year-old recipe for peanut butter cut-out cookies I had to give it a try.

Here’s the original recipe:

peanut butter cut-out cookies
Source: American Cookery (March, 1917)

When I made this recipe, it quickly became apparent that something was wrong. When I combined all the ingredients, I had a thick batter instead of a dough–and there was no way I could roll it out. I wasn’t quite sure what was wrong with the original recipe, but I decided that the best way to salvage it was to add additional flour – lots of flour.  The resulting soft dough rolled out nicely.

The verdict: The cookies were nothing like modern peanut butter cookies, but if you can totally suspend expectations, the cookies were good. The old-fashioned cake-like cookies had a hint of peanut butter, and are lovely with milk or coffee.

Here’s the recipe updated for modern cooks:

Peanut Butter Cut-out Cookies

  • Servings: approximately 48 cookies
  • Difficulty: easy
  • Print

2 tablespoons butter, softened

1/2 cup peanut butter

1 cup sugar

1/2 cup milk

1 egg

1 2/3 cups flour

4 teaspoons baking powder

1/4 teaspoon salt

sugar

Preheat oven to 400° F. Place the  butter, peanut butter, and sugar in a mixing bowl, stir to combine. Stir in the egg and milk, then add the flour, baking powder, and salt. Stir until well-mixed. Refrigerate dough 1/2 hour or until chilled.

On well-floured surface, roll out dough to 1/8 inch thickness. Cut into desired shapes. Place on greased baking sheets. Sprinkle with sugar. Bake 9-11 minutes.