1921 Beliefs About the Benefits of Coffee

coffee in cupI’ve seen several hundred-year-old articles which state that coffee is bad for your health, so I was surprised to see information in a 1921 cookbook about the benefits of coffee. Here is what it said:

The stimulating property of coffee is due to the alkaloid caffeine, together with an essential oil. Like tea, it contains an astringent. Coffee is more stimulating than tea, although, weight for weight, tea contains about twice as much theine as coffee contains caffeine. The smaller proportion of tea used accounts for the difference. A cup of coffee with breakfast, and a cup of tea with supper, serve as a mild stimulant for an adult, and forms a valuable food adjunct, but should never be found in the dietary of a child or dyspeptic.

Coffee taken in moderation quickens action of the heart, acts directly upon the nervous system, and assists gastric digestion. Fatigue of body and mind are much lessened by moderate use of coffee; severe exposure to cold can be better endured by the coffee drinker.

In times of war coffee has proved more valuable than alcoholic stimulants to keep up the enduring power of soldiers. Coffee acts as an antidote for opium and alcoholic poisoning. Tea and coffee are much more readily adsorbed when taken on an empty stomach; therefore this should be avoided except when used for medicinal purposes. Coffee must be taken in moderation; its excessive use means palpitation of the heart, tremor, insomnia, and nervous prostration.

The Boston Cooking-School Cook Book (1921)


What Do Drawings and Pencil Marks Tell Us About a Book’s Original Owner?

drawing in old textbook
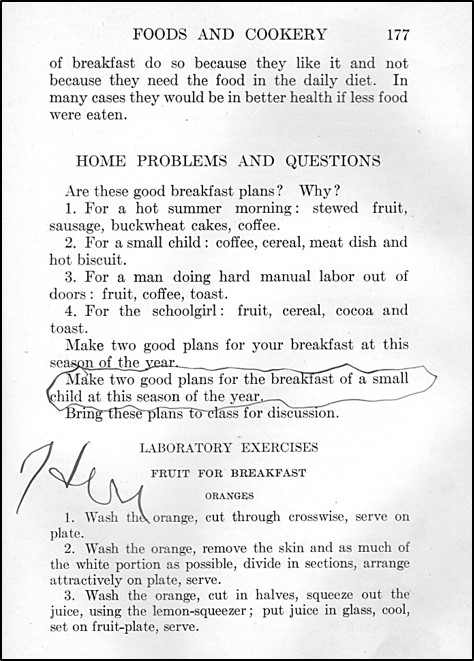
Sometimes old books provide clues about the original owner. For example, I have a 1921 home economics textbook called Elementary Home Economics. It was written by Mary Lockwood Matthews. The book itself is fascinating. It’s fun to see what students learned a hundred years ago – as well as to see how recipes, and cooking techniques and equipment, have changed across the years. Drawing in old textbook

But what I really enjoy about this book are the drawings and pencil marks made by a girl (and back then it would have been a girl) who once used the book. Whenever I open the book I spend many minutes lingering over the drawings. Where did the girl live? What was her family like? Was she a good student? Did she sometimes frustrate her teacher? Was she quiet?. . . or perhaps a very popular student?

pencil marks in old textbook

Lemon Snow with Custard Sauce

Lemon Snow with Custard Sauce

During the summer heat, cool desserts are the best. So when I saw a hundred-year-old recipe for Lemon Snow, I decided to give it a try. The Lemon Snow is served with Custard Sauce, and, if desired, could also be topped with Whipped Cream. I skipped the whipped cream.

The Lemon Snow was light and had a sunny, lemony flavor. The creamy Custard Sauce paired nicely with the Lemon Snow.

Here are the original recipes:

Recipe for Lemon Snow
Source: The Science of Food and Cookery (1921)
recipe for custard sauce
Source: The Science of Food and Cookery (1921)

I put the Lemon Snow in custard cups. It may be possible to remove the chilled Lemon Snow from the cups (molds) for serving, but I served the chilled dessert in the cups.  When I made this recipe, I served the Lemon Snow with Custard Sauce, but I skipped the whipped cream.

Since hot liquid is stirred into the beaten egg whites, the egg whites may be largely cooked, but I used a pasteurized egg for extra safety.

Here’s the recipe updated for modern cooks:

Lemon Snow with Custard Sauce

  • Servings: 2 - 3
  • Difficulty: moderate
  • Print

Lemon Snow

1/2 cup sugar

2 1/2 tablespoons cornstarch

1 egg white

dash of salt

3/4 cup water

3 tablespoons lemon juice

grated rind of 1/2 lemon

Custard Sauce, if desired

whipped cream, if desired

Put the sugar and cornstarch in a bowl; stir to combine. Set aside.

Put the egg white  and the dash of salt in a bowl; beat until stiff. Set aside.

Put the water, lemon juice, and lemon rind in a sauce pan. Using medium heat, bring to a boil. Remove from heat and strain the hot liquid.

Slowly pour the strained liquid over the sugar and cornstarch mixture. Stir until smooth. Return this mixture to the saucepan, and bring to a boil using medium heat while stirring constantly.

Remove from the heat and slowly pour over the beaten eggs whites while using a whisk to combine.

Rinse 2 or 3 custard cups with water. Pour the Lemon Snow mixture into the wet cups. Put in the refrigerator to chill (at least 2 hours).

If desired, serve with Custard Sauce or Whipped Cream.

Custard Sauce

2/3 cup milk

1 egg yolk

1 teaspoon sugar

3-4 drops (a dash) of vanilla

Put the egg yolk and sugar into a small bowl; beat until smooth. Set aside.

Put milk in a saucepan. Using medium heat, heat until hot and steamy while stirring constantly. Put a small amount of the lot liquid in the bowl with the egg yolk mixture while rapidly stirring. Then slowly add the egg mixture into the hot milk while stirring constantly. Continue cooking, while stirring, until the hot mixture thickens slightly and coats a spoon. Remove from heat and stir in the vanilla. Strain and then put into a bowl; chill in the refrigerator.

http://www.ahundredyearsago.com

Why Lemon Pies Become Watery

slice of lemon meringue piePies sometimes don’t turn out quite as intended, and cooks both today and a hundred years ago try to figure out why. In a question and answer column in the November, 1921 issue of American Cookery, a reader asked:

Will you tell me in your paper why my Lemon Pies become watery when I return them to the oven to brown the meringue?

The answer was:

A lemon pie may become watery when put in the oven to brown the meringue, if it is left in the oven too long; or it may water because the filling was not sufficiently cooked before putting into the pastry shell, or it may be from an insufficiency of flour being used in making the filling. If you had told us just how your pies are made, we would be better able to answer your question.


Old-fashioned Bread Griddlecakes

Bread griddlecakes on plate

Food was a major expense for many families a hundred years ago, and cooks tried to minimize food waste. Bread – often homemade – sometimes went stale before it was eaten, and rather than just throwing the stale bread out, they looked for ways to use it.

I recently came across a hundred-year-old recipe for Bread Griddlecakes that called for using stale bread crumbs (and relatively little flour), and I just had to give it a try. The Bread Griddlecakes turned out well. This recipe made relatively thin pancakes that had a nice flavor. If I hadn’t made them myself, I never would have guessed that they contained breadcrumbs. Maybe I shouldn’t have been surprised since bread is made out of flour – so at some basic level this recipe contains similar ingredients to may typical recipes.

Here’s the original recipe:

Recipe for Bread Griddlecakes
Source: The Boston Cooking-School Cook Book (1921 Edition)

Modern bread (at least store-bought bread) doesn’t seem to go stale, so I just used bread that wasn’t stale when I made this recipe.

I’m not sure why the old recipe called for scalded milk, so I used milk that I didn’t scald. It worked fine.

It’s fascinating how words change across the years. The original recipe title had a hyphen between “griddle” and “cake.” Today “griddlecake” is generally written as one word – or people just call them pancakes.

Here’s the recipe updated for modern cooks:

Bread Griddlecakes

  • Servings: 2 - 3
  • Difficulty: easy
  • Print

1 1/2 cups fine bread crumbs (I tore 3 bread slices into very small pieces.)

1 1/2 cups milk

2 tablespoons butter, melted

2 eggs

1/2 cup flour

1/2 teaspoon salt

4 teaspoons baking powder

Put the bread crumbs and milk in a mixing bowl, then soak until the crumbs are soft (10 – 15 minutes). Add butter, eggs, flour, salt, and baking powder; beat to combine.

Heat a lightly greased griddle to a medium temperature, then pour or scoop batter onto the hot surface to make individual griddlecakes. Cook on one side, then flip and cook other side.

http://www.ahundredyearsago.com

Hundred-year-old Directions for Dressing a Chicken

Dressed ChickenMy mother knew how to dress a chicken. I’m (happily) clueless about how to even approach dressing a bird. A hundred years ago,  dressing a chicken was apparently considered such an important skill that a home economics textbook contained directions for how to do it. Times sure have changed!

In case you ever need to dress a chicken, here are the directions:

To Dress a Chicken

  1. Remove feathers by pulling them out, after plunging the fowl into boiling water and holding it there for a moment or two. Fowls are sometimes picked without scalding, if the work can be done immediately after they are killed.
  2. Singe the plucked fowl by holding it in a flame of gas or burning paper, being sure that all parts are exposed during the process so that all hairs are removed.
  3. Cut off the head, if it has not been removed. The neck may be removed by pushing back the skin and cutting it off.
  4. Remove the feet in cutting and breaking the legs at the joints.
  5. Make an incision one inch above the vent and crosswise between the legs. Draw out the intestines and other organs carefully, cutting away the vent. Remove from the mass the heart, liver and gizzard, being careful not to break the gall bladder which lies under the liver. Cut the gall bladder away carefully.
  6. Remove the skin from around the gizzard; open the gizzard and remove the inner skin and contents.
  7. Wash the liver, gizzard and heart, squeezing the latter to remove any blood. These organs are known as the “giblets.”
  8. The crop and windpipe may be removed at the neck. Do this without breaking the crop, or tearing the skin at the neck.
  9. Remove all pinfeathers with a sharp-pointed small knife. Remove the oil bag from the tail.
  10. Wash the chicken well in cold water, both inside and out. Dry  with a cloth. The fowl is now ready to be used from baking.
  11. When a fowl is to be cut into pieces, as for stewing, it is usually convenient to remove the wings and legs before removing the intestines and other organs from the body.

Poultry should always be allowed to stand several hours after dressing before it is cooked.

Elementary Home Economics (1921) by Mary Lockwood Matthews

Hundred-Year-Old Directions for Frying Bacon

Baking frying in a pan

Some foods have retained their popularity across the years. Bacon is one of those foods. Here are hundred-year-old directions for frying bacon:

To Fry Bacon

Use a thick, or what is called a well-seasoned, frying pan. Put the slices of bacon in the cold pan and set over a slow fire until cooked, pour off the fat and set aside, not mixing it with other frying fats, for it is best kept separate for cooking eggs and frying slices of graham bread. Put some of the slices of bacon back into the pan to crisp, for those who like it that way, and toss about. 

American Cookery (August/September, 1921)