Old-fashioned Creole Eggs

Creole Eggs and Toast

I recently found a hundred-year-old recipe for Creole Eggs, which are shirred (baked) eggs topped with tomato, green pepper, and onion. Shirred eggs are surprisingly easy to make. And, when topped with the tomato mixture, they are absolutely delightful.

Here’s the original recipe:

Recipe for Creole Eggs
Source: Good Housekeeping’s Book of Recipes and Household Discoveries (1920)

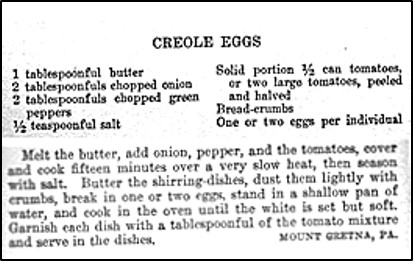
I found this recipe confusing – though the eggs turned out well. It is an odd mixture of very specific directions – “2 tablespoonfuls green pepper”; “Garnish each dish with a tablespoonful of the tomato mixture.” And, very general directions – “one to two eggs per individual” with no clue how many individuals the recipe was supposed to serve. If only 1 tablespoon of the tomato mixture was put on top of the eggs in each ramekin, it seems like this recipe would make enough tomato mixture for a lot of eggs. In the end, I decided that another option would be to just make fewer servings and use more of the tomato mixture per serving (2+ tablespoons).

It also was not clear how big “two large tomatoes” were supposed to be – though the comment that 1/2 can of tomatoes (a 1 pound can?) could be substituted for the fresh tomatoes made me think that it was calling for about a cup of canned tomatoes. The statement that just the “solids” from a can of tomatoes were supposed to be used, also made me think that the recipe was calling for about 1/2 cup of canned tomatoes after they were strained. And, that if fresh tomatoes are used (which is what I used), that there should be about 1/2 cup of diced tomatoes.

I used clear glass ramekins, and didn’t grease them or “dust” with breadcrumbs, because I was concerned that the photo would not look very nice with the breadcrumbs around the edge of the ramekin. I didn’t have any problems with the egg sticking excessively to the edge of the ramekins, so don’t think that it is necessary to grease and dust them. I also reduced the salt from 1/2 teaspoon to 1/4 teaspoon, since the original amount called for seemed like a lot.

Bottom line – This recipe appears to be an attempt to provide exact measurements for a recipe that actually is very flexible. It’s not important to have exact amounts of onion, green, pepper, or tomatoes – just make an amount that seems appropriate for the desired number of servings.

Here’s the recipe updated for modern cooks:

Creole Eggs

  • Servings: 4
  • Difficulty: moderate
  • Print

4 – 8 eggs (1 – 2 eggs per serving)

1 tablespoon butter

2 tablespoons onion, chopped

2 tablespoons green pepper, chopped

1/4 teaspoon salt

2 tomatoes, diced (about 1/2 cup) or 1 cup of canned tomatoes, strained (measure before straining) – I used fresh tomatoes.

Melt butter in a saucepan. Add onion and green pepper; cook until tender. Stir in the tomatoes and continue cooking until the tomatoes are thoroughly cooked; stir occasionally while cooking. Stir in salt.

In the meantime, preheat oven to 400° F. Break 1 – 2 eggs into each of four ramekins. Place in a shallow pan that contains about 1 inch of hot water. Put in oven and bake until the white is set, and yolk is the desired firmness. (About 10-15 minutes.) Remove from oven and remove the ramekins from the pan with water.

Spoon the tomato mixture on top of the cooked eggs (about 2 tablespoons per ramekin), and immediately serve the eggs.

http://www.ahundredyearsago.com

Chocolate Animals (Chocolate Animal Crackers)

Chocolate-covered animal crackers on plateWhen were animal crackers invented? Until I saw a recipe for Chocolate Animals (Chocolate Animal Crackers) in a hundred-year-old cookbook, I’d never given it any thought.

I knew that animal crackers have been around for a long time (or in other words, since I was a child), but I would have guessed that they were invented mid-century. However, the recipe in the 1920 cookbook suggests that they have been around much longer.

This led me to check what it said in Wikipedia. I was surprised to discover that animal crackers have been around since the late 1800’s. It also said:

Animal biscuit crackers were made and distributed under the National Biscuit Company banner. In 1902, animal crackers officially became known as “Barnum’s Animals” and evoked the familiar circus theme of the Barnum and Bailey Circus. Later in 1902, the now-familiar box was designed for the Christmas season with the innovative idea of attaching a string to hang from the Christmas tree.

Here’s the original recipe:

Recipe for Chocolate Animals
Source: Good Housekeeping’s Book of Recipes and Household Discoveries (1920)

I used a small (2.125 ounce box) of animal crackers when I made this recipe, so I only needed a little chocolate. If I’d made more Chocolate Animal Crackers I would have need to use more. chocolate.

The old recipe describes a process for making tempered chocolate. This is necessary to get a smooth, glossy coating – or chocolate melting wafers or chocolate candy coating can be used. I generally try to be true to old recipes – but ended up deciding that making a small batch of a fun recipe was the time to make an exception – so I went with the melting chocolate waters.

Here’s the recipe updated for modern cooks:

Here’s the recipe updated for modern cooks:

Chocolate Animals (Chocolate Animal Crackers)

animal crackers

chocolate melting wafers / chocolate coating

Put a piece of waxed paper on a plate. Set aside.

Using the microwave or low heat on the stove, melt enough chocolate to coat the animal crackers. (If a small 2.125 ounce box of crackers is used, melt about 1/2 cup of chocolate.) Dip the animal crackers in the melted chocolate, and then place on the waxed paper-covered plate.

Let the chocolate thoroughly cool and harden before serving. (I put the plate of chocolate-covered crackers in the refrigerator for a few minutes to quickly harden the chocolate.)

http://www.ahundredyearsago.com

Old-fashioned Tomato Fritters

3 tomato fritters on plateThe tomatoes are rapidly ripening in the garden (and I’m getting close to having excess tomatoes, if such a thing is possible), so I looked for a hundred-year-old tomato recipe. And, I think that found a winner. Old-fashioned Tomato Fritters make a tasty appetizer or side dish.  The fritters are crispy and take only a few minutes to make.

Here’s the original recipe:

tomato fritter recipe
Source: American Cookery (March, 1920)

Here’s the recipe updated for modern cooks:

Tomato Fritters

  • Servings: 4 - 6
  • Difficulty: moderate
  • Print

2 cups flour

3 teaspoons baking powder

1/2 teaspoon salt

1/4 teaspoon pepper

1 egg

1/2 cup water or meat/vegetable stock (I used water.)

1 tablespoon parsley, finely chopped

2 – 3 medium tomatoes, finely chopped (or use 1 1/2 cups canned tomatoes)

1 tablespoons grated cheese (I used Parmesan cheese.)

Shortening or cooking oil

Put flour, baking powder, salt, pepper, egg, and water or stock in a mixing bowl; beat until thoroughly combined. Stir in parsley and tomatoes. Add grated cheese and continue stirring until combined.

Melt shortening or cooking oil in a skillet. Using a tablespoon, drop mixture by spoonfuls into the hot shortening or oil. Fry until lightly browned; flip and cook other side. Drain on paper towels.

If desired, serve with a tomato sauce dip.

http://www.ahundredyearsago.com

Old-fashioned Pineapple Bavarian Cream

Molded Pineapply Bavarian Cream on Plate

During these hot August days, I love light, refreshing desserts. And, I found a wonderful hundred-year-old recipe that fits the bill. Pineapple Bavarian Cream is delicious, and has just the right balance of sweetness and tartness,

Here is the original recipe:

Recipe for Pineapple Bavarian Cream
Source: School and Home Cooking (1920) by Carlotta C. Greer

When I made the recipe, I used a little less water than called for in the original recipe because, when I make molded gelatin-based desserts, I tend to have problems with the mixture not getting firm enough.

Here’s the recipe updated for modern cooks:

Pineapple Bavarian Cream

  • Servings: 4 - 5
  • Difficulty: moderate
  • Print

Note: This recipe makes about 3 cups. I doubled this recipe when I made it because I wanted to use a 6-cup mold.

1 packet (0.25 ounce) of unflavored gelatin

1/4 cup cold water

1 small can (8 ounce) can of crushed pineapple

water

1/2 cup sugar

dash salt

2 tablespoons lemon juice

1/2 cup whipping cream

Place the cold water in a small bowl; then sprinkle the gelatin over the water. Let the gelatin absorb the water and soften for a few minutes.

In the meantime, drain the juice from the pineapple. Place the juice in a measuring cup, and add enough water to make it 1 cup. Place the pineapple juice and water mixture in a saucepan, and heat to boiling using medium high heat. Reduce heat to low. Add the softened gelatin, and stir until dissolved. Add the sugar and salt and continue stirring until the sugar is dissolved. Remove from heat, then stir in the lemon juice.  Chill until the mixture just begins to thicken.

In the meantime, put the whipping cream in a bowl, and beat until soft peaks form.

Once the gelatin mixture has begun to thicken, stir in the crushed pineapple and then fold the whipped cream into the mixture.

Spoon into a 3-4 cup mold (or spoon into individual serving dishes or cups), and chill until firm (at least 4 hours).

To serve (if molded): Quickly dip the mold in hot water, then unmold onto serving plate.

http://www.ahundredyearsago.com

Hundred-year-old Recipe for Boiled Corn (Corn on the Cob)

corn on the cob on plate

I see some very basic recipes (I tend to call them non-recipes) for simple foods in both modern and hundred-year-old cookbooks. Apparently both in 2020 and 1920 some cooks had simple questions – like how do you cook corn on the cob?

In 1920 corn on the cob was referred to boiled corn. And, here are directions for making it:

Recipe for boiled corn
Source: The New Royal Cook Book (1920)

When I made the recipe I skipped the suggestion to put the Boiled Corn on a napkin. Somehow it just didn’t seem necessary – and it seemed like the napkin might get soaked from any water that dripped off the corn.

Here is the recipe updated for modern cooks:

Boiled Corn (Corn on the Cob)

  • Difficulty: easy
  • Print

Husk corn and remove all silk. Fill large pot 2/3’s full with water. Bring water to a boil using high heat. Place husked corn in the boiling water, and boil rapidly for 5 minutes. Use tongs to remove the corn from the water.

http://www.ahundredyearsago.com

Old-fashioned Fried Eggplant, Julienne Style

Fried Eggplant, Julienne Style and Steak on Plate

The eggplants were beautiful at the farmers’ market, so I bought one – and then started searching for a hundred-year-old eggplant recipe.

I found a nice recipe for Fried Eggplant, Julienne Style. The eggplant strips were tasty, and a nice alternative to French fried potatoes.

Here’s the original recipe:

Recipe for Fried Eggplant, Julienne Style
Source: Balanced Daily Diet (1920) by Janet McKenzie Hill

Here’s the recipe updated for modern cooks:

Fried Eggplant, Julienne Style

  • Servings: 4-6
  • Difficulty: moderate
  • Print

1 eggplant

salt & pepper

1/2 cup flour

shortening or cooking oil

Peel eggplant, and cut into strips approximately 4 inches long, and 1/2 inch thick and wide. Sprinkle with salt and pepper. Put the flour in a shallow bowl, then roll the eggplant strips in the flour.

Heat 1/2 inch of shortening or oil in a large frying pan until hot. Place the floured eggplant strips in the pan in a single layer. Depending upon pan size, the eggplant strips may need to be cooked in several batches. Fry for about two minutes or until the bottom side of each piece is lightly browned, then gently turn and fry until the other side is browned. Remove from pan and drain on paper towels. Serve immediately.

http://www.ahundredyearsago.com

Old-fashioned Crusty French Bread Recipe

Recipe for Crusty French Bread
Source: American Cookery (April, 1920)

My grocery store has yeast! It’s the first time that I’ve seen it in months, and I knew exactly which recipe I wanted to make – a hundred-year-old recipe for Crusty French Bread. Several years ago I’d tried to make French Bread – and I’d been disappointed in the results – so I wondered if an old-time recipe might make a more authentic French Bread.

As part of the rising process, the hundred-year-old recipe called for putting the bread dough in lukewarm water, and then waiting for it to float. I had my doubts, but it was easy to do – and I was very pleased with the results.

The Crusty French Bread turned out wonderfully. It was crusty on the outside, and soft and chewy on the inside. This recipe is a keeper, and I feel certain that I’ll make it again.

2 loaves of Crusty French Bread
Source: American Cookery (April, 1920)

Here’s the original recipe:

I had to use more water than the recipe called for when I made the dough by mixing water, yeast, and flour. The recipe called for 1/2 cup of water, but it was not enough to make the dough cling together.

And, here’s the recipe updated for modern cooks:

Crusty French Bread

  • Servings: 2 loaves
  • Difficulty: moderate
  • Print

1 packet dry active yeast

1/2 – 3/4 cup lukewarm water + 1/2 cup lukewarm water + additional lukewarm water for use during the rising process (all the lukewarm water should be 110 – 115° F.)

2 cups flour + 1 1/2 – 2 cups flour

1 teaspoon salt

milk, melted butter, or a sugar and water mixture (to brush on the top of the loaves) (I used milk.)

Blend the yeast with a little water in a measuring cup, and when smooth, add additional lukewarm water to make 1/2 cup. Put 2 cups flour in a mixing bowl, add the water and yeast mixture, and stir to combine. If it is too dry to knead, add additional lukewarm water until it can be kneaded. (It should be dryer than for most bread doughs). Put the mixture on a prepared surface and knead to form a stiff dough (about 5 minutes). Form the dough into a ball, and score it a couple of times across the top with a knife.

In the meantime, fill a Dutch oven or other large pan 2/3 full with lukewarm water. Put the ball of dough in the water with the scored side up. If the water does not cover the dough add additional water. Cover, and let the sit in a warm place until the dough swells and floats on top of the water (about 15-20 minutes). Lift the ball out of the pan using a large skimmer.

In a mixing bowl, dissolve the salt in 1/2 cup of lukewarm water, then add the ball of dough. Add 1 1/2 cups flour. (If needed, add additional flour to make the dough the right consistency for kneading.) Put the dough on a prepared surface and knead until smooth and elastic (about 5 minutes). Put in a large bowl, cover with a cloth, and place in a warm spot that is free from drafts until doubled in size (about 1 1/2 hours).

Divide dough into two equal parts, and shape into long narrow loaves. (I rolled each part into a rectangle approximately 9″ X 20″, then rolled starting from one of the long sides.) Place on a greased baking sheet. Score with light slanting strokes of a knife across the top of each loaf. Brush with milk, melted butter, or a mixture and water and sugar. Let rise until doubled (about 30 minutes).

In the meantime preheat oven to 400° F. Put the bread in the oven for 20 – 30 minutes or until lightly browned.

http://www.ahundredyearsago.com