Lemon Snow with Custard Sauce

Lemon Snow with Custard Sauce

During the summer heat, cool desserts are the best. So when I saw a hundred-year-old recipe for Lemon Snow, I decided to give it a try. The Lemon Snow is served with Custard Sauce, and, if desired, could also be topped with Whipped Cream. I skipped the whipped cream.

The Lemon Snow was light and had a sunny, lemony flavor. The creamy Custard Sauce paired nicely with the Lemon Snow.

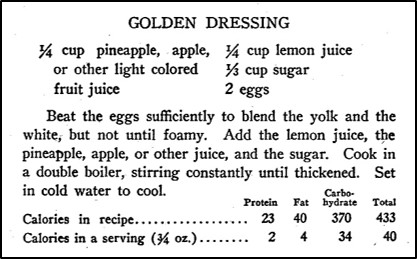
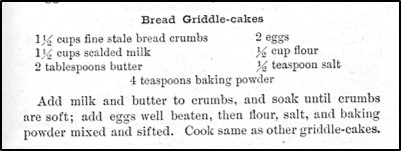
Here are the original recipes:

Recipe for Lemon Snow
Source: The Science of Food and Cookery (1921)
recipe for custard sauce
Source: The Science of Food and Cookery (1921)

I put the Lemon Snow in custard cups. It may be possible to remove the chilled Lemon Snow from the cups (molds) for serving, but I served the chilled dessert in the cups.  When I made this recipe, I served the Lemon Snow with Custard Sauce, but I skipped the whipped cream.

Since hot liquid is stirred into the beaten egg whites, the egg whites may be largely cooked, but I used a pasteurized egg for extra safety.

Here’s the recipe updated for modern cooks:

Lemon Snow with Custard Sauce

  • Servings: 2 - 3
  • Difficulty: moderate
  • Print

Lemon Snow

1/2 cup sugar

2 1/2 tablespoons cornstarch

1 egg white

dash of salt

3/4 cup water

3 tablespoons lemon juice

grated rind of 1/2 lemon

Custard Sauce, if desired

whipped cream, if desired

Put the sugar and cornstarch in a bowl; stir to combine. Set aside.

Put the egg white  and the dash of salt in a bowl; beat until stiff. Set aside.

Put the water, lemon juice, and lemon rind in a sauce pan. Using medium heat, bring to a boil. Remove from heat and strain the hot liquid.

Slowly pour the strained liquid over the sugar and cornstarch mixture. Stir until smooth. Return this mixture to the saucepan, and bring to a boil using medium heat while stirring constantly.

Remove from the heat and slowly pour over the beaten eggs whites while using a whisk to combine.

Rinse 2 or 3 custard cups with water. Pour the Lemon Snow mixture into the wet cups. Put in the refrigerator to chill (at least 2 hours).

If desired, serve with Custard Sauce or Whipped Cream.

Custard Sauce

2/3 cup milk

1 egg yolk

1 teaspoon sugar

3-4 drops (a dash) of vanilla

Put the egg yolk and sugar into a small bowl; beat until smooth. Set aside.

Put milk in a saucepan. Using medium heat, heat until hot and steamy while stirring constantly. Put a small amount of the lot liquid in the bowl with the egg yolk mixture while rapidly stirring. Then slowly add the egg mixture into the hot milk while stirring constantly. Continue cooking, while stirring, until the hot mixture thickens slightly and coats a spoon. Remove from heat and stir in the vanilla. Strain and then put into a bowl; chill in the refrigerator.

http://www.ahundredyearsago.com

Why Lemon Pies Become Watery

slice of lemon meringue piePies sometimes don’t turn out quite as intended, and cooks both today and a hundred years ago try to figure out why. In a question and answer column in the November, 1921 issue of American Cookery, a reader asked:

Will you tell me in your paper why my Lemon Pies become watery when I return them to the oven to brown the meringue?

The answer was:

A lemon pie may become watery when put in the oven to brown the meringue, if it is left in the oven too long; or it may water because the filling was not sufficiently cooked before putting into the pastry shell, or it may be from an insufficiency of flour being used in making the filling. If you had told us just how your pies are made, we would be better able to answer your question.


Old-fashioned Bread Griddlecakes

Bread griddlecakes on plate

Food was a major expense for many families a hundred years ago, and cooks tried to minimize food waste. Bread – often homemade – sometimes went stale before it was eaten, and rather than just throwing the stale bread out, they looked for ways to use it.

I recently came across a hundred-year-old recipe for Bread Griddlecakes that called for using stale bread crumbs (and relatively little flour), and I just had to give it a try. The Bread Griddlecakes turned out well. This recipe made relatively thin pancakes that had a nice flavor. If I hadn’t made them myself, I never would have guessed that they contained breadcrumbs. Maybe I shouldn’t have been surprised since bread is made out of flour – so at some basic level this recipe contains similar ingredients to may typical recipes.

Here’s the original recipe:

Recipe for Bread Griddlecakes
Source: The Boston Cooking-School Cook Book (1921 Edition)

Modern bread (at least store-bought bread) doesn’t seem to go stale, so I just used bread that wasn’t stale when I made this recipe.

I’m not sure why the old recipe called for scalded milk, so I used milk that I didn’t scald. It worked fine.

It’s fascinating how words change across the years. The original recipe title had a hyphen between “griddle” and “cake.” Today “griddlecake” is generally written as one word – or people just call them pancakes.

Here’s the recipe updated for modern cooks:

Bread Griddlecakes

  • Servings: 2 - 3
  • Difficulty: easy
  • Print

1 1/2 cups fine bread crumbs (I tore 3 bread slices into very small pieces.)

1 1/2 cups milk

2 tablespoons butter, melted

2 eggs

1/2 cup flour

1/2 teaspoon salt

4 teaspoons baking powder

Put the bread crumbs and milk in a mixing bowl, then soak until the crumbs are soft (10 – 15 minutes). Add butter, eggs, flour, salt, and baking powder; beat to combine.

Heat a lightly greased griddle to a medium temperature, then pour or scoop batter onto the hot surface to make individual griddlecakes. Cook on one side, then flip and cook other side.

http://www.ahundredyearsago.com

Hundred-year-old Directions for Dressing a Chicken

Dressed ChickenMy mother knew how to dress a chicken. I’m (happily) clueless about how to even approach dressing a bird. A hundred years ago,  dressing a chicken was apparently considered such an important skill that a home economics textbook contained directions for how to do it. Times sure have changed!

In case you ever need to dress a chicken, here are the directions:

To Dress a Chicken

  1. Remove feathers by pulling them out, after plunging the fowl into boiling water and holding it there for a moment or two. Fowls are sometimes picked without scalding, if the work can be done immediately after they are killed.
  2. Singe the plucked fowl by holding it in a flame of gas or burning paper, being sure that all parts are exposed during the process so that all hairs are removed.
  3. Cut off the head, if it has not been removed. The neck may be removed by pushing back the skin and cutting it off.
  4. Remove the feet in cutting and breaking the legs at the joints.
  5. Make an incision one inch above the vent and crosswise between the legs. Draw out the intestines and other organs carefully, cutting away the vent. Remove from the mass the heart, liver and gizzard, being careful not to break the gall bladder which lies under the liver. Cut the gall bladder away carefully.
  6. Remove the skin from around the gizzard; open the gizzard and remove the inner skin and contents.
  7. Wash the liver, gizzard and heart, squeezing the latter to remove any blood. These organs are known as the “giblets.”
  8. The crop and windpipe may be removed at the neck. Do this without breaking the crop, or tearing the skin at the neck.
  9. Remove all pinfeathers with a sharp-pointed small knife. Remove the oil bag from the tail.
  10. Wash the chicken well in cold water, both inside and out. Dry  with a cloth. The fowl is now ready to be used from baking.
  11. When a fowl is to be cut into pieces, as for stewing, it is usually convenient to remove the wings and legs before removing the intestines and other organs from the body.

Poultry should always be allowed to stand several hours after dressing before it is cooked.

Elementary Home Economics (1921) by Mary Lockwood Matthews

Pineapple and Strawberry Salad with Golden Dressing

Bowl of Strawberry and Pineapple Salad

Fruit salad is perfect for hot summer days, so I was thrilled to find a delightful hundred-year-old recipe for Pineapple and Strawberry Salad. The fruits are paired with a sunny dressing that contains lemon juice, and pineapple or other fruit juices.

Here is the original recipe:

Recipe for Pineapple and Strawberry Salad
Source: The New Cookery (1921) by Lenna Frances Cooper

And, here is the original recipe for Golden Dressing:

Recipe for Golden Dressing
Source: The New Cookery (1921) by Lenna Frances Cooper

Three-fourths cup of Golden Dressing seemed like a lot, so I used about 1/3 cup which seemed like plenty.

Here’s the recipe updated for modern cooks:

Pineapple and Strawberry Salad with Golden Dressing

  • Servings: 3 - 4
  • Difficulty: moderate
  • Print

2 cups diced fresh pineapple (dice into bite-sized pieces)

1 cup strawberries (cut into half – or quarters if the strawberries are large)

1/3 cup Golden Dressing – use more if desired

Put pineapple and strawberries in a bowl. Add Golden Dressing and stir gently to coat the fruit with the dressing.

Golden Dressing

2 eggs

1/4 cup pineapple juice, apple juice, or other light-colored fruit juice

1/4 cup lemon juice

1/3 cup sugar

Beat eggs for the yolks and whites until combined (but not foamy). Add the remaining ingredients, and beat until mixed. Put in a saucepan and cook using medium heat until the dressing thickens; stir constantly while cooking. Remove from heat and strain. Put in the refrigerator to cool. May be stored for several days.

http://www.ahundredyearsago.com

Gingered Rhubarb and Baked Rice Pudding

Gingered Rhubarb and Rice Pudding

Food preferences change across the years. Some foods increase in popularity over time, while other foods that were once common are now seldom made. As I work on this blog, I often think about food fads and trends over the past hundred years. Occasionally 1921 cookbooks and magazines provide a window into even earlier times. For example, in 1921 a reader of American Cookery asked for a recipe that she remembered from her childhood.

Request for Gingered Rhubarb Recipe
Source: American Cookery (Aug./Sept., 1921)

Gingered Rhubarb apparently was a food that was eaten in the late 1800’s in Scotland, but by 1921 it apparently was not part of the repertoire of cooks on the U.S. side of the Atlantic. Why had it become less popular? Was it already considered an old-fashioned dessert a hundred-years ago?

The query also contains a serving suggestion. The individual requesting the recipes states that she remembers eating Gingered Rhubarb on rice desserts (which I took to mean rice pudding).

In any case, I was intrigued and decided to make Gingered Rhubarb. I also made Rice Pudding to serve with the Gingered Rhubarb. The recipe I found was for a Baked Rice Pudding (rather than the type of Rice Pudding that is made in a saucepan on top of the stove).

The verdict: Gingered Rhubarb is a tart sauce embedded with sweetened chunks of rhubarb. It goes nicely with Baked Rice Pudding (which is drier and less sticky than many modern Rice Puddings). That said, you need to enjoy rhubarb and its intense flavor to like this recipe. My husband and I both liked the Gingered Rhubarb with Baked Rice Pudding. However, our daughter did not think it was edible. My conclusion- this recipe features rhubarb with its unique tart taste. If you really like that taste, you’ll enjoy this recipe. However, if you are lukewarm to rhubarb, this recipe is not for you.

Here are the original recipe for Gingered Rhubarb:

Gingered Rhubarb Recipe
Source: American Cookery (Aug./Sept., 1921)

I put the rhubarb mixture in a large glass casserole bowl and let it sit overnight on my kitchen counter. The next day, I put the mixture in a stainless steel pan and cooked. it I used ground ginger when making the recipe.

I was pleased with how well the rhubarb pieces retained their shape when I cooked the Gingered Rhubarb. I think that allowing the rhubarb and sugar mixture sit overnight before cooking may have helped the pieces retain their shape. The sugar drew liquid out of the rhubarb.

The 1 1/2 hour cooking time seemed long to me, but I think that it allowed the flavors to concentrate as some of the liquid boils off. The rhubarb turned brownish as it is cooked (similarly to how apples turn brownish when cooked for a long time to make apple butter).

This is a very large recipe. When I made the recipe, I halved it.

Here is the original recipe for Baked (Plain) Rice Pudding:

Plain Rice Pudding Recipe
Source: The New Cookery (1921) by Lenna Frances Cooper

Cooks many years ago would have made both the Gingered Rhubarb and the Baked Rice Pudding using a wood or coal stove. Both of these recipes have a long cook time – but that probably wasn’t considered an issue when the stoves operated constantly, and foods could be cooked for several hours with little attention from the cook.

Here’s the recipes for Gingered Rhubarb updated for modern cooks:

Gingered Rhubarb

  • Servings: 7-9 servings
  • Difficulty: moderate
  • Print

3 pounds rhubarb, cut into 1/2 pieces (about 6 cups of pieces) -Do not peel.

4 cups sugar

1 tablespoon ground ginger

In a crock or large glass casserole bowl combine the sugar and ground ginger. Add the rhubarb pieces and stir to coat the rhubarb with the sugar mixture. Cover, and let sit overnight at room temperature.

The next morning put the rhubarb mixture in a stainless steel pan and bring to a boil using medium-high heat. Reduce heat to low and simmer for 1 1/2 hours. Gently stir several times while it is cooking.

Remove from heat. May be serve hot or cold.  If desired serve with rice pudding, ice cream, or other dessert.

http://www.ahundredyearsago.com

Here’s the recipe for Rice Pudding updated for modern cooks:

Baked Rice Pudding

  • Servings: 5 - 7
  • Difficulty: moderate
  • Print

5 cups milk

1/2 cup rice

1/2 teaspoon salt

1/3 cup sugar

grated rind of 1/2 lemon

Preheat oven to 325° F. Wash the rice, and combine with all the other ingredients. Pour into a 2-quart buttered baking dish. Place in oven and bake for a total of three hours.

During the first hour, stir three times. Then reduce heat to 3oo° F. and continue baking. After another hour, stir again.  Continue baking for an additional hour, or until a knife inserted in the center comes out clean. If desired, when the rice pudding is set, the Rice Pudding can be put under the broiler for a short time to lightly brown the top. May be served hot or cold. Refrigerate, if not served immediately.

http://www.ahundredyearsago.com