The recipes in specialty cookbooks focused on specific ingredients are often hit or miss. The authors sometimes get so focused on using certain ingredients that taste is lost. So I had a bit of trepidation when I recently came across a cookbook published in 1918 called The Corn Cook Book: War Edition by Elizabeth O. Hiller. This cookbook was written during World War I when wheat flour was in short supply, so Ms. Hiller sought to help cooks, “save the wheat” by using corn.
I was drawn to a recipe for Popped Corn Macaroons. I was intrigued by idea of using pop corn to make macaroons, and I liked that it was a gluten-free recipe.
The verdict: Popped Corn Macaroons are light and delightful. They have a nice balance of sweetness and saltiness that works well with the popped corn. And, Popped Corn Macaroons are very attractive with each topped with a piece of candied cherry. This recipe is a keeper, and I’ll definitely make it again.
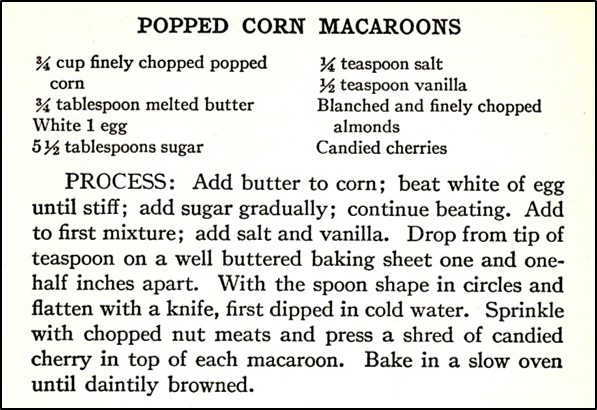
Here is the original recipe:
And, here is the recipe updated for modern cooks:
Popped Corn Macaroons
3/4 cup unsalted popped corn, chopped
3/4 teaspoon butter, melted
1 egg white
5 1/2 tablespoons sugar
1/4 teaspoon salt
1/2 teaspoon vanilla
about 2 tablespoons almonds, chopped
4-6 candied cherries, each cut into several pieces
Stir melted butter into the chopped popped corn, set aside.
Preheat oven to 325° F. In a medium mixing bowl, beat egg white until stiff peaks form. Gradually add the sugar while continuing to beat. Stir in the vanilla and salt, followed by the popped corn.
Line a baking sheet with parchment paper. (It is important to use parchment paper. I had problems with the macaroons sticking to the baking sheet when I did not use it, so remade the recipe using parchment paper and it worked much better.) Drop heaping teaspoons of the mixture on the baking sheet. Space 1 1/2 inches apart. Then shape into a circle and flatten with the back of a spoon or a knife. (Spoon or knife can be dipped in cold water before shaping and flattening, if there are problems with the dough sticking.) Sprinkle with chopped almonds, and then press a piece of candied cherry in the center. Bake approximately 25 minutes or until the macaroons are lightly browned.