When browsing through a hundred-year-old cookbook published by a shrine patrol in Rochester New York, I saw a recipe for Loaf Chocolate Cake, and decided to give it a try. This recipe is a winner. The recipe was easy to make, and the loaf cake was soft and moist, and had just the right amount of sweetness. (I prefer cakes that aren’t overly sweet).
Here is the original recipe:

A hundred-years-ago milk often was not pasteurized. Back then, if the non-pasteurized milk was not used quickly, the “good” bacteria in the milk would turn it into a sour milk suitable for use in recipes. Today’s pasteurized milk can be turned into a sour milk by adding a little vinegar.
In 1923, squares of baking chocolate were typically 1-ounce. Today they are often 1/2 ounce, so 4 squares rather than 2 may be needed.
Here’s the recipe updated for modern cooks:
Loaf Chocolate Cake
1/2 cup milk
1 tablespoon vinegar
2 cups brown sugar
1/2 cup butter, melted
2 cups flour
2 eggs
2 1-ounce squares unsweetened baking chocolate, melted (Many brands of baking chocolate have squares smaller than 1 ounce, so more than 2 squares may be needed.)
1 teaspoon baking soda
1 teaspoon vanilla
1/2 cup boiling water
Preheat oven to 350° F. Grease and flour a large loaf pan (9″ X 5″) or use two smaller ones.
Put the milk in a cup or bowl, then stir in the vinegar. Set aside for at least 2 minutes to allow milk to sour.
Put brown sugar, butter, flour, eggs, melted chocolate, baking soda, vanilla, and the soured milk in a mixing bowl; stir to combine. Add boiling water; beat until smooth than put in loaf pan. Bake 1 hour 10 minutes, or until wooden pick inserted in center comes out clean. (The time would be less if two smaller pans are used.)
 When browsing through a hundred-year-old cookbook, I came across a recipe for Lemon Crumb Pie.
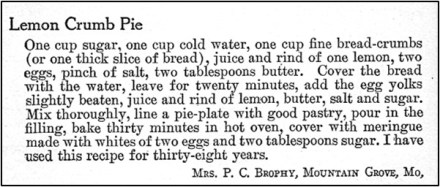
 A full-page advertisement in a 1923 issue of Ladies Home Journal for Kraft Cheese piqued my interest. It contained a recipe for Spinach Timbales. From time to time I see timbale recipes in hundred-year-old magazines and cookbooks. Timbales back then were creamy vegetable or meat mixtures that were put into individual molds and baked.