

My first reaction when I saw a recipe in a hundred-year-old cookbook for Macaroni and White Sauce, was Mac and Cheese – yes. Mac and White Sauce. . . hmm, that’s different. But, I decided to give Macaroni and White Sauce a try. I was pleasantly surprised by the delicate taste of Macaroni and White Sauce. It’s similar to Mac and Cheese and has a creamy milkiness but without a cheesy taste.
Here’s the original recipe:
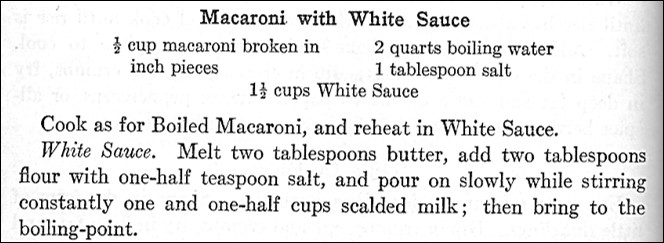
A hundred years ago macaroni came in long pieces that were broken into pieces. I just used the modern small pieces of macaroni when I made the recipe. I think that the tablespoon of salt was supposed to be added to the water that the macaroni was boiled in – however, that seems like a lot to me, so I put 1 teaspoon salt in the water.
Here’s the recipe updated for modern cooks:
Macaroni with White Sauce
1/2 cup macaroni
2 cups water
1 teaspoon salt + 1/2 teaspoon salt
2 tablespoons butter
2 tablespoons flour
1 1/2 cups milk
Put water and 1 teaspoon salt into a large saucepan, and bring to a boil using high heat. Add macaroni, and reduce heat so that the water gently simmers. Cook the macaroni until al dente, then drain and rinse with cold water.
In the meantime, in another pan, using medium heat, melt butter, then stir in the flour and 1/2 teaspoon salt. Gradually, add the milk while stirring constantly. Continue stirring until the white sauce begins to thicken. Stir in the macaroni and gently simmer for 5 – 10 minutes while stirring occasionally, or until excess liquid has been absorbed by macaroni. Remove from heat and put in serving dish.


 Sometimes I’m surprised how long some foods have been around. I recently came across a hundred-year-old recipe for Shrimp Salad that called for canned shrimp. I never would have guessed that canned shrimp was available in 1923.


