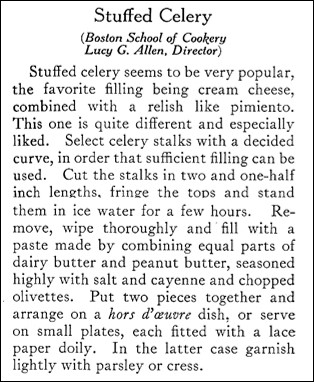
Old-Fashioned Spinach with Noodles

Spinach with Noodles

I recently came across a  lovely recipe for Spinach with Noodles in a hundred-year-old cookbook. The spinach and noodles were smothered with cheese and milk, and then baked until hot and bubbly. It makes a nice side dish – though it is hardy enough that it could be the entree.

Spinach with Noodles

Here’s the original recipe:

Recipe for Spinach with Noodles
Source: Modern Priscilla Cook Book (1924)

This recipes calls for a lot of milk. The key to it not being too juicy, is to not cook the noodles too thoroughly. They should just be cooked in boiling water until they are al dente. They then will absorb the milk and soften some more while in the oven baking.

Here’s the recipe updated for modern cooks:

Spinach with Noodles

  • Servings: 3 - 4
  • Difficulty: moderate
  • Print

1 1/2 cups chopped cooked spinach

water

1 1/4 cups noodles

1 teaspoon salt

1/4 teaspoon pepper

1 cup cheese, grated (I used cheddar cheese.)

1 cup milk

Preheat oven to 350° F. Put water in a large saucepan, place on the stove and bring to a boil using high heat. Add noodles and reduce heat; simmer until the noodles are al dente. Remove from heat and drain.

In a separate pan heat the spinach; then remove from heat and drain any excess liquid.

Put half of the noodles in a baking dish. (I used a 3-cup baking dish; a quart dish would also work well.) Top with half of the spinach. Sprinkle with half of the salt and pepper, then add half the cheese. Add the other half of the noodles, followed by the remaining spinach. Sprinkle with the remaining half of the salt and pepper. Top with the remaining half of the cheese. Pour the milk over the layered mixture, then bake in the oven until hot and bubbly (about 45 minutes).

http://www.ahundredyearsago.com

Old-Fashioned Broiled Tomatoes

broiled tomatoes on plate

I recently came across a hundred-year-old recipe for Broiled Tomatoes, and decided to give it a try. But I then wondered . . . What type of tomatoes should I use in the recipe? Should I use purple, chocolate, yellow, or orange heirloom tomatoes? . . . or should I use red tomatoes. . . . beefsteak? . . . plum?

What did tomatoes look like a hundred years ago? When I search on “tomato” and “history” I get articles about wild tomatoes that were small and yellow or orange. The Aztecs and Mayans raised tomatoes, and tomato seeds went from Latin America to Europe in the 1500s. They became very popular, though some people thought that they weren’t safe to eat. The number of tomato varieties increased and they were bred for various characteristics. Tomatoes were then brought back to North American during the colonial era.  But, I’m not finding information about what tomatoes were like in 1924. I think that they generally were red, so I decided to use red, medium-sized tomatoes.

The Broiled Tomatoes were easy to make and tasty. They are topped with just salt, pepper, and a little butter, which allows the naturally balanced flavors to shine.

Here’s the original recipe:

recipe for broiled tomatoes
Source: American Cookery, August/September, 1924

Here’s the recipe updated for modern cooks:

Broiled Tomatoes

  • Servings: 2-3
  • Difficulty: easy
  • Print

2 medium tomatoes

salt and pepper

2 teaspoons butter

Cut tomatoes into slices 1/2 inch thick. Put on a foil-lined baking sheet. Sprinkle with salt and pepper. Top with small dabs of butter. Place under the broiler and broil until hot (about 3-4 minutes).

http://www.ahundredyearsago.com

Old-time Recipe for Baking Corn on Cob

baked corn on cob in husk

I love corn on the cob, and make it several times a week during the peak season. I’ve always boiled the corn, but was intrigued by a hundred-year-old recipe for Baking Corn on Cob, and decided to give it a try.

The recipe called for pulling the husk back and removing the corn silk, then soaking in water. After the corn has soaked for half an hour, the husk is pulled back into place, and the corn is baked.

The verdict: The corn was tasty, and the cooked corn was attractive in the husk.  Baking the corn on the cob is a nice variation.

Here’s the original recipe:

Recipe for Baking Corn Cob
Source: Cook Book of the Susquehanna Valley Country Club, Sunbury, PA (1924)

Here’s the recipe updated for modern cooks:

Baking Corn on Cob

  • Difficulty: easy
  • Print

1 ear of corn per serving

Pull back the husks on the corn, and remove all the silk. Put the corn (with the pulled-back husks) in a large pan of cold water; let soak for 1/2 hour.

Preheat oven to 400° F. Remove the corn from the pan, and shake off the water. Pull the husks back into place and cover the corn with the husks. Put directly on the wire rack in the oven; bake 30 minutes.

The husk can either be removed before serving or it can be served with the husk still on.

http://www.ahundredyearsago.com

Old-Fashioned Peach Meringue Pie

slice of peach pie with meringue

We’re getting to the peak of peach season. Succulent peaches are wonderful fresh, and are also wonderful when baked into various delectable desserts. I recently came across a recipe for Peach Meringue Pie in a hundred-year-old cookbook, and decided to give it a try.

The pie was a winner. The peach filling was sweet with a hint of tartness, and the meringue topping was refreshingly light with a nuanced vanilla flavor which nicely balanced the peaches.

Here’s the original recipe:

Recipe for Peach Pie (with Meringue)
Source: Butterick Cook Book (1924)

I’m not sure why the recipe called for cooking and mashing the peaches prior to putting them in the pie shell, but I followed the directions. Maybe the recipe author did not want distinct slices of peach in the baked pie.

I sweetened the peaches with 1/2  cup sugar. When I made this recipe the cooked peaches were very juicy -and I knew that they would not hold their shape in a pie, so I added 1/4 cup of flour. This worked well, and the cooked peach pie filling was an appropriate consistency when the pie was baked.

It’s intriguing that the old recipe indicated that the recipe was for either apple or peach meringue pie. I would think that the spices that are used in an apple pie would be somewhat different than the spices in a peach pie. Similarly, I would think that more flour would be needed to thicken the filling of a peach pie than an apple one (though, of course, no flour or other thickener was called for in the old recipe).

Here’s the recipe updated for modern cooks:

Peach Meringue Pie

  • Servings: 6 - 8
  • Difficulty: moderate
  • Print

4 cups sliced and peeled peaches

1/2 cup sugar

1/4 cup flour

1 teaspoon nutmeg

1 9-inch pie shell

3 egg whites

3 tablespoons powdered sugar

1/2 teaspoon vanilla

Preheat oven to 400° F. Put the sliced peaches and the sugar in a saucepan; stir together. Using medium heat bring to a boil while stirring occasionally; simmer, until the peaches are soft, while continuing to stir occasionally (about 5 minutes).  Remove from heat and mash the cooked peaches. (I used a potato masher). It is okay if the mashed peaches are chunky. Stir in the flour and nutmeg. Put the peach mixture into the pie shell and bake in oven until the filling begins to bubble, and the crust is lightly browned.

In the meantime, make the meringue. Place egg whites in a bowl, and beat the egg whites until they form stiff peaks. Gradually add powdered sugar and vanilla while continuing to beat. Then spoon on top of the pie and swirl.  Reduce oven temperature to 350° F. Return pie to oven and cook for an additional 8-10 minutes or until the meringue is lightly browned.

http://www.ahundredyearsago.com

Old-Fashioned Harvest Drink

Glass of Harvest DrinkOn hot summer days, when the heat is intense and blistering, I always remember making hay when I was a child growing up on a farm. It was hot, hard work to bale hay, and then unload it off wagons and stack in the barn. I can remember we thought that it was a good day if we made 1,000 40-pound  bales in a day. To keep the hay from the scratching me, I’d wear long pants and a long-sleeved shirt that were quickly soaked with sweat. To stay hydrated, we took huge jugs of water or Kool-Aid out the fields and the barn.

A hundred-years-ago it was even more labor intensive to make hay. Most farmers used horses rather than tractors, and the hay wasn’t baled. Rather the loose hay was stacked on wagons, and then unloaded in the barn. I never thought about what they drank back then while working in the hot fields until I came across a recipe in a hundred-year-old cookbook published by a Springfield, Illinois newspaper for Harvest Drink.

According to the recipe, Harvest Drink is “relished in the hay-field.” It is made using vinegar, molasses, water, and ground ginger. I decided to give it is try.

I can’t say that I liked Harvest Drink. It is slightly tart with a molasses flavor. Maybe if I was making hay, and was hot and dehydrated, I would find it refreshing – but can totally understand why this beverage has gone out of fashion. We have a lot of better options now that are much tastier.

Here’s the original recipe:

Recipe for Harvest Drink
The New Home Cook Book, 1924 Edition (Published by Illinois State Register, Springfield, IL)

This is a large recipe. I actually divided the amounts by 10. However, many of the ingredient amounts were unusual fractions, so when I updated the recipe, I kept the original amounts.

Here’s the recipe updated for modern cooks:

Harvest Drink

  • Servings: 10
  • Difficulty: easy
  • Print

1/4 cup vinegar

1 cup molasses

10 cups water

approximately 1 tablespoon ground ginger

Combine vinegar, molasses, and water. Stir in the ground ginger; more or less may be used to taste. Serve very cold.

http://www.ahundredyearsago.com

Luncheon Salad (Apple, Celery, and Pecan Gelatin)

Luncheon Salad

On hot summer days, cool and refreshing gelatin salads can hit the spot, so when I saw a recipe in a hundred-year-old cookbook for a gelatin salad called Luncheon Salad I decided to give it a try. Luncheon Salad is a delightful, bright, slightly tart lemon gelatin embedded with apple, celery, and pecan pieces. It is made using unflavored gelatin and lemon juice, which makes the gelatin much more flavorful than gelatin made from a box of “lemon” gelatin.

Sometimes recipes in old cookbooks have unusual names that doesn’t describe the food. This is one of those cases. Why was the recipe called Luncheon Salad? The recipe was in a cookbook published by Susquehanna Valley Country Club (Sunbury, PA). Did they serve this salad at country club luncheons?

Here’s the original recipe:

Recipe for Luncheon Salad (Apple, Celery, and Pecan Gelatin)
Source: Cook Book (Susquehanna Valley Country Club, Sunbury, PA, 1924)

I am not sure how large envelopes of unflavored gelatin were a hundred years ago, but the packets I had said they should be combined with 2 cups of liquid. Since this recipe calls for 3 cups of liquid, I used two packets of gelatin.

Here’s the recipe updated for modern cooks:

Luncheon Salad (Apple, Celery, and Pecan Gelatin)

  • Servings: 8 - 10
  • Difficulty: moderate
  • Print

2  envelopes (0.25 oz each) unflavored gelatin

1 cup cold water

1 1/2 cups boiling water

1/2 cup lemon juice

1/2 cup sugar

3 tart apples, chopped

1 cup celery, chopped

1/2 cup pecans, chopped

Put the cold water in a bowl. Sprinkle the gelatin on top of the water, and let soak for 5 minutes; then add to the boiling water and stir to dissolve. Stir in the sugar and lemon juice. Refrigerate until the mixture begins to stiffen, then stir in the apples, celery, and pecans. Wet a 5 – 6 cup mold with cold water, then pour the mixture into the mold and chill until firm (at least 4 hours).

To serve: Quickly dip the mold in hot water, then unmold onto serving plate.

http://www.ahundredyearsago.com

Old-Fashioned Oatmeal Cookies

oatmeal cookiesWhen our son recently visited, his flight arrived late at night – and I wanted to make a bedtime snack for him. I saw a recipe for Oatmeal Cookies in a hundred-year-old cookbook – and decided they might fit the bill.

These classic cookies were easy to make and very tasty. They have a hint of cinnamon, and are soft and chewy.

Here’s the original recipe:

Recipe for Oatmeal Cookies
Source: Modern Priscilla Cook Book (1924)

I used brown sugar when I made the recipe. It’s intriguing that the recipe specifies “sweet milk” which I think is just regular milk. A hundred-years-ago many families still lived on farms and drank milk that was not pasteurized; and, even in towns, much of the milk that was sold was not pasteurized. Back then, if the non-pasteurized milk was not used quickly, the “good” bacteria in the milk would turn it into a sour milk suitable for use in recipes. I would think that if a recipe just said “milk” that cooks would know that it was just calling for regular milk and not for sour milk, but apparently the cookbook author thought that it was important to clarify.

Here’s the recipe updated for modern cooks:

Oatmeal Cookies

  • Servings: approximately 48 cookies
  • Difficulty: easy
  • Print

1 cup brown sugar

1 cup shortening

2 eggs

1/2 cup milk

1/2 teaspoon salt

1 teaspoon cinnamon

3/4 teaspoon baking soda

1 teaspoon baking powder

2 cups flour

1 teaspoon vanilla

2 cups old-fashioned oatmeal

Preheat oven to 375° F.  Cream the shortening and brown sugar.  Stir in the milk and eggs, then add the salt, cinnamon, baking soda, baking powder, flour, and vanilla; stir until smooth. Still in oatmeal; stir until combined.  Drop heaping teaspoons of the dough onto greased baking sheets; bake until set and lightly browned (about 10 minutes).

http://www.ahundredyearsago.com