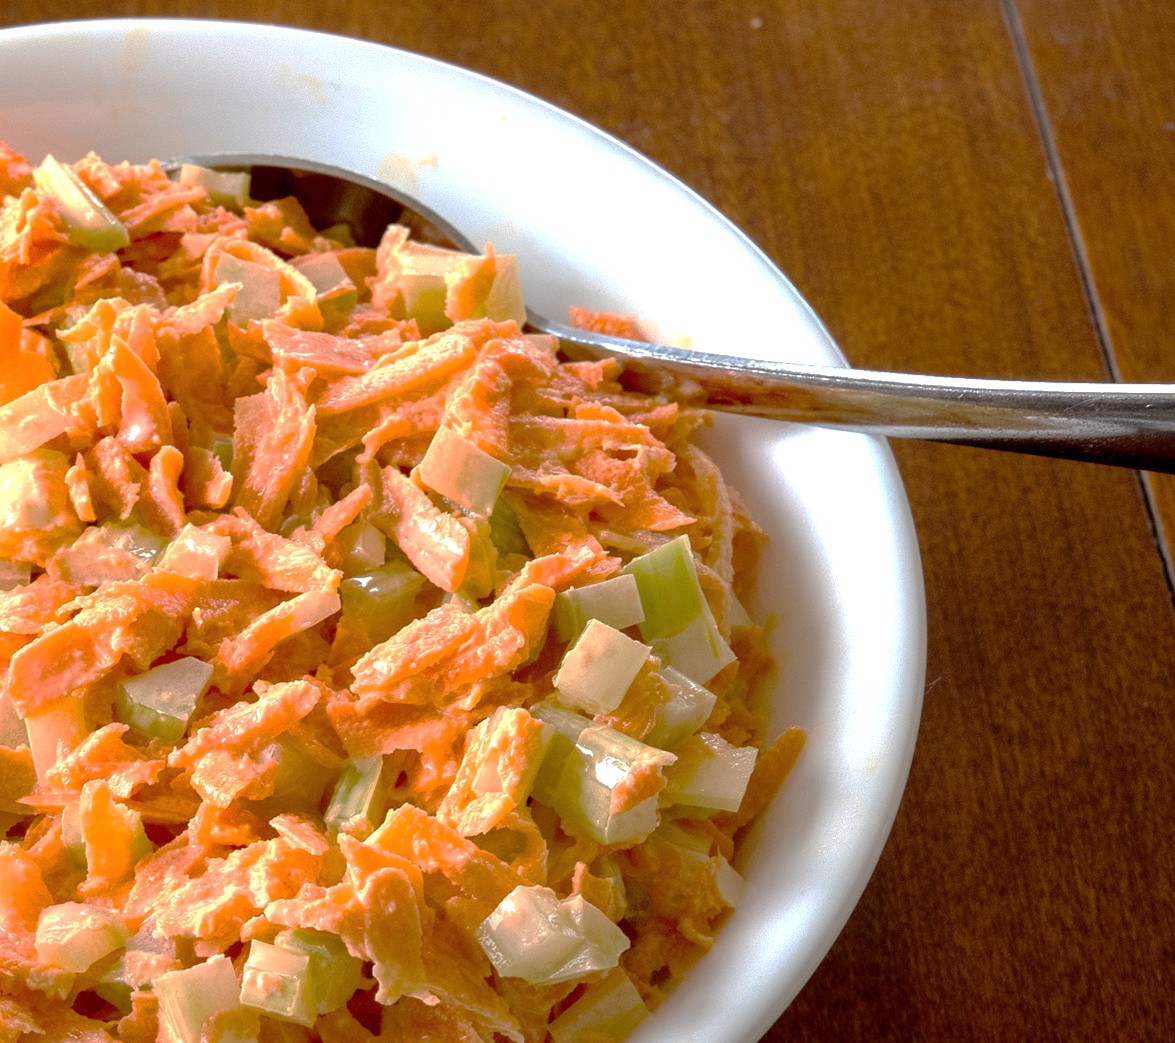
Old-Time Standard Cream of Vegetable Soup Recipe

Cream of Vegetable Soup in BowlBrrr . . . it’s cold outside. I’ve also made a new year’s resolution not to waste food. The winter weather, plus my resolution, led me to search for hundred-year-old soup recipes that used left-over vegetables. I found an old general description of how to make soup using left-over vegetables as well as a recipe for Standard Cream of Vegetable Soup. I combined the directions from the two sources to make a lovely Cream of Vegetable Soup.

Similarly to now, soup was a popular winter comfort food a hundred years ago. According to an article titled “Soups – Economical and Delicious” – in the January, 1926 issue of Farm Journal:

With plenty of good soup, good bread and butter, some fruit or a simple dessert, a good, hearty meal can be prepared in a short time. Cold weather is just the time for a hearty soup, too.

The article identifies three “classes” of soup: (1) soups made using a single vegetable; (2) soups using meat stock as the foundation; and (3) soups made using left-over vegetables.  Here’s what it says about using left-over vegetables to make soup:

Soups of the third class are perhaps the simplest and most economical.  Such soups can be made entirely of left-over vegetables or can include both left-over and new cooked vegetables. Perhaps there are some cooked potatoes (cooked any way) on hand, a little gravy, a few spoonfuls of peas or shelled beans, and a little turnip. Put in a kettle enough boiling water to make the required amount of soup for your family. Into the kettle slice one or two onions, two or three carrots and a few more raw potatoes if needed. Cook until tender the left-over vegetables, gravy, and some salt (pepper if liked) and boil up. Now use a wire potato-masher to reduce the vegetables to a smooth, delightfully blended mixture. A most pleasing variety of soups can be had by varying the ingredients. Ripe tomatoes in any form can be used, even the rinsings of the catsup bottle. Boiled beans, baked beans, squash, corn, a little cabbage, a bit of parsnip, celery, macaroni, rice, oatmeal, the left-over meat pie (crust and all) can all be utilized in this way. Celery makes a most delicious soup. The celery itself can be used or crushed dried leaves or celery salt can be used for flavoring. When a straight vegetable soup is made, add fresh or evaporated milk or a little cream to give the desired richness. Lacking these, butter or a good cooking oil can be used.

Farm Journal (January, 1926)

A recipe in a 1926 cookbook contained a “standard” recipe for this type of soup:

Recipe for Standard Cream of Vegetable Soup
Source: Mrs. Peterson’s Simplified Cooking (1926)

My research was complete. I now was ready to make the soup. I used the Standard Cream of Vegetable Soup recipe as the basis for the soup, but pulled in some of the suggestions from the Farm Journal article. I had some left-over mashed potatoes, and cooked carrots that I used. I thought that onions and celery would be a nice addition. so I chopped up about half a cup of each. These items didn’t make the 2 cups of vegetables called for in the “standard” recipe, so I added small amounts of frozen green peas, corn, and lima beans that had languished in my freezer in almost empty bags.

And, I was intrigued by the suggestion in the Farm Journal article to add the “rinsings of the catsup bottle” to the soup. It’s difficult to get the lid off many modern catsup bottles, so I just added 2 tablespoons of catsup to the vegetable mixture.

The vegetables (including the water they are cooked in) are pureed after they are cooked, and added to milk that has been thickened with butter and flour. The soup is then heated until it is hot and steamy. The resulting soup had a lovely,  delicate flavor. The seasonings should be adjusted if a bolder flavor is desired. The soup is garnished with croutons.

The old recipe said that it made enough soup to serve six. In my opinion, six servings is a stretch. This recipe makes 4-5 generous servings.

The bottom line is that this recipe is extremely flexible and cooks should adjust the recipe based on the left-overs and other vegetables they have in their kitchen. My daughter-in-law often says that she cooks “free style.” This is a recipe for free style cooks. Here’s my combined and updated recipe for Standard Cream of Vegetable Soup.

Standard Cream of Vegetable Soup

  • Servings: 4 - 5
  • Difficulty: moderate
  • Print

2 cups vegetables (Any combination of left-over vegetables work well in this recipe. I used left-over mashed potatoes and cooked carrots. I also added about ½ cup chopped onions and 1 stalk celery. I then added a few frozen green peas, lima beans, and corn to get a total of 2 cups of vegetables.)

2 tablespoons catsup (optional)

2 cups water

2 tablespoons butter

2 tablespoons  flour

2 cups milk

1 teaspoon salt

¼ teaspoon pepper

croutons

Step 1. Put water and all the vegetables in a sauce pan. If desired, stir in the catsup. Bring to boil using high heat, then reduce heat and simmer until the vegetables are tender (about 10 – 15 minutes).  Remove from heat and cool slightly. (Do not drain.)

Step 2. Puree the cooked vegetables and the water they were cooked in. (A blender or food processor works well.)

Step 3. In the meantime, melt the butter in a large saucepan. Stir in the flour. Gradually add the milk, while stirring constantly; cook using medium heat until the mixture begins to thicken.

Step 4. Add salt, pepper, and vegetable puree to the milk mixture. Cook, while stirring constantly, until hot and steamy. If a bolder flavor is desired, add additional seasonings.

Step 5. Put in soup bowls. Garnish with croutons.

http://www.ahundredyearsago.com

Old-Time Cheese Delight (Cheese & Bread Custard)

Cheese Delight (Cheese and Bread Custard)As the holidays are beginning to wind down, I’m in the mood for comfort food. So, when I came across a hundred-year-old recipe for Cheese Delight, I was intrigued and decided to give it a try.

Cheese Delight is a delicate cheese and bread custard. It is not the same as modern egg and cheese casseroles that often contain bacon, onions, and green peppers. If you can set aside any possible expectation that Cheese Delight will be the same as modern egg and cheese casseroles, you will  will enjoy this dish.

The original recipe called for using American cheese. I thought about updating it to go with a natural cheese that has a tangier flavor, but decided to stick with the recipe author’s choice. The mild and creamy nature of American Cheese (and velvety smoothness when it melts) worked well in this recipe, and made this dish a delightful, old-fashioned comfort food.

Here is the original recipe:

Cheese Delight Recipe
Source: Ladies Home Journal (September, 1925)

I decided to put the custard in a baking dish rather than make individual cups of custard.

When I made this recipe, I added chopped parsley to the egg mixture. I sprinkled a little paprika on the top before putting in the oven to bake, but I could not see the paprika when I took the dish out of the oven, so would not bother putting any on it if I made the dish again.

Here’s the recipe updated for modern cooks:

Cheese Delight (Cheese and Bread Pudding)

  • Servings: 3 - 4
  • Difficulty: moderate
  • Print

2 eggs

1 1/2 cups bread torn into 1/2-inch cubes (I used half white bread and half whole wheat bread.)

1 1/2 teaspoons salt

1/8 teaspoon pepper

1/4 pound American cheese, grated (about 6 slices) (I folded the cheese slices to make a small stack and then grated with a box grater.)

2 cups milk

2 tablespoons chopped parsley

Step 1. Preheat oven to 325° F.

Step 2. Put the eggs in a mixing bowl and beat. Stir in the milk, salt, and pepper. Add the bread cubes and the grated cheese; stir until all ingredients are evenly distributed. Stir in the chopped parsley.

Step 3. Pour into individual custard cups or into a 1-quart baking dish.

Step 4. Place the custard cups or baking dish in a pan of hot water and place in the oven.

Step 5. Bake for 50-60 minutes or until a knife inserted in the center of the pudding comes out nearly clean. (It may not be totally clean because of the melted cheese.) It will take a less baking time if individual cups were used than if the mixture was put into a baking dish.

http://www.ahundredyearsago.com

“Food for the Gods” (Date Crumbles) Recipe

Date Crumbles with whipped cream toppingI recently came across an intriguing recipe in a 1925 issue of Farm Journal. The recipe was labeled “food for the gods or date crumbles.” What a bold assertion! Could this recipe possibly be that good? I had to find out, so next thing I knew I was making the recipe.

Date Crumbles had a crispy crust, with lot of nuts in the middle.  The dates cooked down to create a lovely, sweet date filling on the bottom. I scooped the Date Crumbles out of the pan, and put it in serving glasses (dishes would also work just fine). I served it with whipped cream. I thoroughly enjoyed this dessert.

Here is the original recipe:

recipe for "food for the gods"
Source: Farm Journal (April, 1925)

It’s fascinating that the old recipe directs cooks to serve it in “tall glasses.” I took this to mean stemware. I envision Farm Journal readers, living in remote rural locations, feeling like they were serving a very elegant dessert when they put the Date Crumbles in stemmed glasses and topped it with whipped cream. After all, they were serving “food for the gods.”

I did not want 16 servings, so I made half of the recipe. That said, I don’t think that half of this recipe would be enough for 8 people, so when I updated the recipe, I indicated that it would make 5 – 7 servings.

I assumed that a “slow oven” meant setting the temperature at 300° F.

As I prepared to bake the date mixture, I considered putting it in a baking dish instead of a pie pan as indicated in the old recipe; but, in the end just used an old 9-inch metal pie pan that I had and that worked well. A baking dish would also work. Date Crumbles in pan

I would not store Date Crumbles in a tin box. When I made this recipe, I ate some of it right away, and covered the remainder in the pan that it was baked in. It also could be stored in a food storage container.

Here’s the recipe updated for modern cooks:

Food for the Gods (Date Crumbles)

  • Servings: 5 - 7
  • Difficulty: easy
  • Print

1 egg, beaten

1/2 cup sugar

1 teaspoon baking powder

1 tablespoon flour

1/2 cup nuts, chopped (I used pecans.)

1/2 cup dates, chopped

whipped cream

Step 1. Preheat oven to 300° F.

Step 2. Put egg, sugar, and baking powder in a mixing bowl. Stir to combine.

Step 3. Stir in the chopped nuts and dates.

Step 4. Put the mixture in a greased pie pan or other baking dish (an 8″ X 8″ dish would work well), and spread it out.

Step 5. Put in oven and bake for 45 minutes.

Step 6. Use a spoon to “crumble” the baked dessert; put into dessert dishes or glasses to serve. May be served hot or cold. Top with whipped cream.

Note: The Date Crumbles can be covered and stored in the pan that it was baked in or it can be “crumbled” and stored in a tightly covered container.

http://www.ahundredyearsago.com

Old-Fashioned King George’s Steamed Pudding

Steamed puddings, with their subtle blending of flavors, are a traditional cold weather dessert. For generations, cooks regularly made steamed puddings on their wood or coal stoves. The stoves were used for both cooking and heat, so they were hot all day, and it was easy to cook a pudding that needed to be steamed for several hours.

Hundred-year-old cookbooks contain numerous steamed pudding recipes, but as people shifted to more modern heating and cooking methods, steamed pudding become less popular because of their long cooking time (and concerns about the energy cost of steaming a food for several hours). That’s a pity. Steamed puddings make a lovely dessert.

I found a nice recipe for King George’s Pudding in a 1925 cookbook and decided to give it a try. Myth has it that King George I requested steamed pudding for a Christmas feast in the 1700’s, and that the request resulted in him being considered the “pudding king.”

The King George’s Pudding was sweet and moist with a dense texture that is characteristic of steamed puddings. The old recipe says to serve the pudding with a sweet sauce. I decided to make a lovely Lemon Sauce that I previously posted.  A Vanilla Sauce  or Brandy Sauce would also work well.

Here’s the original recipe:

Recipe for King George Pudding
Source: The Rumford Complete Cookbook (1925)

Cooks regularly update recipes to adapt to changing tastes or to use new ingredients. This recipe clearly is not a replicate of the steamed pudding served at King George’s Christmas feast. It calls for both very traditional pudding ingredients such as suet and an ingredient (flaked cereal) that would have be considered “modern” in 1925. Suet has a high melting point which results in it melting slowly. This gives the pudding a lovely spongy texture. When I made the recipe, I used bran flakes for the flaked cereal.

King George's Pudding with Lemon Sauce

  • Servings: 7 - 9
  • Difficulty: moderate
  • Print

1/3 cup flour

1/3 cup sugar

1/2 teaspoon salt

2 teaspoons baking powder

1/3 cup suet, finely chopped

1 cup flaked cereal (I used bran flakes.)

1 egg

1/2 cup dark-colored jam (e.g., plum, raspberry, blackberry, currant) (I used currant.)

1/3 cup milk

Step 1. Put flour, sugar, baking powder, and salt in a mixing bowl; stir to mix. Add chopped suet; stir to coat the suet with the flour mixture. Add flaked cereal; stir until evenly dispersed in the mixture. Set aside.

Step 2. Put the egg in another bowl. Beat egg, then add jam and continue beating until mixed. Add milk and stir. Add this mixture to the bowl with the other ingredients.

Step 3. Put the batter into a greased mold or bowl (1 1/2 pint or larger), cover and steam for 3 hours.

Step 4. Remove bowl or mold from pan or steamer. Let sit for 15 minutes, then unmold.

Step 4. Serve hot with a sweet sauce such as Vanilla Sauce or Lemon Sauce.

http://www.ahundredyearsago.com

Mignons Cookies Recipe

I recently found a hundred-year-old recipe for Mignons, and decided to give it a try. Mignons are almond cut-out cookies. The cookie dough contains ground almonds, as well as a little cinnamon; and, there are chopped almonds on the top of the cookies.

Mignons Cookies on plateThe name of these cookies seemed a bit confusing to me. I wasn’t sure what “mignon” meant, but kept thinking of Filet Mignon, so looked up the definition of “mignon.” According to Dictionary.com, mignon means “small and pretty; delicately pretty.” It’s an apt description of these cookies. They are visually appealing, light, and tender cookies.

The Mignons had a lovely almond flavor, with just a hint of cinnamon. They would be perfect with a cup of coffee, or on a holiday cookie tray.

Here’s the original recipe:

Recipe for Mignons Cookies
Source: The Rumford Complete Cookbook (1925)

Mignons Cookies on plateHere’s the recipe updated for modern cooks:

Mignons Cookies

  • Servings: approximately 36 cookies
  • Difficulty: moderate
  • Print

½ cup butter, softened

½ cup sugar + additional sugar to sprinkle on top of cookies

3 eggs, separated

¼ cup sliced almonds, ground fine (They can be ground with a blender or food processor) + approximately 2/3 cup sliced almonds, chopped

½ teaspoon cinnamon

1 ½ teaspoons baking powder

½ teaspoon vanilla

1 ½ cups flour

milk, if needed

Step 1. Preheat oven to 400° F.

Step 2. Put butter and sugar in a mixing bowl, then cream. Stir in the egg yolks, then the ground almonds, cinnamon, baking powder, and vanilla. Add the flour, stir to make a dough that can be rolled. (If the dough is too dry add a small amount of milk).

Step 3. Put the dough on a prepared surface, and roll the dough until it is ¼ inch thick, then cut with a cookie cutter. (Relatively small cookie cutters that are basic shapes work best.) Put the cookies on a plate and brush the cookie tops lightly with egg white, then sprinkle chopped almonds and sugar on the cookies; press firmly to ensure that the almonds stay put. (It works best to put the almonds on before the sugar.)

Step 4. Put the cookies on a greased cookie sheet, then put in oven and bake for 9-11 minutes or until the cookies are lightly browned.

http://www.ahundredyearsago.com

Old-Fashioned Potato Griddle Scones

Potato Griddle Scones on  plate

Old-fashioned, thick and fluffy Potato Griddle Scones are perfect for cozy winter breakfasts. I recently found a delightful hundred-year-old recipe for them that puts me in the mindset of cooks back then.

Cooks a hundred years ago cooked almost every day, and wanted quick and easy recipes that used inexpensive ingredients while satisfying a hungry family. Potato Griddle Scones fit the bill  for those frugal cooks. The recipe calls for mashed potatoes, and are a perfect way to use left-over mashed potatoes.  The mashed potatoes are mixed with flour, milk and a few other basic ingredients, and the scones take just a few minutes to make.

The old recipe called for rolling the dough into a circle that is 3/4 inch thick, cutting into triangles, and then cooking on a griddle or in a skillet. This results in lovely, thick scones. They are thicker than many modern Potato Griddle Scones. I can picture cooks a hundred years ago making these scones in a cast iron skillet with a large family clamoring in the background for breakfast. Satisfying amounts of the scones could have been quickly made and ready to eat, as compared to the slower process of cooking just a few thin pancakes at a time on a griddle or skillet with limited space on the top.

Warm Potato Griddle Scones are lovely with a little jam or butter smeared on them. They also make a nice lunch or dinner quick bread.

Here is the original recipe:

Recipe for Potato Griddle Cakes
Source: The Rumford Complete Cook Book (1925)

Here’s the recipe updated for modern cooks:

Potato Griddle Scones

  • Servings: 4 - 6
  • Difficulty: easy
  • Print

3/4 cup mashed potatoes

2 cups flour

1/2 teaspoon salt

4 teaspoons baking powder

2 tablespoons shortening or butter (softened) (I used butter.)

1 egg, lightly beaten

approximately 1 cup milk

Step 1. If the mashed potatoes are refrigerated and cold, warm them slightly to soften them. (I put them in the microwave for a few seconds.) Set aside.

Step 2. Combine the flour, salt, and baking powder in a mixing bowl. Add the butter, mashed potatoes, and egg, then stir to combine. Add about 2/3 cup milk and stir to mix. If the dough is too thick, add additional milk to create a dough that is a nice consistency to roll. (If the mashed potatoes contained milk, probably less than 1 cup of milk will need to be added.)

Step 3. Divide the dough in half. Roll half of the dough on a prepared surface into a circle that this approximately 3/4 inch thick, then cut into sixths to create triangles. Roll other half of dough, and cut into triangles.

Step 4. Grease griddle or a large skillet, then heat using medium-high heat. When hot, put the triangles of dough on the griddle or skillet. Cook until lightly browned (about 3-4 minutes), then flip and cook on the other side.

http://www.ahundredyearsago.com

Old-Fashioned Giblet Gravy

Giblet Gravy in gravy boat

A hundred years ago when cooks were making turkey or chicken gravy, they often added chopped giblets (gizzard, liver, heart, neck) to the gravy. I always assumed that they added the giblets because they were frugal and did not want to waste anything, but after making Giblet Gravy using 1925 directions, I now realize that my assumptions were not totally accurate. Those cooks, so many years ago, may have been frugal, but they also knew that the giblets added lovely, complex flavors and textures to the gravy while making it rich and savory.

Over the years, when selecting recipes to make, I skipped over Giblet Gravy recipes. I had bad memories of the Giblet Gravy my mother and grandmother made when I was a child (though I’m not sure that I ever actually ate any of it), and I had little interest in trying a hundred-year-old recipe for Giblet Gravy. But this year, I came across a 1925 Thanksgiving menu in an old issue of Ladies Home Journal that listed Giblet Gravy as one of the foods on the menu, so I finally decided that it was time to give it a try. And, I am glad that I did. This classic gravy is a delightful comfort food that is lovely on mashed potatoes, slices of turkey, and stuffing.

The directions for making Giblet Gravy were somewhat scattered in a 1925 cookbook that I have, but here are the original directions for cooking giblets and making the gravy:

Recipe for Giblet Gravy
Source: The Home Makers’ Cooking School Cook Book (1925)

Today, the giblets typically packaged with a turkey or chicken include the gizzard, liver, heart, and neck. The membrane with the “grist” generally has already been removed from the gizzard, so that does not need to be removed. The old recipe also mentions the bladder – but I did not include it when I updated the recipe. I also did not include the wing tips or the claws in the updated list of ingredients.

Here’s the recipe updated for modern cooks:

Giblet Gravy

  • Servings: 8 - 10
  • Difficulty: moderate
  • Print

giblets from one turkey or chicken (gizzard, heart, liver, neck)

water

liquid and drippings from pan that the turkey or chicken was cooked in

4 tablespoons flour

salt and pepper

Step 1. The giblets can be cooked while the turkey or chicken is roasting. Put the giblets in a saucepan and cover with cold water. Put on the stove and bring to a boil using high heat, then reduce heat and simmer until tender (about 1 – 2 hours). Additional water can be added during cooking if needed to keep the giblets covered during cooking. Remove from heat and take the giblets out of the broth. Reserve the giblet broth. When the giblets are cool enough to handle, remove the meat from the neck and any gristle from the gizzards, then chop the cooked giblets.

Step 2. When the turkey or chicken is removed from the oven, pour the liquid and pan drippings from the roasting pan into a bowl. Scrape the bottom of the pan to get all the drippings. Let it settle and cool a little, then skim 4 tablespoons of fat off the top of the liquid. (Any additional fat can be skimmed off the top of the broth and discarded.)

Step 3. Combine the broth and drippings from the turkey or chicken with the broth from cooking the giblets.

Step 4. Put the 4 tablespoons of fat in a saucepan. Heat using medium heat, and stir in the flour. Gradually add 2 cups of the combined turkey and chicken broth/drippings, while stirring constantly.

Step 5. Bring to a boil while continuing to stir constantly. If the gravy is too thick add additional broth. If the gravy is still too thick, and additional liquid is needed, add water until the gravy is the desired consistency. (If the gravy is lumpy, strain, then return to pan.)

Step 6.  Stir in the chopped giblets, then continue heating until the gravy again boils.

Step 7. Season to taste with salt and pepper, then remove from heat and serve.

http://www.ahundredyearsago.com