Different Foods for Different Seasons

blueberries, strawberries, and raspberriesA century ago people believed that it was better eat different foods in different seasons. Here’s what a hundred year old cookbook said:

Some food adapted for use at one season or in one climate are not suited to another.

Some people make the mistake of eating in warm weather the same foods and the same quantities of food that they consume in the winter; but the quantity of food should be reduced during the spring and summer months. The digestive organs cannot readily care for the same quantity or the same quality in spring that they are capable of digesting during the winter. Wisely, therefore, with the return of spring, nature take away the desire for many of the more solid foods, and furnishes us with fruits, and greens, and succulent vegetables, which are appetizing and cooling to the system.

Much of the common sickness, especially during the spring and summer months, is caused by the absorption of poisons resulting from the decay of unsuitable food in the intestinal tract. Pimples, rash, and itching of the skin are often signs that nourishment ill-suited to the season or to the condition of the blood has been taken into the body. Fresh fruits are both food and medicine, and are needed by the blood; being especially rich in alkaline elements, they serve to keep the blood in good condition, and because they contain the carbon in the form most easily digested (fruit sugar), they hold first place in the list of foods which go to make up the ideal diet.

The Science of Cookery (1921) by H.S. Anderson

Old-fashioned Chocolate Mint Blancmange

Chocolate Mint Blancmange on plate
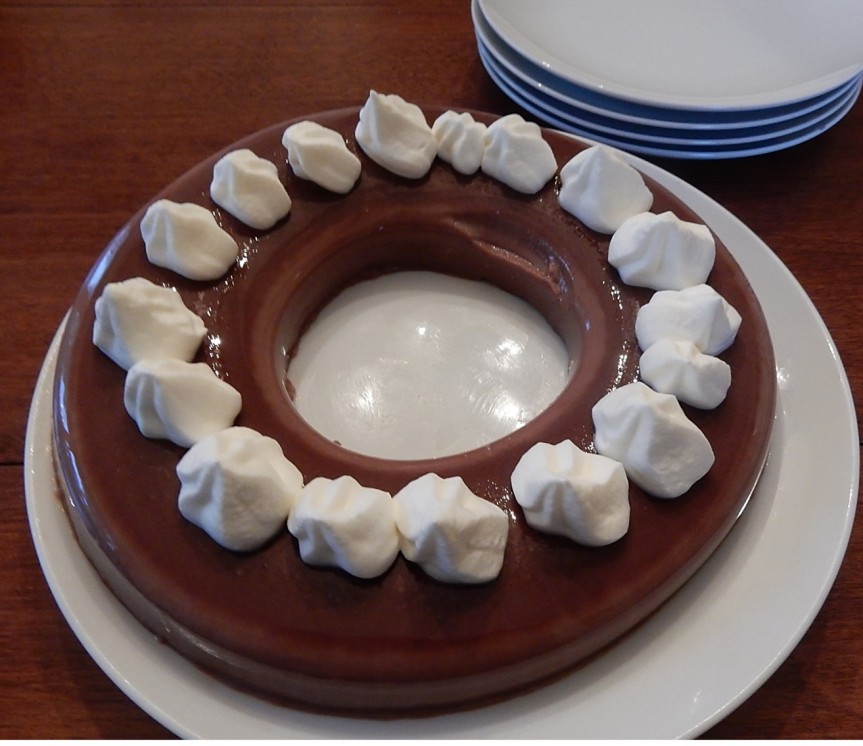
Summer is the perfect time to make chilled desserts, so I was pleased to find a hundred-year-old recipe for Chocolate Mint Blancmange.
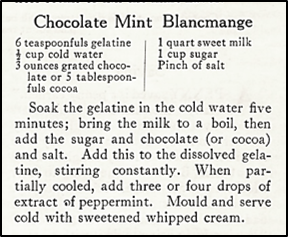
Chocolate Mint Blancmange is smooth and chocolaty with the essence of mint. It is made with milk and thickened with gelatin, and topped with whipped cream.

This molded dessert seemed old-fashioned, but the taste and texture reminded me of some of the small individual- serving chocolate desserts that I’ve had at restaurants or hotels. I think that Chocolate Mint Blancmange would seem much more trendy and modern if put into individual serving cups.

Here’s the original recipe:

recipe for Chocolate Mint Blancmange
Source: American Cookery (August-September, 1921)

Here’s the recipe updated for modern cooks:

Chocolate Mint Blancmange

  • Servings: 6 - 8
  • Difficulty: moderate
  • Print

3 packets (0.25 ounce) of unflavored gelatin

1/2 cup cold water

3 ounces grated chocolate or 5 tablespoons cocoa (I used cocoa.)

1 quart (4 cups) milk

1 cup sugar

dash of salt

3 or 4 drops of peppermint extract

whipped cream

Place the cold water in a small bowl; then sprinkle the gelatin over the water. Let the gelatin absorb the water and soften for a few minutes.

In the meantime put the milk in a large saucepan and bring to a boil using medium heat; stir constantly. Stir in sugar, chocolate (or cocoa), and salt. Add the softened gelatin while continuing to stir constantly. Once the gelatin has dissolved, remove from heat. Strain and let partially cool for a few minutes, then add the peppermint extract and stir. Put into a 5 or 6 cup mold (or put into individual serving dishes or cups). Chill until firm (at least 4 hours).

To serve (if molded): Quickly dip the mold in hot water, then unmold onto serving plate.

Serve with whipped cream.

http://www.ahundredyearsago.com

Making Jelly in the Days Before Commercially-Produced Pectin

apple jelly When making jams and jellies, pectin helps make the juice “jell.” A hundred years ago commercial liquid and powdered pectin was not available. Rather cooks used fruits with naturally occurring pectin – and often combined several fruits, including one with a lot of pectin, when making jelly. Here’s what it said in a hundred-year-old home economics textbook:

Fruit juice can be made into jelly when it contains two substances, (1) pectin and (2) acid. All fruits do not contain these in sufficient amounts to make good jelly, and often it is necessary to combine the juices of two fruits before the juice will “jell.” Sugar helps to make the juice form jelly, but unless pectin and acid are present, no amount of sugar will have that effect.

Fruits used for jelly should not be over-ripe, and sometimes it is better to use green fruits, because as fruit ripens it contains less pectin and acid. Tart apples, grapes, currants, crab apples and plums are good for making jelly. Sweet ripe apples, strawberries, blackberries, peaches and pears are poor fruits from which to make jelly.

Lemon and orange peel contain pectin in considerable amounts and are sometimes used to make fruit juices “jell.” Remove the yellow layers of the peel and put the white material that is left through the food grinder, cover with water and let stand for several hours, then cook slowly for two or three hours; strain the liquid and add it to the fruit juice that lacks pectin.

Elementary Home Economics (1921) by Mary Lockwood Matthews


Old-fashioned String Beans Recipe

green snap beans

Sometimes old cookbooks contain recipes for very basic foods that barely seem to need a recipe. For example, I recently came across this recipe for String Beans in a hundred-year-old cookbook.

String Beans Recipe
Source: Boston Cooking-School Cook Book (1921 Edition)

But, when I look more closely, I realize that the directions are very different than how the beans would be made today. Boiled string bean recipes today often call for leaving the beans whole and merely breaking the tips off the beans; other modern recipes call for breaking the beans into 2- 3 inch pieces. The hundred-year-old recipe, however, called for breaking or cutting the beans into small 1-inch pieces.

Modern recipes for boiled string beans also call for cooking them just a few minutes – 5 minutes or maybe 10 max. However the old recipe directs cooks to boil the string beans for  1-to 3 hours!!!

What the heck?  But, next thing I knew I was boiling string beans for 1 hour. (I couldn’t bring myself to boil them for more than that).

The verdict – The beans were very soft, but still maintained their shape. My daughter said, “Why did you ruin some perfectly good green beans? They taste like frozen or canned beans.”

Old-fashioned String Beans

  • Servings: 2 - 3
  • Difficulty: easy
  • Print

1 pound string beans (green beans or wax beans)

1 teaspoon salt

butter

Break the tips off the string beans. Cut or break into 1-inch pieces. Wash beans, then put into a sauce pan. Cover with water and bring to a boil using high heat. Reduce heat and simmer for 1 to 3 hours. Add salt for last 1/2 hour of cooking. If most of the water boils away, add additional water. Remove from heat and drain. Put in serving bowl and top with a dab of butter.

http://www.ahundredyearsago.com

Old-fashioned Peach Shortcake

Peach Shortcake with Whipped Cream on Plate

Sweet, juicy, local peaches are just beginning to appear at farm stands, so I was pleased to find a hundred-year-old recipe for Peach Shortcake. The recipe turned out well – and was perfect for a hot summer day.

Here’s the original recipe:

Recipe for Peach Shortcake
Source: Lowney’s Cook Book (1921 Revised Edition)

This recipe made a little less shortcake than I was expecting. I used a 10-inch round cake pan when I made the recipe. (There wasn’t enough dough to make two layers.) If I made this recipe again, I think that 8-inch cake pans would work better, so that is the pan size that I listed in the updated recipe.

Here’s the recipe updated for modern cooks:

Peach Shortcake

  • Servings: 4 - 5
  • Difficulty: moderate
  • Print

3 cups peeled and sliced peaches

1/2 cup sugar

2 tablespoons lemon juice

whipped cream

Combine sliced peaches, sugar, and lemon juice; stir gently. Spoon some of the  sweetened peaches between the layers of shortcake (see recipe below). Put additional peaches and the whipped cream on the top layer of shortcake.

Shortcake

2 cups all-purpose flour

1/2 teaspoon salt

3 teaspoons baking powder

3 tablespoons butter, softened

3 tablespoons lard

1 cup milk

butter, if desired

Preheat oven to 425° F. Put flour, salt, and baking powder in a bowl; stir to combine. Cut in butter and lard using a pastry blender. Add milk and mix using a fork until dough starts to cling together. Grease two 8-inch round cake pans, then divide dough in half and put into the pans. Bake 10-15 minutes or until lightly browned. Cool slightly, then remove from pans. Split each layer using a fork. If desired butter layers, Arrange layers with fruit filling in the middle and on top.

http://www.ahundredyearsago.com

Hundred-year-old Tips for Packing Sandwiches

Until I saw directions for packing sandwiches in a hundred-year-old cookbook, I never thought about how people packed sandwiches to take to school or work back then:

Keep sandwiches wrapped in a cheese cloth which has been thoroughly dampened with cold water, and pack in a closed box until ready to use.

Lowney’s Cook Book (Revised, 1921 Edition)

Sounds like a good way to get a soggy sandwich – but apparently if the cheese cloth is merely “dampened” and not “wet,” this is not a problem.

The tip was supposed to provide cooks with guidance so they could confidently pack sandwiches. But I’m left with more questions: Was the cheese cloth reused for multiple days, or was it discarded after one use?Why didn’t the cook book suggest using waxed paper to wrap sandwiches? I’ve seen hundred-year-old recipes that call for using waxed paper to line pans, so I know it was available back then.

Packing sandwiches sure was more complicated in the days before Ziploc bags!