
What a deal! A bowl of hot cereal for less than a penney a serving.

What a deal! A bowl of hot cereal for less than a penney a serving.

I recently came across a hundred-year-old recipe for Dutch Salad, and decided to give it a try. It is a lettuce salad with a hot vinegar dressing. The this simple, classic salad was delightful.
Here’s the original recipe:
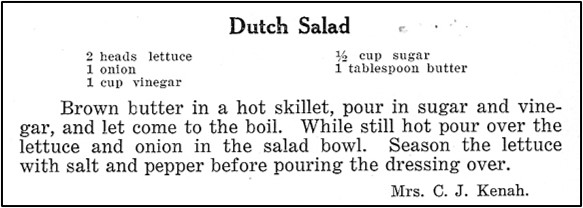
This makes a lot of dressing, so I halved the recipe. And, I skipped seasoning the lettuce with salt and pepper.
Here’s the recipe updated for modern cooks:
1 head lettuce
1/2 onion
salt and pepper, if desired
1 1/2 teaspoons butter
1/4 cup sugar
1/2 cup apple cider vinegar
Wash lettuce, dry, and then tear into small pieces and put into a bowl. Cut onion into small pieces and add to the lettuce. If desired sprinkle with salt and pepper. Set aside.
Melt and lightly brown (using care not to burn) the butter in a skillet. Stir in the sugar and vinegar, using medium heat bring to a boil. Remove from heat and pour over salad. Toss and serve.

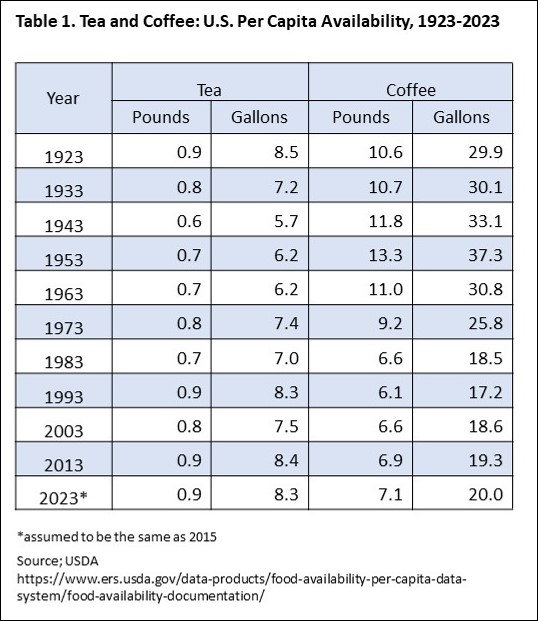
Do people drink more coffee and tea today than they did a hundred years ago? When I researched this on the U.S. Department of Agriculture website, I was surprised to discover that in the U.S. people now consume only about two-thirds as much coffee as they did in 1923, but that they consume about the same amount of tea. Here are the details:

I recently made a hundred-year-old recipe for Cheese Biscuits. The recipe was simple to make and the biscuits were tasty. My husband said, “You should make these again sometime,” which is high praise from him. This recipe is a keeper.
Here’s the original recipe:

When I made this recipe, I used shortening rather than lard. Here is the recipe for Baking Powder Biscuits that the Cheese Biscuits recipe refers to:
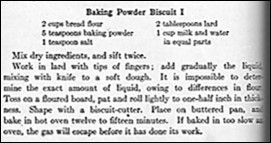
And, here’s the recipe updated for modern cooks:
1 cup bread flour
2 1/2 teaspoons baking powder
1/2 teaspoon salt
1/2 tablespoon lard or shortening
1/2 tablespoons butter, softened
3/8 cup milk and water in equal parts (3/16 cup milk + 3/16 cup water) (Don’t worry if the proportions aren’t exactly the same for the milk and water. It will turn out fine even it they are not.)
1/2 cup grated cheese (I used cheddar cheese.)
Preheat oven to 425° F. Mix the dry ingredients together; cut (work) in the lard or shortening and butter using fingers, pastry blender, or food processor. Gradually add the milk and water mixture while mixing with a knife or spoon. Continue adding liquid until there is a soft dough. Add grated cheese, and gently stir until the cheese is evenly distributed. The amount of water needed varies depending upon the type of flour. On a floured board, pat or roll the dough until 1/2 -inch thick. Cut with a round biscuit cutter. (I used a glass as the cutter.) Place on greased baking sheet, and bake for 12- 15 minutes, or until lightly browned. Serve warm.

Here are tips in a hundred-year-old cookbook for browning pie crusts:
To brown pies and tarts, use a small pastry brush and brush them with milk before putting them in the oven, and to glaze pies, brush them with the white of an egg if you wish them to be a shiny brown.
Order of the Eastern Star Relief Fund Cook Book (1923) published by the Michigan Grand Chapter

Happy Easter!
Easter is such a special time of year. It’s so much fun coloring eggs with children or grandchildren – but it’s often then a challenge to figure out ways to eat the eggs. So I was pleased to find a recipe for Eggs with Asparagus in a hundred-year-old cookbook.
The Eggs with Asparagus is a classic recipe with the asparagus topped with chopped hard-boiled eggs embedded in a white sauce.
Here’s the original recipe:

Here’s the original recipe:
Here’s the recipe updated for modern cooks:
1 bunch asparagus (about 1 pound), cut into 1-inch pieces
1 cup water
1/2 teaspoon salt
2 tablespoons butter
2 tablespoons flour
dash pepper
1/2 cup heavy cream
2 hard-boiled eggs, finely chopped
Put the asparagus, salt, and water in a saucepan, and bring to a boil using high heat; reduce heat and simmer until tender (about 3 minutes). Remove from heat and drain, reserve the water that was used for cooking.
Meanwhile in another saucepan, melt the butter. Stir the flour and pepper into the butter. While stirring constantly, slowly pour in the water that was used for cooking the asparagus and the cream; bring to a boil using medium heat while stiring constantly. Stir in the chopped eggs (reserve a small amount of the yolk for garnish). Remove from heat and pour over rthe cooked asparagus. Garnish with the chopped egg yolk.

Until I saw a fish availability calendar in a 1923 cookbook, I never thought about the seasonal variation in when various types of fish can be purchased. In today’s world, where fresh fish are sometime shipped across hemispheres and previously frozen fish are sometimes thawed and sold as “fresh,” is there much seasonal variability?
