Army Food Procurement: 1918 and 2018

Source: Ladies Home Journal (June, 1918)

How the U.S. military procures food for soldiers has changed over the past hundred years.

In 2018, the Defense Logistics Agency Troop Support Subsistence program purchases the food. Here’s what the Defense Logistics Agency website says:

The Subsistence supply chain provides food support for the military all over the world. From individually packaged meals in a soldier’s ruck sack, to a ship’s galley and to full service dining facilities on military installations, Subsistence gets that food there.

We work with our industry partners around the globe to feed the newest troops in training and seasoned sailors at sea. And we take pride in ensuring our service members have a taste of home for the holidays, no matter where they’re deployed.

In 1918, World War I was raging, and I’m sure that much food for the soldiers was purchased from large companies; however, the army also purchased home-canned foods. Here are some excerpts from an article in the June, 1918 issue of Ladies Home Journal:

How Twelve Girls Fed a Camp of Soldiers

I have been asked to give an account of the work done by the Girls’ Canning and Evaporating Club of Harvard, Massachusetts in order to demonstrate what twelve patriotic girls between the ages of nine and seventeen can do. The club was organized in the spring of 1917, with a special aim in view – that of creating what one might call an emergency supply. President Wilson said, to the women of the country, that one of the most patriotic things they could do was to conserve a surplus amount of food that would be available in case of a general shortage.

In the case of towns around the army camps, the possibility of being called upon to help out with food for the soldiers in case of shortage made this idea of an emergency supply of added value.

Now, while amateur work is often excellent, there is always the element of chance in it, because the knowledge of the fundamental principles is apt to be superficial. It was decided to give the girls a thorough training that would be a solid groundwork. A paid demonstrator was engaged to instruct the class every Saturday.

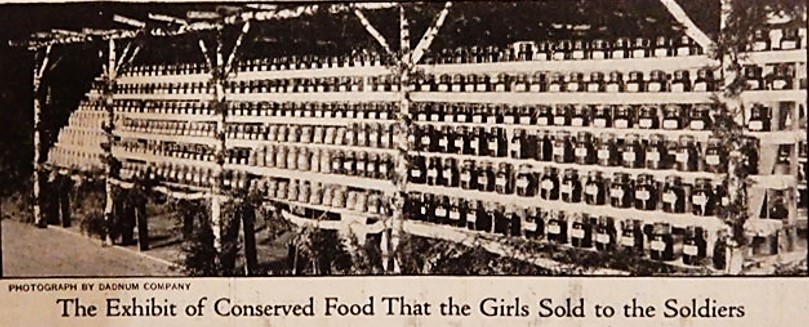
Toward the end of the season the club was invited to send an exhibit to the big Eastern States Exhibition that was held at Springfield, Massachusetts, and had the great pleasure and encouragement of being awarded a medal. This added zest to the work being done by the club, and all hands redoubled their efforts as the day for the home exhibition, held at the Town Hall at Harvard, approached. The results of the work were 1,000 jars of canned food done in the club and 200 pounds of evaporated food.

When the day came, in spite of a drenching rain, the doors had hardly been opened when the whole club exhibit of canned and evaporated food was sold to Battery F, 303d Heavy Artillery, through Lieutenant Martindale, the Battery’s mess officer, who expressed a wish that there was double the amount to secure.

The next morning a large army truck was sent over from the camp, and we had the great joy and satisfaction of seeing it packed with the results of our labor.

Clara Endicott Sears

How to Make Vinegar from Apple Parings

When I came across a hundred-year-old recipe for making vinegar from apple peels and cores, I had to give it a try. I put the apple cores and peels, molasses, and water in a bowl, covered with cheesecloth, set on the kitchen counter,  and viola – a month later I had vinegar. The use of molasses in this recipe results in a delightful dark robust vinegar.

Here is the original recipe:

Source: American Cookery (December, 1917)

And, here is the recipe updated for modern cooks:

Homemade Vinegar Made from Apple Peels and Cores

  • Difficulty: moderate
  • Print

This recipe makes about 3 cups vinegar. It can be doubled, tripled, etc.

approximately 2 quarts apple peels and cores

1 quart water

1/4 cup molasses

Put the apple peels and cores in a large bowl or crock (or the peels can be put in quart canning jars).

In a separate bowl stir together the water and molasses. Pour over the apple peels until covered. (The peels may float. If they do weight them down with a plate.) Cover with cheese cloth, and tie with a string to hold in place.

Set in a warm spot, and wait one month. (I stirred weekly to help ensure that the peels are under the liquid; then re-covered – but I don’t think that it is necessary. Over the course of the month some white “mother” will develop as the vinegar ferments.)

After a month, strain at least three times. First strain to remove the large pieces of peels, then restrain to remove smaller pieces of pulp. Next line the strainer with cheese cloth and strain a third time.

Put vinegar in bottles or jars. This vinegar will get stronger over time. Once it reaches the desired strength, store in the refrigerator to slow any additional fermentation.

Gluten Peculiar to Wheat

Source: Foods and Household Management: A Textbook of the Household Arts (1915)

A hundred years ago, much of the wheat (and wheat flour) in the United States was being shipped to Europe to feed the troops in World War I.  Cooks were trying to figure out how to successfully bake bread while using little or no wheat.  Here’s a question and answer about the gluten in wheat which appeared in a 1918 magazine.

Gluten Peculiar to Wheat

Question: Will you please give me a list of the various flours now on the market as wheat substitutes with their gluten content. What combination of these flours will yield the lightest loaves of bread if made without any wheat whatever? Is it necessary to use more yeast than with the same amount of wheat flour? Is it true that breads made from these flours are less digestible than bread made from wheat flour?

Miss A.C.P., Vt.

Answer: Practically none of the cereals, except wheat, contains gluten. Even wheat does not contain gluten until the flour is moistened. Two of the constituents of wheat, glutenin and gliadin, then unite to form gluten. Gluten it the best agent in ordinary flours to hold the gas bubbles which make light or leavened bread. Other cereals which have properties permitting aeration are rye and oatmeal.

All the substitutes for wheat are benefited from the point of view of palatability by mixing in a certain amount of wheat flour. It is probable that more yeast is required with wheat substitutes than with wheat alone. Bread is not necessarily more wholesome when leavened but usually it is more palatable.

Biscuits (crackers) and unleavened breads are perfectly wholesome when well masticated, and are just as digestible as the more porous breads. The breads made from other cereals than wheat are not necessarily less digestible than wheat bread. The chief difficulty is that the art of making other breads has not been fully developed.

Good Housekeeping (September, 1918)

Sour Milk French Toast

Ever wonder what to do with a food once it’s past its prime? A hundred years ago that was often a problem. For example, the homemade bread would often go stale before it was all eaten, and the non-pasteurized milk that most people drank often soured.

The solution was to make a dish that was even tastier than the original foods. The century-old recipe that I found for Sour Milk French Toast calls for – well, you guessed it – sour milk and stale bread.

I had neither sour milk nor stale bread, but decided to give the recipe a try. I used vinegar to “sour” the milk. (Lemon juice would also work.). And, I used day-old homemade bread (though commercially made bread would also work well).

This recipe made a tasty French toast that I’ll definitely make again.

Here’s the original recipe:

Source: Larkin Housewives Cook Book (1917)

And, here’s the recipe updated for modern cooks:

Sour Milk French Toast

  • Servings: 2 - 3 slices
  • Difficulty: easy
  • Print

2 -3 slices bread

1/2 cup milk

1 1/2 teaspoons vinegar or lemon juice (I used vinegar.)

1 egg, slightly beaten

1/3 teaspoon salt

1/2 teaspoon baking soda

1 teaspoon sugar

2 tablespoons flour

butter

shortening or lard

Stir together milk, vinegar, egg, salt, baking soda, sugar, and flour to create a thin batter. Dip each slice of bread in the batter.

In the meantime, heavily grease griddle or skillet with a mixture of butter, and shortening, or lard. (The old recipe suggests that a mixture of butter and lard might add a nice flavor.)  Heat griddle or skillet, and put prepared slices of bread on it. Brown bottom side; flip and brown on other side. Remove from heat and serve immediately.

Role of Potatoes in Diets a Hundred Years Ago

Potatoes were an important part of the diet a hundred years ago. Here’s what a cookbook said:

Housewives are always interested in new ways of preparing the potato as it appears on the average menu 365 times in the year. There are innumerable ways of preparing potatoes for the table.

When potatoes are practically the only vegetable used in the household, they should always be cooked in their skins, so that all the mineral salts may be retained. When salad plants and other vegetables are used freely, the skins may be removed before cooking, although it is not economy to do so. Sometimes convenience and palatability decide in favor of the latter.

Potatoes, combined with milk and cheese, provide a dish fully as nourishing as when combined with meat. This is interesting to know when meat prices are high.

The Housewife’s Cook Book by Lilla Frich (1917)

Old-fashioned Fried Green Tomatoes

I think of Fried Green Tomatoes as a classic comfort food – but I never actually tried them until I recently made a hundred-year-old recipe.

This is a food that I should have tried years ago. The Fried Green Tomatoes turned out wonderfully.  They were delightful with a crispy cornmeal coating.

Here is the original recipe:

Source: The Blue Grass Cook Book (Compiled by Minnie C. Fox, 1917)

And, here’s the recipe updated for modern cooks:

Fried Green Tomatoes

  • Servings: 3 - 4
  • Difficulty: easy
  • Print

4 medium green tomatoes, cut into 1/2-inch slices

4 cups water

1 teaspoon salt

sugar

salt

pepper

1/2 cup corn meal

shortening or lard

Combine  the water and  1 teaspoon salt in a mixing bowl, then soak the sliced tomatoes in the water for approximately 30 minutes. Remove the tomatoes from the water and drain on a paper towel, then lay the tomatoes in a single layer on a baking sheet, and sprinkle with sugar, salt, and pepper. Put the cornmeal in a small bowl, then roll each tomato slice in the cornmeal.

Heat 1/2 inch of shortening or large in a large frying pan. Carefully place the breaded green tomato slices in the pan in a single layer. Depending upon pan size, the slices may need to be cooked in several batches. Fry for about 3 minutes or until the bottom side of each slice is lightly browned, then gently turn and fry until the other side is browned. Remove from pan and drain on paper towels. Serve immediately.