Cauliflower Mousselaine

Cauliflowre Mousselaine

When flipping through a hundred-year-old cookbook I was intrigued by a recipe for Cauliflower Mousselaine, and decided to give it a try.

The cauliflower was embedded in a creamy, sunny, lemony sauce with a hint of nutmeg. I was surprised that the lemon in sauce predominated over the cauliflower, but it was delightful. This recipe has gourmet feel to it, and is an unusual flavor combination, but I’d make it again.

Here’s the original recipe:

Recipe for Cauliflower Mousselaine
Source: The Boston Cooking School Cook Book (1923)

Here’s the recipe updated for modern cooks:

Cauliflower Mousselaine

  • Servings: 3 - 5
  • Difficulty: moderate
  • Print

1 head cauliflower, separated into florets (about 3 cups florets)

2 egg yolks, slightly beaten

1/4 cup heavy cream

1/2 teaspoon salt

1/8 teaspoon nutmeg

juice of 1/2 lemon

2 tablespoons butter

Put cauliflower florets in a saucepan, and cover with water. Put on stove, and bring to a boil using high heat, then reduce heat and simmer for 4-6 minutes. Remove from heat and drain. Put in serving bowl.

In the meantime, make the sauce by putting the egg yolks, heavy cream, salt, nutmeg, and lemon juice in a saucepan; stir until thoroughly combined and smooth. Cook, using medium heat, while stirring constantly, until the sauce thickens. Add the butter – a few small pieces at a time – while continuing to stir. When the butter is melted, pour the sauce over the cauliflower.

http://www.ahundredyearsago.com

Hundred-year-old “Revolving Susan”

revolving susan
Source: Household Engineering: Scientific Management in the Home (1923)

A hundred-year-old book on scientific management of homes recommended the use of a “revolving susan.”

In many cases, where the dining table has a large enough diameter, it is practical to use in the middle of the table a “revolving susan” – or circular glass tray mounted on a revolving stand, which will accommodate butter, relishes, etc.; but its greatest value lies in assisting the host to pass dishes to each person to be served. Set the plate of food on the server, give a slight touch, and it will revolve to the person desired, thus doing away with awkward passing from one to another. Similarly the server may be used for removing the soiled plates, by each person laying their soiled plate in turn on the server, and whirling to the hostess, who will then remove them unobtrusively.

Household Engineering: Scientific Management in the Home by Mrs. Christine Frederick (1923)

Old-fashioned Fried Celery

Fried Celery

It was more popular to serve celery as a stand-alone vegetable a hundred years ago than it is now. One way of serving it back then was to bread the celery, and then fry it.

When I made this recipe, I struggled to get the bread crumbs to stay on the celery – and the breading was very uneven – though it tasted fine.

Here’s the original recipe:

Recipe for Fried Celery
Source: General Welfare Guild Cook Book(Beaver Valley General Hospital, New Brighton, Pennsylvania, 1923)

I used paper towels instead of cheese cloth to dry the celery.

Fried Celery

  • Servings: 3 - 5
  • Difficulty: moderate
  • Print

1 bunch celery

salt

1 egg, beaten

3/4 cup fine bread crumbs

shortening, lard, or other fat

Wash celery and cut into 4-pieces; dry with paper towels. Sprinkle the celery pieces with salt, then dip in beaten eff, and then roll in the bread crumbs.

Heat 1-inch of fat in large skillet. Put the breaded celery in the heated fat, and fry until the breading is brown and the celery tender; remove from skillet and drain on paper towels.

http://www.ahundredyearsag0.com

First Vegetables Introduced to Babies a Hundred Years Ago

First vegetables for babies
Source: Order of the Eastern Star Relief Fund Cook Book (Michigan Grand Chapter, 1923)

A hundred-year-old cookbook recommended that the best first vegetables for a baby are strained spinach, asparagus, peas, and young carrots. I can’t remember which vegetables were introduced first when my children were young, but the Strong 4 Life site says:

Great first veggies to try:

  • Pureed carrots
  • Pureed squash
  • Pureed broccoli
  • Pureed sweet potatoes
  • Pureed green beans

Old-fashioned Loaf Chocolate Cake

Chocolate Loaf Cake

When browsing through a hundred-year-old cookbook published by a shrine patrol in Rochester New York, I saw a recipe for Loaf Chocolate Cake, and decided to give it a try. This recipe is a winner. The recipe was easy to make, and the loaf cake was soft and moist, and had just the right amount of sweetness. (I prefer cakes that aren’t overly sweet).

Here is the original recipe:

Recipe for Chocolate Loaf Cake
Source: Cook Book published by Bethany Shrine Patrol No. 1, Rochester, NY (1923)

A hundred-years-ago milk often was not pasteurized. Back then, if the non-pasteurized milk was not used quickly, the “good” bacteria in the milk would turn it into a sour milk suitable for use in recipes. Today’s pasteurized milk can be turned into a sour milk by adding a little vinegar.

In 1923, squares of baking chocolate were typically 1-ounce. Today they are often 1/2 ounce, so 4 squares rather than 2 may be needed.

Here’s the recipe updated for modern cooks:

Loaf Chocolate Cake

  • Servings: 7 - 9
  • Difficulty: easy
  • Print

1/2 cup milk

1 tablespoon vinegar

2 cups brown sugar

1/2 cup butter, melted

2 cups flour

2 eggs

2 1-ounce squares unsweetened baking chocolate, melted (Many brands of baking chocolate have squares smaller than 1 ounce, so more than 2 squares may be needed.)

1 teaspoon baking soda

1 teaspoon vanilla

1/2 cup boiling water

Preheat oven to 350° F. Grease and flour a large loaf pan (9″ X 5″) or use two smaller ones.

Put the milk in a cup or bowl, then stir in the vinegar. Set aside for at least 2 minutes to allow milk to sour.

Put brown sugar, butter, flour, eggs, melted chocolate, baking soda, vanilla, and the soured milk in a mixing bowl; stir to combine. Add boiling water; beat until smooth than put in loaf pan. Bake 1 hour 10 minutes, or until wooden pick inserted in center comes out clean. (The time would be less if two smaller pans are used.)

http://www.ahundredyearsago.com

Old-Fashioned Lemon Crumb Pie

Slice of Lemon Crumb Pie
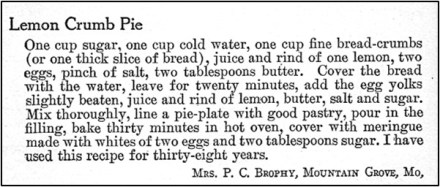
When browsing through a hundred-year-old cookbook, I came across a recipe for Lemon Crumb Pie.

Recipe for Lemon Crumb Pie
Source: Larkin Housewives Cook Book (1923)

I was intrigued by the statement that the recipe author has used this recipe for 38 years. Even though all recipes I make for this blog are old, this one seemed particularly old-fashioned and called for using bread soaked in water to help thicken the pie filling.

The pie turned out well, and is very similar to Lemon Meringue Pie. I never would have guessed that there was bread in the baked pie. There’s something to be said for recipes that have been made (and maybe refined) over the course of 38 years .

Here’s the recipe updated for modern cooks:

Lemon Crumb Pie

  • Servings: 4 - 6
  • Difficulty: moderate
  • Print

1 slice bread torn into small pieces (about 1 cup)

1 cup water

1 cup sugar

Juice from 1 lemon

Grated rind of 1 lemon

2 egg yolks

dash salt

2 tablespoons butter, melted

1 8-inch (small) pie shell

Meringue

2 egg whites

2 tablespoons sugar

Preheat oven to 425° F. Put bread pieces and water in a mixing bowl and let soak for 20 minutes. Then add sugar, lemon juice, grated lemon rind, egg yolks, salt, and melted butter; beat until combined. Pour mixture into pie shell and bake until the mixture is hot and bubbly and thickened (about 30 – 35 minutes). Watch pie closely because the filling will easily boil over.

To prepare the meringue, put the egg whites into a mixing bowl. Beat until stiff peaks form, then beat in the sugar. Spoon the meringue onto the top of the baked pie, and then swirl. Bake in the oven for approximately 8-10 minutes or until the meringue is a light brown.

http://www.ahundredyearsago.com