I’ve never given much thought as to what I should do with my knife and fork when I finish eating a meal. I typically just put the knife across the top of my plate and let the fork tines lay somewhere on my plate. But apparently a hundred years ago people worried about proper etiquette. Here’s what it said in a 1924 magazine:
What to Do with the Knife and Fork at the Close of Dinner
At the close of dinner, or at the close of a course, the knife and fork should be laid side by side, fork with the tines up, knife with the sharp edge nearest the fork, and a little to the right side of the dinner plate, and at right angles to the edge of the table. This should be the signal that the guest has finished the meal, or the course, and is ready to have his plate removed.
American Cookery (November, 1924)
I decided to see what this looked like, and tried to follow the directions (though used a clean plate rather than one with food scraps after I’d eaten). It looks really strange to me. And, why aren’t there any directions for what to do with the spoon?
Cranberries are a Fall favorite, so when I saw a recipe for Cranberry-Raisin Roll in a hundred-year-old cookbook I decided to give it a try.
Chopped cranberries and raisins were rolled into a baking powder dough and then steamed, which results in the roll having a different texture than if it had been baked. It is served with lemon sauce. The Cranberry-Raisin Roll was delightful and almost seemed elegant. It was soft, but slightly chewy, with the lovely tartness of cranberries that were slighted moderated by the sweetness of the raisins.
Here’s the original recipe:
Source: Modern Priscilla Cook Book (1924)
The dough seemed too thick when I rolled it to a thickness of 1/2 inch, so I rolled it a little more until it was about 1/4-inch thick.
And, here is the recipe for Lemon Sauce:
Source: Modern Priscilla Cook Book (1924)
I didn’t stir in boiling water when I made the Lemon Sauce. It didn’t seem necessary since the mixture was heated on the stove. I just used room temperature water.
Chop cranberries and raisins. (A blender or food processor works well to chop them.) Then put in a bowl and stir in the sugar. Set aside.
Put baking powder, sugar, salt, flour, and butter in a bowl. Add 3/4 cup milk, and mix using a fork until dough starts to cling together. If it is too dry, add additional milk. Turn onto a flour-prepared surface, and roll dough into an approximate 11-inch X 18-inch rectangle that is 1/4 inch thick. Evenly spread the cranberry and raisin mixture on the rolled dough to within 1/2 inch of the edges. Start at one of the narrower sides and roll, then put in a steamer over quickly boiling water and cover. Steam for 1 1/2 hours. Remove from steamer and serve with Lemon Sauce.
Lemon Sauce
1/2 cup sugar
1 tablespoon corn starch
dash salt
1 cup water
2 tablespoons butter
1 1/2 tablespoons lemon juice
1/4 teaspoon grated lemon rind
1/8 teaspoon nutmeg
Mix the sugar, cornstarch, and salt together in a saucepan. Stir in the water, and heat using medium heat until the mixture boils. Reduce heat and simmer until the mixture thickens. Stir in the butter, lemon juice, grated lemon rind, and nutmeg. Serve hot.
I have a lot of fun making hundred-old-recipes. Often old recipes have less detailed directions than modern ones, and I need to try to interpret what the recipe author meant. Usually it is fairly easy to figure out what to do, but occasionally an old recipe just leaves me scratching my head. This is one of those times. Here’s the original recipe for Marshmallow Pudding:
Cook Book of the Susquehanna Valley Country Club, Sunbury, PA (1924)
What the heck is 10¢ worth of marshmallows and 10¢ worth of shelled nuts? I quickly did a few online searches with relatively little luck. Amazingly even the artificial intelligence (AI) feature in my search engine doesn’t know what marshmallows cost in 1924. (I thought that AI took at stab at answering all questions and would try to give me a price for marshmallows. Rather it redirected me to the prices of eggs, round steak, and macaroni in 1924.)
I decided to use with 3 cups miniature marshmallows and 1/2 cup chopped walnuts. I have not idea whether this is similar to what the recipe author used, but it worked okay.
I used canned pineapple tidbits when making this recipe. The old recipe calls for chopped pineapple. I had a vague memory that years ago gelatin packages said not to use fresh pineapple when making gelatin, so did another search that was more successful. Gelatin won’t set when mixed with fresh pineapple because of an enzyme it contains; however, it will set if canned pineapple is used.
I had difficulty getting the gelatin dissolved. One tablespoon cold water plus 2 tablespoons boiling water just did not seem like enough liquid to get it successfully dissolved. I ended up heating 1/4 cup of pineapple juice (from the canned pineapple) and adding that to the gelatin that I was trying to dissolve.
I assumed that “1-3 cup sugar” meant “1/3 cup sugar.” I also assumed that “1 pint whipped cream”, meant 1 pint of unwhipped heavy cream that I then whipped.
The verdict: My interpretation of this recipe was very nice. The Marshmallow Pudding was creamy and sweet with bits of tart pineapple and crunchy walnuts. It reminds me of similar dishes that I’ve had at reunions, pot luck dinners, and family gatherings over the years.
1 cup canned pineapple tidbits, drained (Reserve 1/4 cup pineapple juice)
2 cups heavy whipping cream
1/3 cup sugar
3 cups miniature marshmallows
1/2 cup walnuts, chopped
Place the cold water in a small bowl; then sprinkle the gelatin over the 1 tablespoon cold water. Let the gelatin absorb the water and soften for a few minutes. In the meantime, heat 2 tablespoons of water plus 1/4 cup pineapple juice to boiling. Reduce heat to low and stir in softened gelatin; stir until dissolved. Add 1/3 cup sugar; stir until dissolved. Remove from heat. Set aside and allow to partially cool.
Put the whipping cream in a bowl. Beat until stiff peaks form. Gently stir in the dissolved gelatin and sugar. Fold in the pineapple tidbits, miniature marshmallows, and walnuts. Put in serving bowl. Refrigerate until chilled (at least 2 hours).
Need some ideas for a Halloween dinner? Look no further than the October, 1924 issue of American Cookery magazine. The menu calls for serving 16 foods plus coffee. Whew, what a lot of food! That said, I’m off to a good start making the foods on the menu:
I love browsing through hundred-year-old cookbooks and selecting recipes to make for this blog. Generally I choose recipes that I think I will enjoy. But, old cookbooks also contain some recipes that seem very unusual and that I don’t think that I will like. I tend to ignore those recipes, but occasionally I’m intrigued enough to give one a try – while not having very high expectations. The recipe that I’m sharing this week is one of those times.
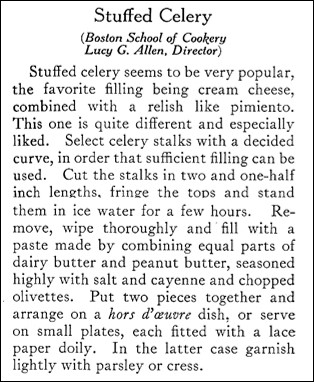
I made Stuffed Celery. The recipe called for “fringing” celery pieces with a knife, putting in ice water for several hours, and then stuffing and putting two pieces together and standing on a plate. What seemed really unusual was that the stuffing contained butter, peanut butter, salt, cayenne (red) pepper, and chopped olives. I couldn’t even begin to imagine what this mixture might taste like, but definitely had my doubts that I’d like it.
The verdict: The Stuffed Celery looked very dramatic, though some of the pieces didn’t want to stay together or stand for very long. The stuffing mixture actually tasted okay (not incredible, but it was not terrible). It was definitely a case where something tasted better than it sounds.
Here’s the original recipe:
Source: American Cookery (October, 1924)
I’m not sure what olivettes are, but I interpreted it to mean olives. When I made this recipe I used stuffed green olives that I finely chopped.
2 tablespoons stuffed green olives, finely chopped
Select the large curved stalks of celery in the bunch, wash, and then cut into 2 1/2 inch pieces. (Save small stalks and pieces for use in other recipes.) Fringe the top of the celery by making vertical cuts close together in the top half of each piece of celery. Stand the fringed celery in ice water for 2-4 hours.
In the meantime put the butter, peanut butter, salt, and cayenne pepper in a small bowl; stir until thoroughly mixed. Add chopped olives and stir until evenly distributed.
After 2-4 hours remove celery pieces from the ice water and wipe dry. Fill the bottom portion of each piece of celery with the peanut butter mixture. Put two pieces together, and wipe with a paper towel to remove any excess peanut butter mixture, then stand on a plate. The bottom edges of the celery may be trimmed if needed to make them level so they will stand better.
Source: Canadian Grown Apples: Delight in Every Bite (1924)
Many popular apple varieties today did not exist a hundred years ago; and some popular varieties a hundred years ago are seldom seen today. Both now and then, there were lists of which apple varieties were best for different uses. Today lists often refer to apples for eating, and cooking or baking. A 1924 list refers to apples for cooking, dessert apples, and cider apples. Were dessert apples ones that were particularly good to eat raw?