Old-Fashioned Nut Molasses Bars


Nut Molasses Bars
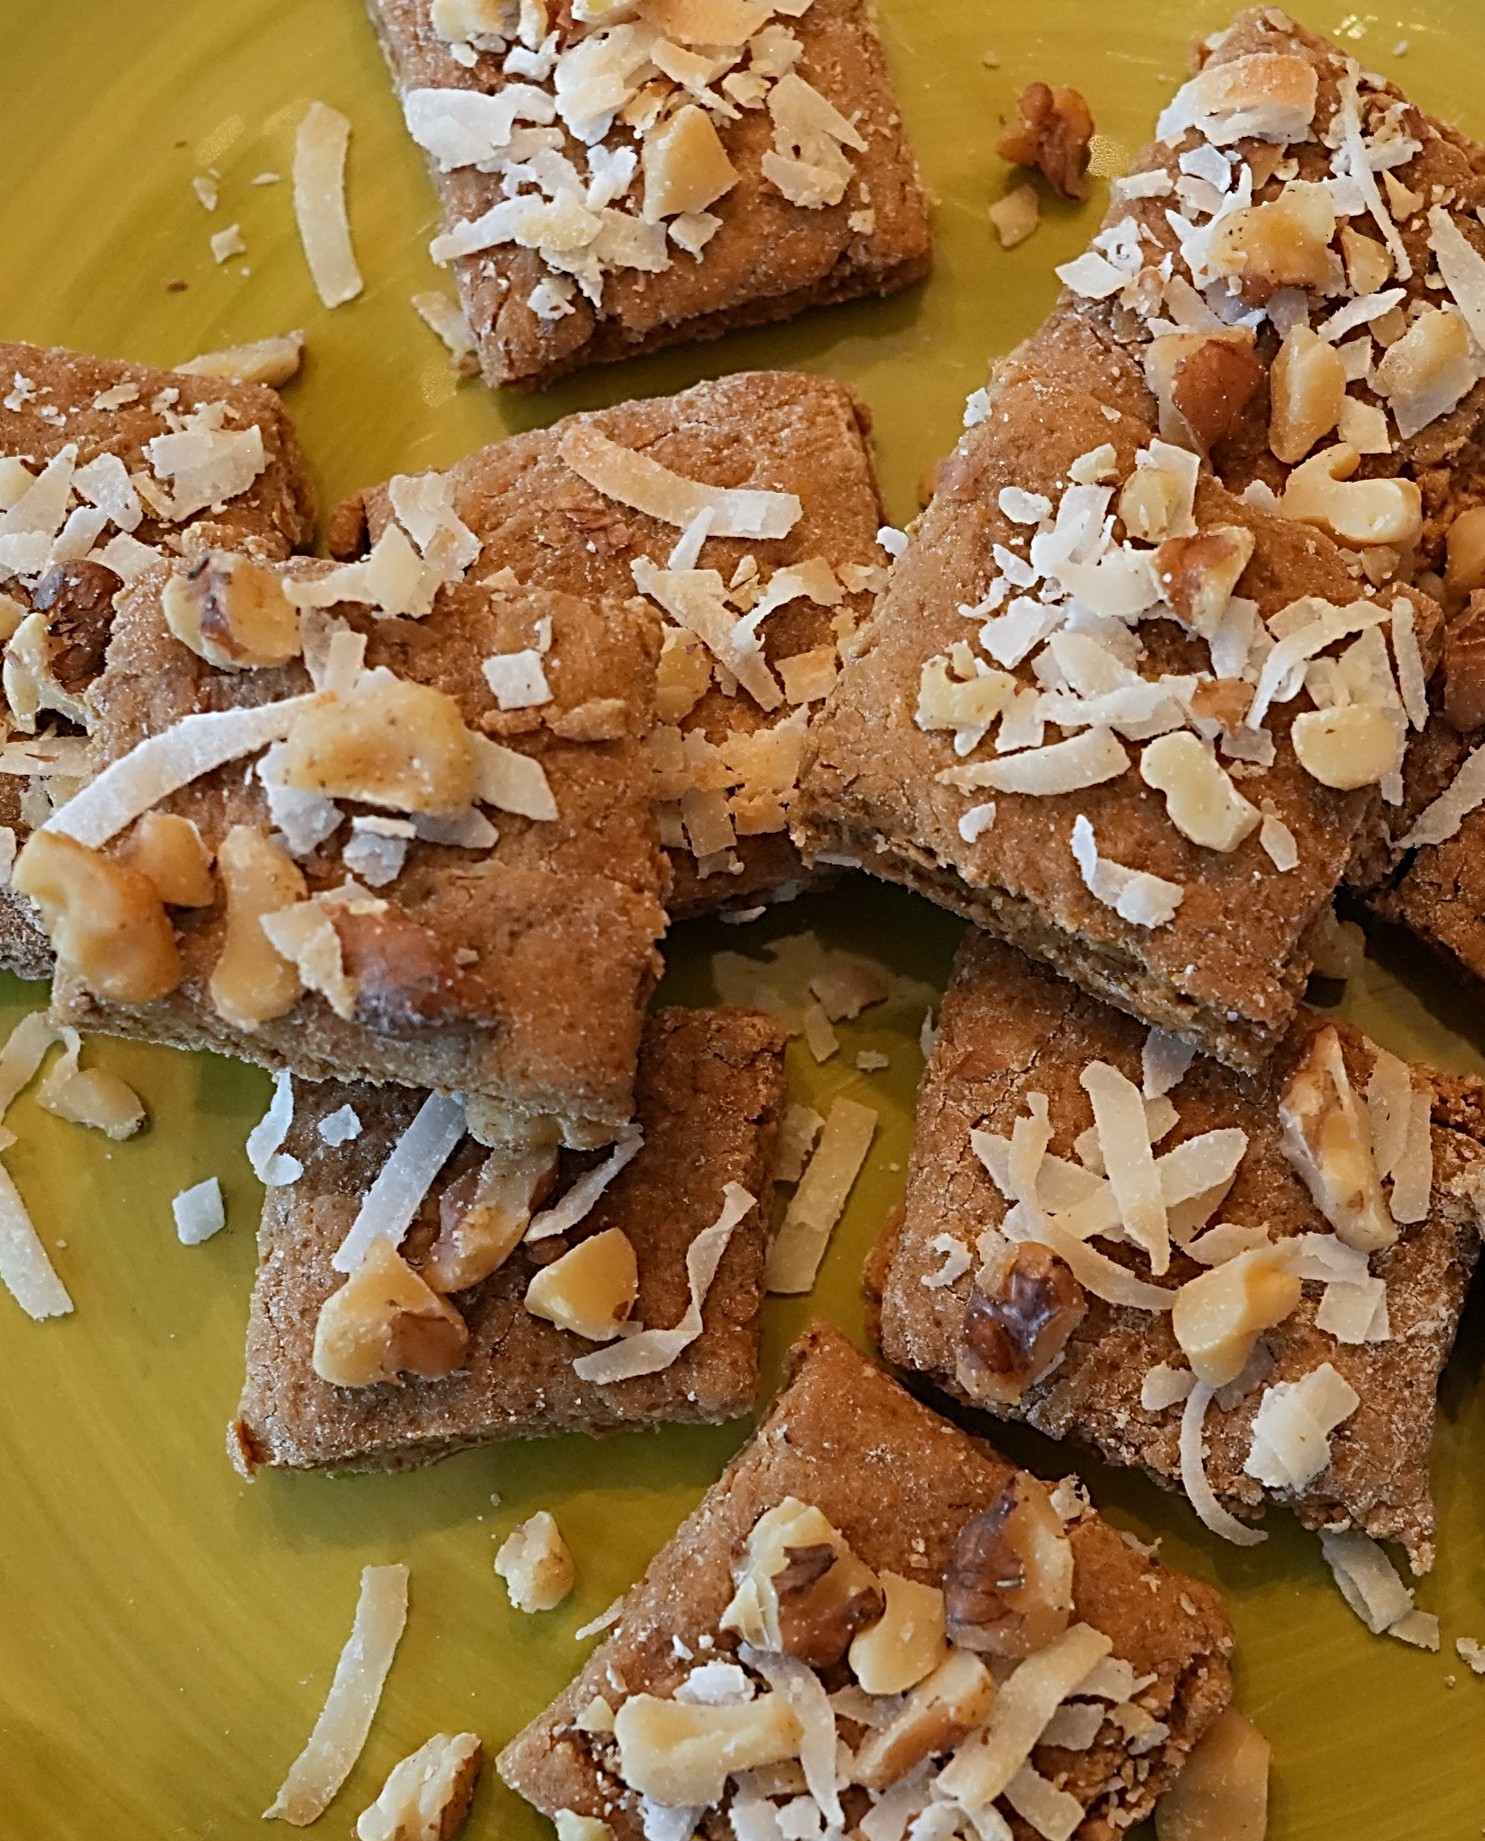
I came across a hundred-year-old recipe for Nut Molasses Bars and decided to give it a try.

The cookies are a cross between cutout cookies and modern bar cookies. The dough is rolled out, then cut into bars, and topped with coconut and walnuts. They were tasty with just the right amount of spices and molasses.

Here is the original recipe:

Nut Molasses Bars
Source: The Home Makers’ Cooking School Cook Book (1925)

English walnuts are just the usual walnuts that are sold commercially. Unless walnuts are specifically labeled as black walnuts, they are English walnuts.

If the butter is softened before making this recipe, the water does not need to be boiling.

The cookie dough was extremely dry, so I added additional water to make it rollable.

I had trouble with the coconut and walnuts not adhering to the bars. To help make the topping stay put, I revised the recipe to say that the rolled cookie dough should be brushed with beaten egg white before the coconut and walnuts are sprinkled on it.

Here’s the recipe updated for modern cooks:

Nut Molasses Bars

  • Servings: approx. 60 bars
  • Difficulty: moderate
  • Print

1/2 cup butter, softened

1/4 cup water + additional water, if needed

1/2 cup brown sugar

1/2 cup molasses

1 teaspoon baking soda

1/2 teaspoon ground ginger

1/8 teaspoon ground cloves

1 teaspoon salt

3 2/3 cups flour

1 egg white, beaten

1/2 cup coconut

1/2 cup walnuts, chopped

Preheat oven to 350◦ F. Put butter, water, brown sugar, and molasses in a mixing bowl; stir. Add baking soda, ginger, cloves, and salt; stir to combine. Add flour, and stir. If the dough is too dry, add additional water until it holds together. (I had to add about 3/4 cup of additional water). Chill for 1/2 hour.  Place the dough on a lightly floured surface. Roll to 1/8 inch thickness. Cut into 3 1/2 inch X 1 inch strips. Brush with egg white, then sprinkle with coconut and walnuts. Press the coconut and the walnuts firmly into the dough. Cut each strip into 3 pieces. Put the pieces on a prepared baking sheet. Bake 12 minutes.

http://www.ahundredyears.com

Old-Fashioned Grapefruit Cocktail

Grapefruit Cocktail

The word “cocktail” generally brings to mind alcoholic beverages, but another definition of cocktail is ” a cold dish, often eaten at the start of a meal, consisting of small pieces of food.” According to the January, 1925 issue of American Cookery magazine, a fruit appetizer called Grapefruit Cocktail was served at many of the best hotel back then. Given this strong recommendation, I decided to make Grapefruit Cocktail.

It was easy to make. Grapefruit segments are cut into bite-sized pieces, then a little powdered sugar and juice from a jar of maraschino cherries is added. The mixture is served in an attractive serving cup or sherbet glass that is lined with lettuce and topped with a maraschino cherry.

The recommended way of serving Grapefruit Cocktail in a sherbet glass lined with lettuce makes an attractive presentation, but it has a very old-fashioned look. (When is the last time you’ve eaten fruit nested in lettuce leaves?) But the Grapefruit Cocktail was refreshing and very tasty with a nuanced burst of flavor provided by the maraschino cherry juice.

Here’s the original recipe:

Grapefruit Cocktail

Recipe for Grapefruit Cocktail
Source: American Cookery (January, 1925)

Here’s the recipe updated for modern cooks:

Grapefruit Cocktail

  • Servings: 2
  • Difficulty: easy
  • Print

1 grapefruit

1 tablespoon powdered sugar

1 teaspoon juice from a jar of maraschino cherries

lettuce

2 maraschino cherries

Peel the grapefruit, then divide into segments and cut each segment into thirds. Put into a bowl. Sprinkle with powdered sugar and add maraschino cherry juice; gently stir. Line serving cups or sherbet glasses with lettuce leaves, then fill with the grapefruit mixture. Garnish with a maraschino cherry on top.

http://www.ahundredyearsago.com

Old-Fashioned Shamrock Salad with French Dressing with Mustard

Shamrock Salad

Hundred-year-old magazines sometimes have holiday recipes. For St. Patrick’s Day, the March, 1925 issue of American Cookery had a recipe for Shamrock Salad with French Dressing with Mustard. I decided to give it a try.

Shamrock Salad is made by stuffing green pepper halves with a cream cheese and olive mixture. The stuffed peppers are refrigerated for several hours, then sliced. The French Dressing with Mustard is very different from modern bottled French dressings, but it was a nice oil and vinegar dressing.

The Shamrock Salad with French Dressing with Mustard was good, but had a very old-fashioned look and taste.

Here’s the original recipe:

Shamrock Salad

Recipe for Shamrock Salad with French Dressing with Mustard
Source: American Cookery (March, 1925)

The old recipe indicates that the serving size is four slices. I cannot imagine eating a serving that large of this salad; 1 slice – at most 2 – makes a nice serving size. Since I thought that the serving size was very large, I halved the recipe when I updated it.

For the French Dressing with Mustard, I used olive oil for the oil.

Here’s the recipe updated for modern cooks:

Shamrock Salad with French Dressing with Mustard

  • Servings: 2 - 3
  • Difficulty: moderate
  • Print

1 large green pepper

1/2 tablespoon butter, softened

1 8-ounce container cream cheese (room temperature)

1/4 tablespoon cream

1/4 teaspoon salt

6 stuffed green olives, finely chopped

lettuce (optional)

Remove stem from the green pepper, then cut in half. (There will be a top half and a bottom half.) Remove pith and seeds. Set aside.

Put butter in a bowl and cream, then add the cream cheese, cream, and salt. Stir until smooth. Add the chopped olives and stir until the olives are evenly distributed in the mixture.

Use the cream cheese mixture to fill the green pepper halves. Press the mixture in firmly. Refrigerate the stuffed peppers until the cream cheese is firm (at least 4 hours)

Remove from refrigerator and with a sharp knife cut the stuffed peppers into thin slices (about 1/4 inch thick). If desired, put the slices on lettuce leaves. Serve with French Dressing with Mustard (see below).

French Dressing with Mustard

1 teaspoon brown mustard

1/8 teaspoon salt

dash of pepper

1 teaspoons onion, grated (optional)

1 1/2 tablespoons olive oil

3/4 tablespoon vinegar

Put the brown mustard in a bowl, then stir in the salt and pepper. If desired, add the grated onion and stir. Gradually add the olive oil while stirring rapidly, then add the vinegar and stir to combine.

http://www.ahundredyearsago.com

Old-Fashioned Cheese and Green Pepper Sandwiches (Toasted)

Cheese and Green Pepper Sandwich on plate

Grilled cheese sandwiches can get a little boring, so when I saw a recipe in a hundred-year-old cookbook for Cheese and Green Pepper Sandwiches that were toasted, I decided to give it a try.

The sandwiches were delightful. The crunchiness, slight sweetness, and subtle tanginess of the green peppers co-mingled nicely with the melted cheese.

The old recipe said to cut the toasted sandwiches into strips. I have never previously cut a sandwich into strips, but I decided to give it a try and it made a nice presentation.

Here’s the original recipe:

Recipe for Cheese and Green Pepper Sandwich
Source: Rumford Complete Cook Book (1925)

The ingredient list indicates that salt is an ingredient in this recipe, but it is not mentioned in the cooking instructions. Since cheese already contains salt, and it was not mentioned in the instructions, I did not add any salt when making this recipe.

Maybe most people had meat choppers a hundred years ago, but today I don’t think that many cooks have one. I know that I don’t. Instead, I decided to use my grater to grate the green pepper. That worked fine and there was some green pepper juice similar to what was described in the old recipe. It would also work to finely chop the green pepper, though there might be less juice, but I think that it would still work since the cheese will melt and hold everything together when the sandwich is heated.

This recipe is very specific regarding the amounts for the cheese and green papers, but very vague about the number of slices of bread to use. I decided to make three sandwiches, and adjusted the amount of green pepper and cheese to make an appropriate amount of filling. Three green peppers sound like a lot of green pepper. I think that green peppers often were much smaller a hundred years ago than what they typically are today, so I decided to use 1/2 cup of shredded or grated green pepper. I also thought that 8 ounces of cheese was more than was needed to make 3 sandwiches, so I used 4 ounces of cheese.

The original recipe says to “toast over a hot fire,” so I toasted the sandwiches using the broiler in my oven; but, it would also work well to put butter on the bread slices and grill in a skillet.

I didn’t think that there was any need to tuck the toasted sandwich strips in the folds of a napkin to keep them warm. I just served the hot sandwiches immediately.

Here’s the recipe updated for modern cooks:

Cheese and Green Pepper Sandwich (Toasted)

  • Servings: 3
  • Difficulty: moderate
  • Print

4 ounces cheese, grated or shredded (I used cheddar cheese)

1/2 cup green pepper, grated or finely chopped

6 slices bread

Put the cheese and the green pepper in a bowl; stir until the cheese and green pepper pieces are evenly distributed. Put half of the bread slices on a baking sheet, then spread with the cheese mixture. Top with the remaining slices of bread.

Set the rack 7-8 inches under the broiler. Put the baking sheet with the sandwiches under the broiler. Broil until the top slice of bread is lightly browned; gently flip the sandwiches, continue broiling until the other side is lightly browned. (Another option for browning the bread would be to lightly butter the bread slices, then grill in a skillet.)  Remove from heat. If desired, cut each sandwich into three strips. Serve immediately.

http://www.ahundredyearsago.com

Old-Fashioned Apricot Souffle

Apricot SouffleWhere I live March came in like a lion, and I wanted to make a cheery dessert. I found a hundred-year-old recipe for Apricot Souffle that fits the bill. It was light and had a lovely apricot flavor with a hint of almond.

Here’s the original recipe:

Recipe for Apricot Souffle
Source: Rumford Complete Cook Book (1925)

I got this recipe out of a cookbook that I bought off eBay. It had a penciled checkmark at the top which suggests that the original owner of the cookbook made it.

I used a 15-ounce can of apricots. I drained them, and then measured the apricots and had about 1 cup of them which I then pureed. I baked the apricot souffle in custard cups. I did not grease and sugar the cups because I thought it might make the top portion of the cups that was above the apricot mixture look messy. It worked fine not to grease them.

Here’s the recipe updated for modern cooks:

Apricot Souffle

  • Servings: 4 - 5
  • Difficulty: moderate
  • Print

1 can (15-16 oz.) canned apricots

1/2 cup sugar

6 drops almond extract

3 egg whites, stiffly beaten

Preheat oven to 350◦ F. Drain apricots and puree. Put pureed apricots in a saucepan and bring to a boil using medium heat. Remove from heat and stir in the sugar and almond extract. Put a small amount of the apricot mixture (1 – 2 tablespoons) in the beaten eggs whites, and fold in. (The egg white is first combined with a little of the hot mixture to prevent it from immediately cooking when introduced into the hot combination.) Fold the egg whites into the remaining apricot mixture, then put into individual custard cups.  Put the custard cups in a pan containing enough hot water to come halfway up the cups. Bake until set and just beginning to brown (about 20 minutes).

http://www.ahundredyearsago.com

Old-Fashioned Cocoa Raisin Muffins

Cocoa Raisin Muffins

There is a fun children’s book that contains both a story and recipes called Billy in Bunbury. It was a promotional book that was published in 1925 by the Price Baking Powder Company. I decided to make a recipe in the book for Cocoa Raisin Muffins.

The muffins were delicious. They were chocolatey with a hint of cinnamon, and had a nice texture with lots of raisins. And, the recipe does not call for any eggs – an added bonus during this time of exorbitant egg prices. Here’s the original recipe:

Recipe for Cocoa Raisin Muffins
Source: Billy in Bunbury (1925)

It is a little surprising that a recipe in a children’s cookbook calls for 7/8 cup of milk. I seldom see recipes that call for eights of a cup, and it seems like an especially complex measure for a child to navigate when making this recipe.

Raisins were the last ingredient I added when I made this recipe, and that worked fine.

The recipe indicates that this recipe will make 16 muffins, but when I made this recipe, it only made 12 muffins. The number of muffins is very dependent upon the size of the individual muffin cups in the muffin tin. Apparently, muffins were fairly small a hundred years ago.

Here’s the recipe updated for modern cooks:

Cocoa Raisin Muffins

  • Servings: 12 -14
  • Difficulty: easy
  • Print

1 3/4 cups flour

2 tablespoons cocoa

5 tablespoons sugar

1/2 teaspoon salt

1/4 teaspoon cinnamon

4 teaspoons baking powder

2/3 cup raisins

7/8 cup milk

5 tablespoons butter or shortening, melted

Preheat oven to 400◦ F. Sift together flour, cocoa, sugar, salt, cinnamon and baking powder. Slowly add milk while stirring. Continue stirring until the batter is smooth, then add butter or shortening, and stir until combined. Stir in raisins. Put batter into prepared muffin tins. Fill each muffin cup about 3/4th  full.  Bake for approximately 20 minutes or until lightly browned.

http://www.ahundredyearsago.com

Old-Fashioned Corn Souffle

Corn Souffle

I recently came across a hundred-year-old recipe for Corn Souffle, and decided to try it. The recipe called for separating the eggs and stiffly beating the egg whites, then folding them into a white sauce and corn mixture which is baked.

The Corn Souffle turned out well. It was delicious, and had a light, creamy, pudding-like texture.

Here’s the original recipe:

Recipe for Corn Souffle
Source: Cook Book Compiled by Women of Country Club Christian Church (Kansas City, Missouri), 1925

Here’s the recipe updated for modern cooks:

Corn Souffle

  • Servings: 4 - 5
  • Difficulty: moderate
  • Print

2 eggs, separated

1/4 cup butter

1/4 cup flour

1/3 teaspoon salt

1/8 teaspoon pepper

2/3 cup milk

1 cup cooked corn (I used canned creamed corn.)

Heat oven to 375◦ F. Put egg whites in bowl; beat until stiff. Set aside.

Melt butter in a large saucepan. Stir in flour, salt, and pepper. Gradually stir in milk. Heat to boiling, stirring constantly. Remove from heat.

Put egg yolks in a small bowl; stir until smooth. Place a small amount (approximately 1 – 2 tablespoons) of hot mixture into dish with egg yolk, stir quickly. (The egg is first combined with a little of the hot mixture to prevent it from turning into scrambled eggs when introduced into the hot combination.)  Add egg mixture to the remaining hot mixture in the saucepan; stir. Add the corn and stir. Fold in the beaten egg whites. Pour into an 8″X8″X2″ or similar-sized casserole dish. Bake in oven uncovered until thickens (approximately 25 – 35 minutes.)

http://www.ahundredyearsago.com