When I saw a hundred-year-old recipe for Rosy Macaroni, I just had to give it a try. It’s really macaroni and cheese made with canned tomato soup, and some celery and onions thrown in for good measure, as well as tiny amounts of ground cloves and paprika.
The tomato soup added a new dimension to the macaroni and cheese – and I loved the crunchiness that the celery added to the dish. Rosy Macaroni definitely falls into the comfort food category, though I must admit that I find it slightly disappointing that commercially canned soups have been available for more than a hundred years.
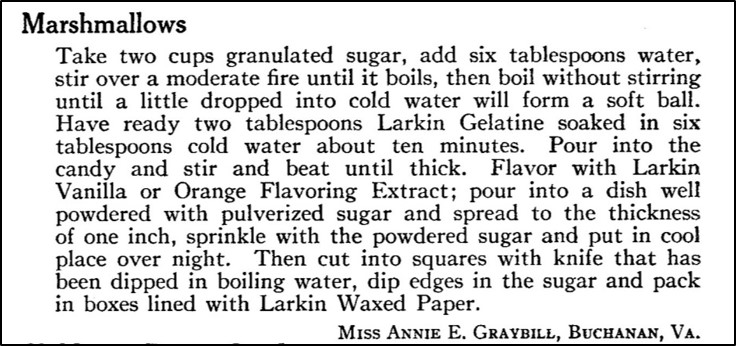
Here’s the hundred-year-old recipe:

The murky language of old recipes is often challenging. The nuanced language differentiating between a “dust” of ground cloves and a “pinch” of soda was particularly confounding. When I updated the recipe, I went with 1/8 teaspoon for both ground cloves and baking soda – but I’m I probably not exactly replicating the original recipe for either ingredient.
And, I started with a box of macaroni containing the typical 1-inch pieces. (Macaroni must have looked very different a hundred years ago if it needed to be broken into short pieces.) I also stirred the cooked macaroni into the tomato sauce rather than making them separate layers since it was easier – and it seemed like there would be little difference in the end product.
Here’s how I updated the recipe for modern cooks:
Rosy Macaroni
2 cups macaroni
3 tablespoons butter + 1 tablespoon butter
2 tablespoons corn starch
1 tablespoon onion, finely chopped
2 tablespoons celery, finely chopped
1/8 teaspoon ground cloves
1/8 teaspoon baking soda
1 can condensed tomato soup
1/2 soup can of water
1/2 cup bread crumbs
1 cup cheddar cheese, shredded
salt
paprika
Preheat oven to 350° F. Fill a large sauce pan 2/3’s full of water, bring to a boil using high heat. Stir in the macaroni, and reduce heat to medium so that the water just simmers. Cook until the macaroni is al dente (about 6 – 8 minutes). Remove from heat and drain. Rinse with cold water to prevent the macaroni from sticking together, drain again.
Melt the 3 tablespoons of butter in a skillet using low heat. Add the corn starch and stir until smooth. Stir in the onion, celery, cloves, and baking powder. Add the tomato soup and water; stir until smooth. Stir in the cooked macaroni, then increase heat to medium while continuing to stir. When hot remove from heat.
In the meantime, melt one tablespoon butter using low heat in a small skillet. Stir in the bread crumbs. Increase heat to medium and stir continuously for 2-3 minutes to lightly toast the crumbs. Remove from heat.
Place 1/3 of the macaroni mixture in a buttered 1 1/2- quart casserole dish, then put 1/2 of the cheese on top of it and sprinkle with salt and paprika. Repeat, ending with the macaroni mixture. Top with the buttered bread crumbs.
Put in oven and bake until hot and bubbly (20-30 minutes).