When browsing through hundred-year-old cookbooks, I often skip the yeast bread section while thinking that breadmaking is too much work and too time consuming. But I recently had a little spare time – and thought that it might be relaxing to make bread – so I looked at the old bread recipes. The one that piqued my interest was a recipe for Raisin Bread. It had been year since I’d eaten Raisin Bread – and suddenly I was very hungry for it. (I know that I can buy it at the store, but I never do.)
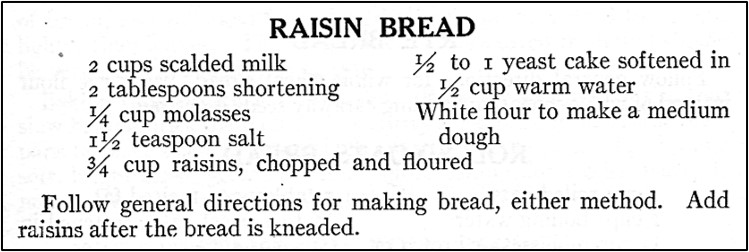
Here’s the original recipe:
Sounds easy peasy. Right?
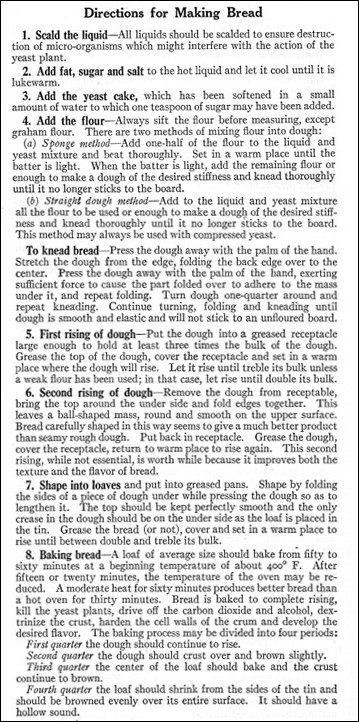
Next I found the general directions for making bread, as well as the directions for making white bread, and realized it was a little more complicated than I originally thought. Here are the general directions in the 1924 cookbook for making bread:
And, here is the “standard recipe for making white bread” that was in that cookbook:
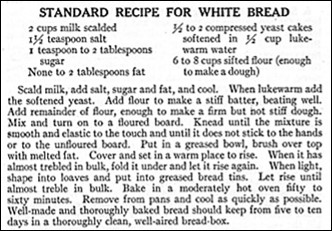
After reading all of these directions, I realized that this bread recipe is different from most other bread recipes that I’ve made. It called for allowing the bread to rise three times (rather than two times like I typically do), and instead of kneading the bread the second time, the directions called for folding the dough under. Also, the recipe indicated that the dough should be allowed to “almost treble” for the first and third times the dough was allowed to rise, while the second time, the dough should be allowed to rise until it was “light.”
My head was starting to spin, so I did several online searches, and discovered that bread dough can be allowed to rise three times (though there is a risk of the bread collapsing during baking if it is allowed to rise too much) – but that stretching and folding bread dough instead of kneading it the second time is gentler on the dough, so it reduces the risk of the bread collapsing. The online searches also indicated that folding the bread dough and allowing it to rise three times had the potential to improve the texture.
Since yeast cakes a hundred years ago, aren’t the same as modern dried yeast, I did another online search and determined that a yeast cake was about the same as a packet of dry active yeast. I used a packet of yeast when making this recipe.
As indicated in the old directions, I started baking the bread in a 400° F. oven. After 15 minutes, I reduced the heat to 350° F. After baking an additional 25 minutes (for a total of 40 minutes), the bread was nicely brown and sounded hollow when I tapped it, so I removed it from the oven. (I didn’t bake if for the 50 to 60 minutes called for in the old directions.)
Onward–
The verdict: This recipe was worth the effort. The Raisin Bread turned out great. It was tasty and had a lovely texture. It should be noted that most modern Raisin Breads contain cinnamon, but that this recipe didn’t call for any – so it tastes a little different than modern Raisin Breads. That said, this Raisin Bread is lovely warm, spread with butter, and sprinkled with cinnamon.
Here’s the recipe updated for modern cooks:
Raisin Bread
2 cups milk
2 tablespoons shortening
1/4 cup molasses
1 1/2 teaspoon salt
1 packet dry active yeast
1/2 cup warm water
6 to 8 cups flour
3/4 cup raisins
Scald the milk by heating to just below boiling (about 180 – 185° F.). Remove from heat and add shortening, molasses, and salt. Allow to cool until lukewarm.
In the meantime, chop the raisins (I cut each raisin into 3 – 4 pieces.). Then dredge the raisin pieces with approximately 1-2 tablespoons flour and gently stir to coat the pieces with flour. Set aside.
In the meantime, dissolve the yeast in the warm water. Combine the dissolved yeast, and lukewarm scalded milk mixture in a large bowl. Add half the flour; beat until smooth beat. Then add additional flour until the dough reaches a consistency where it can be handled. Turn onto a floured surface and knead until the dough is smooth and elastic (about 10 minutes). Flatten the dough and sprinkle about one-fourth of the chopped raisins on top; then fold over and knead a little more to incorporate the raisins. Repeat until all the raisins are embedded in the dough. Put in a large greased bowl, and grease the top of the dough. Cover and place in a warm spot that is free from drafts until it has almost tripled in size (about 1 1/2 hours).
Fold the dough by pulling each side of dough to stretch it, and then fold underneath the other dough. Cover and allow to rise until light (about 30 minutes). Divide dough into two equal parts and shape into loaves. Place in two greased loaf pans, and cover. Let rise until tripled in size (about 1 hour).
Bake loaves in 400° F. oven for 15 minutes, then reduce heat to 350° F and continue baking until lightly browned (about an additional 25 minutes for a total of about 40 minutes).