Hundred-year-old Recipe for French Onion Soup

bowl of French Onion Soup with toast and cheese on top

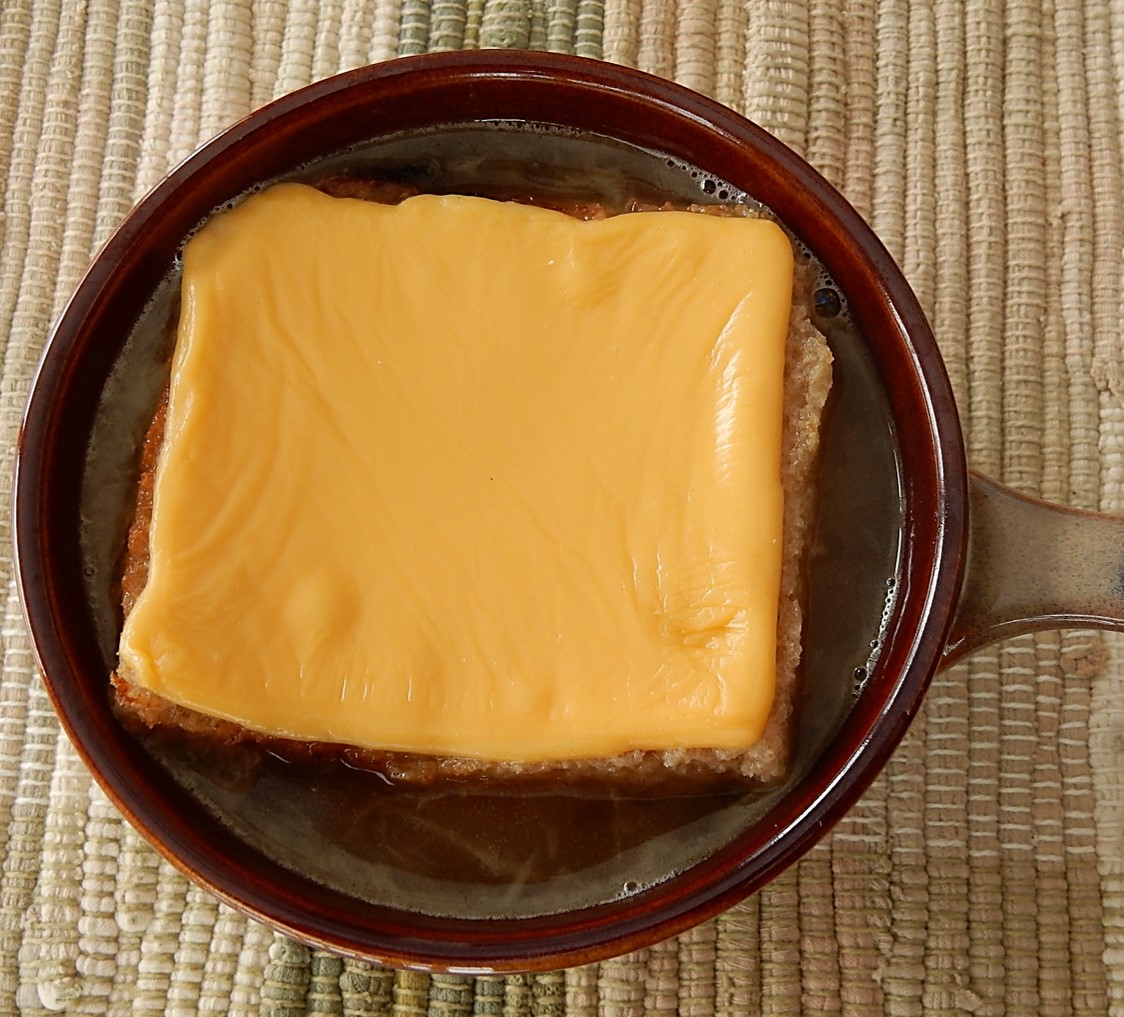
French Onion Soup topped with toast and Swiss or Gruyere cheese is my favorite “restaurant soup,” so I was intrigued when I saw a recipe for French Onion Soup in a hundred-year-old cookbook. I could immediately tell the old recipe wasn’t exactly like a modern one because the soup was topped with toast and American cheese.

I have a somewhat negative stereotype of American cheese (and it just isn’t the same as Swiss or Gruyere cheese), so my expectations weren’t very high for this recipe. But I was pleasantly surprised. The resulting soup tasted similar to modern French onion soups–and the melted American cheese was yummy (and not the least bit jarring) when immersed in the soup. My husband even said that he liked how the cheese was “less stringy” than the cheese on the typical French Onion Soup.

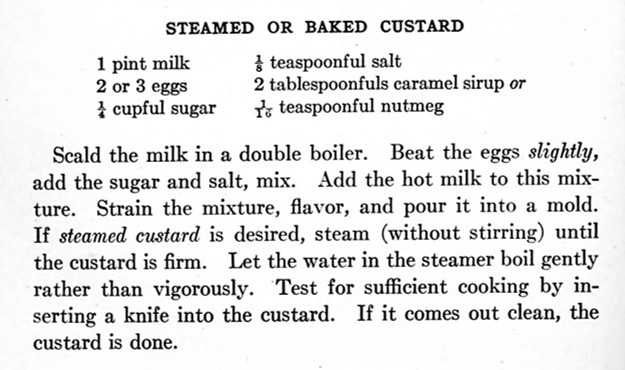
Here’s the original recipe:

Recipe for French Onion Soup
Source: A New Snowdrift Cook Book (1920) by Mrs. Ida C. Bailey Allen

Old cookbooks often just use the generic term “cheese.” This is the first time I’ve seen a hundred-year-old recipe explicitly call for American cheese. According to Serious Eats, James Kraft patented a method for making process American cheese in 1916, and it apparently was widely available by 1920.

This recipe is from a promotional cookbook for Snowdrift published by The Southern Cotton Oil Trading Company. Snowdrift was a shortening made from cottonseed oil. When I made the recipe, I substituted butter for the Snowdrift.

And, here is the recipe updated for modern cooks:

French Onion Soup

  • Servings: 3-4
  • Difficulty: moderate
  • Print

3 tablespoons butter

6 medium-sized onions, thinly sliced

1 quart soup stock (I used beef broth.)

1 slice of bread for each bowl of soup

1 slice American cheese for each bowl of soup (Use 2 slices per bowl if the slices are thin.)

Melt butter in a Dutch oven or stock pot, then add onion slices. Using medium heat sauté until the onions have softened and caramelized while stirring occasionally. It will take approximately 45 minutes for the onions to caramelize. Add the soup stock, and bring to a simmer.

In the meantime, lightly toast bread. Cut toast into squares small enough to fit the soup bowls; then cut the American cheese into squares slightly smaller than the toast. Top the toast with the squares of American cheese. Put under the boiler until the cheese melts (about 1 minute); remove from oven.

To serve: Ladle soup into bowls, and top with the toast squares/melted cheese.

1920 Tips to Prevent Spreading Disease

Woman drinking from a cup.
Source; Household Arts for Home and School (Cooley & Spohr, 1920)

During this cold and flu season, I frequently see tips for staying healthy. A hundred years ago people also want to avoid spreading diseases. Here is a list in a 1920 home economics textbook of precautions to take against infection and spreading disease:

  1. Use individual towels, combs, brushes, and clothing.
  2. Use individual drinking cups.
  3. Do not put fingers or hands to the mouth or face.
  4. Do not put money, pencils, pins, or anything else but food and drink into the mouth.
  5. Use a handkerchief to cover a sneeze or cough.
  6. Do not carry a handkerchief in the hand or leave it lying about. Put it where it will not be seen.
  7. Use gauze or clothes that may be burned when you have a cold; then burn them after use.
  8. Never kiss anyone on the mouth.
  9. Never spit on the floor of any building, or on the sidewalk.
  10. Avoid crowds of all kinds when there is an epidemic.
  11. Isolate yourself when there is an epidemic.
  12. Disinfect all dishes, clothing and other things which have been used by a person who had had a contagious disease.

Source: Household Arts for Home and School (Vol. II) (1920) by Anna M. Cooley & Wilhelmina H. Spohr

Old-fashioned Fried Parsnips

fried parsnips in bowl

When I recently saw a hundred-year-old recipe for Fried Parsnips, I decided to give it a try. As winter begins to wind down, I’m enjoying some of the less common vegetables.

The parsnips are cut into large chunks. After they are cooked, each piece is dipped into a batter and then fried. The Fried Parsnips had a delightful earthy, sweetness which was accentuated by the crispy coating.

Here is the original recipe:

Recipe for Fried Parsnips
Balanced Daily Diet (1920) by Janet McKenzie Hill

I could not figure why the cooked parsnips were supposed to stand in the butter for half an hour, or why the batter was to sit for half an hour – so I didn’t include extended wait times when I updated the recipe.

I also substituted butter for some of the Crisco, and any shortening or lard works for frying.

Here is the recipe updated for modern cooks:

Fried Parsnips

  • Servings: 3-4
  • Difficulty: moderate
  • Print

2 pounds parsnips (6 – 8 medium parsnips)

1 egg

1/2 cup milk

3/4 cup flour

1/4 teaspoon salt

salt and pepper

2 tablespoons butter

shortening or lard

Peel parsnips and cut into 2 1/2 inch chunks. Place in a saucepan and cover with water. Bring to a boil using high heat, then reduce heat and simmer until tender (approximately 20 – 25 minutes). Drain.

While the parsnips are cooking, make the batter. In a mixing bowl place the egg, milk, flour and 1/4 teaspoons salt. Beat until smooth; set aside.

Melt butter in skillet, then add cooked parsnips. Sprinkle with salt and pepper, then gently roll in the melted butter. Remove parsnip pieces from the skillet, then add enough shortening or lard to the skillet so that there is 1/2 inch of shortening once it is melted.

Dip each piece of parsnip in the batter to coat, remove from batter, let any excess batter drip off, then put the batter-coated parsnips pieces into the hot fat. Cook until lightly browned on the bottom, then gently roll several times to brown other sides. When browned, remove parsnip pieces from the skillet with a fork. Drain on paper towels, then serve.

http://www.ahundredyearsago.com

1920 Hygeia Open-Mouthed Nursing Bottle Advertisement

Hygeia Nursing Bottle Advertisement
Source: Ladies Home Journal (January, 1920)

Sometimes we look at the past through rose-colored glasses, and everything seems very idyllic. But, actually a hundred-years ago, factories were in full swing, and people were rapidly shifting from traditional ways of doing things to more modern ways that often utilized commercially-produced products. Sometimes this was good; other times it may not have been. For example, in the early twentieth century, a rapid shift was occurring in how infants were fed.

Breastfeeding was in decline, and was viewed as something done by women in the lower socio-economic classes.

The real decline of wet nursing came, of course, with the rise of formula bottle-feeding, which began in the 1910s.  Bottle feeding was convenient (especially for women busy outside the home); it was “scientific”; and it was “modern” – it was what mothers who were “with it” did. From that point of view, only primitive or unenlightened women breastfed.

Source: Breastfeeding History (Made in America: A History of American Culture and Character)

A hundred years ago, magazines contained advertisements for baby bottles that made mothers feel good about bottle feeding. An advertisement for the Hygeia Open-Mouthed Nursing Bottle emphasized how much babies liked the nipple design and how easy it was to clean.

In comparison, today new mothers are encouraged to feed their babies breast milk. It is generally considered superior to formula (and high-quality breast pumps are now available that can make it more convenient to pump and store milk). According to the Centers for Disease Control and Prevention (CDC), 82.3% of the babies born in the U.S. in 2015 started out breastfeeding. At six months, 57.6% of babies were still breastfeeding, though only about 25% were breastfeeding exclusively.

Canned Fruit Custard


Cherries in custard sauce in stemmed glassesSometimes it is a challenge to make a recipe in an old cookbook. The cookbook may make assumptions about the knowledge level of the cooks who will use the cookbook that totally miss the mark when it comes to modern cooks; or one recipe may refer to another recipe which might then refer to still another.

For example,  I recently found a hundred-year-old recipe for Canned Fruit Custard that at first appeared very simple – Make a thin (soft) custard and pour it over drained canned fruit. But there was just one problem; the cookbook did not contain a recipe for thin custard. Apparently cooks were just supposed to know how to make thin custard.

Recipe for Canned Fruit Custard
Source: The Cook Book for Left-Overs (1920) Compiled by The More Nurses in Training Movement (Illinois)

Unfortunately I  am not as knowledgeable as cooks a hundred year ago, and didn’t know how to make a thin (soft) custard, so I searched through other old cookbooks for a recipe. I finally found a soft custard recipe in a 1920 home economics textbook.

soft custard recipe
Source: School and Home Cooking (1920) by Carlotta Greer

All was good, but I then was surprised to discover that I needed to find still another recipe. The Soft Custard recipe said to “mix the materials in the same way as for steamed or baked custard.”

Steamed or Baked Pudding Recipe
Source: School and Home Cooking (1920) by Carlotta Greer

Whew, this was getting complicated. After I found all three recipes, I took a stab at synthesizing all the directions, I finally made Canned Fruit Custard using canned sweet dark cherries. The dessert was lovely, with the cherries coated with a creamy, slightly sweet custard sauce, but the whole process has left me feeling drained.

So that others don’t need to go through the process of synthesizing the recipes, here is the Canned Fruit Custard recipe updated for modern cooks.

Canned Fruit Custard

  • Servings: 4 - 5
  • Difficulty: moderate
  • Print

2 pints canned fruit (15-16 ounce cans) – I used canned dark sweet cherries.

Custard

2 eggs, separated

2 cups milk

1/4 cup sugar

1/8 teaspoon salt

1/2 teaspoon vanilla

To make the custard, first scald the milk. To do this, put the milk in a heavy sauce pan (use a double boiler if available); then heat using medium heat. Stir frequently until the milk just barely begins to bubble, then remove from the heat.

In a bowl beat egg whites until stiff peaks form. Set aside.

In a separate bowl, beat egg yolks slightly, then add sugar and salt. Beat to combine. Then place a small amount (approximately 1 – 2 tablespoons) of hot milk into bowl with the egg mixture, stir quickly. Add this mixture to the hot milk and stir. (This helps prevent the egg from coagulating when the egg is introduced to the hot liquid.)  Return to stove and cook, using medium heat while stirring constantly until the mixture begins to thicken or coat a spoon. Quickly stir in the beaten egg whites. Remove from heat. Strain and then stir in the vanilla. Chill at least 3 hours.

To Serve

Drain canned fruit. Put the fruit in dessert dishes, and spoon the soft custard over the fruit.

Dish-washing and Efficiency

large old-fashioned kitchen sink
Source: School and Home Cooking (1920) by Carlotta Greer

Dishwashing is one of those never-ending chores, but I don’t stress over it; and I have a very simple process for deciding how to do the dishes. I ask myself, “Are there a lot of dirty dishes?” If the answer is “yes,” I use the dishwasher; if it’s “no,” I wash them by hand.

A hundred-years-ago there were lots of large families – who produced lots of dirty dishes; and almost all those many dishes were washed by hand. So people were looking for ways to wash dishes more efficiently. Here is some hundred-year-old advice:
Dish-washing and Efficiency
There is almost invariably a waste of effort in both the washing and the drying of dishes. This may be due to:
(a) Poorly arranged dish-washing equipment
(b) Inadequate utensils for dish-washing
(c) Lack of forethought in preparing the dishes for washing and in washing and drying them.
Since dish-washing is one of the constant duties of housekeeping, efficiency methods, i.e., methods which accomplish satisfactory results with the fewest motions and in the least time, should be applied to it.
School and Home Cooking (1920) by Carlotta Greer

Old-Fashioned Dainty Cheese (Cheese Ball) Recipe

Cheese ball surrounded by crackers on a plateBased on a quick scan, many cooking blogs currently have Super Bowl posts – The Best Super Bowl Food Ideas, Easy Super Bowl Recipes, Super Bowl Crowd Pleasing Snacks, and so on.

So I asked myself, “A hundred years ago what would people have eaten during the Super Bowl?” And, I immediately realized that it was a stupid question – the first Super Bowl wasn’t held until 1967.

So I revised my question, “Are there hundred-year-old recipes that might make a crowd pleasing snack for Super Bowl LIV?”

Success. . . I think I found a winner. A 1920 cookbook, Good Housekeeping’s Book of Recipes and Household Discoveries, has a wonderful recipe for Dainty Cheese – which is actually a cheese ball. I have no idea why it was called Dainty Cheese; but, regardless, the cheese ball is delicious, and would be a perfect Super Bowl snack.

The Dainty Cheese cheese ball is made with cream cheese embedded with finely chopped stuffed olives and hard-boiled egg, and a bit of onion. Since the old recipe does not call for cheddar cheese, it’s less “cheesy” than many modern recipes. (hmm . . . Maybe that’s why it is called Dainty Cheese.”) It also isn’t coated with nuts, bacon, or pepperoni like many modern balls.

But, once I set aside my modern expectations, the Dainty Cheese cheese ball was delightful. It is slightly salty with a mild onion and olive taste that works perfectly when spread on crackers.

Here is the original recipe:

Recipe for Dainty Cheese
Source: Good Housekeeping’s Book of Recipes and Household Discoveries (1920)

I couldn’t find onion juice at the store (Is it still made?), so I substituted 1 teaspoon grated onion for the 1/3 teaspoon onion juice. When I made the cheese ball, instead of following the old directions and packing the mixture into a mold (which I worried that I’d have difficulty unmolding), I shaped the cheese ball  on a piece of plastic wrap. then wrapped it in the plastic wrap and chilled until firm.

Here is the modern recipe updated for modern cooks:

Dainty Cheese (Cheese Ball)

  • Servings: 1 medium-sized cheese ball
  • Difficulty: moderate
  • Print

1 8-ounce package cream cheese, softened to room temperature

1 tablespoon butter, melted

1/3 teaspoon salt

dash cayenne (red) pepper

15 stuffed olives, finely chopped

1 hard-bowled egg, finely chopped

1 teaspoon onion, grated

Put cream cheese in a mixing bowl, beat until smooth. Add butter, salt, and cayenne pepper; beat until combined. Add olives, egg, and onion; stir until combined.  Shape into a cheese ball on a piece of plastic wrap, then wrap in the plastic wrap. Chill (at least two hours), then unwrap, put on plate, and serve with crackers.

http://www.ahundredyearsago.com