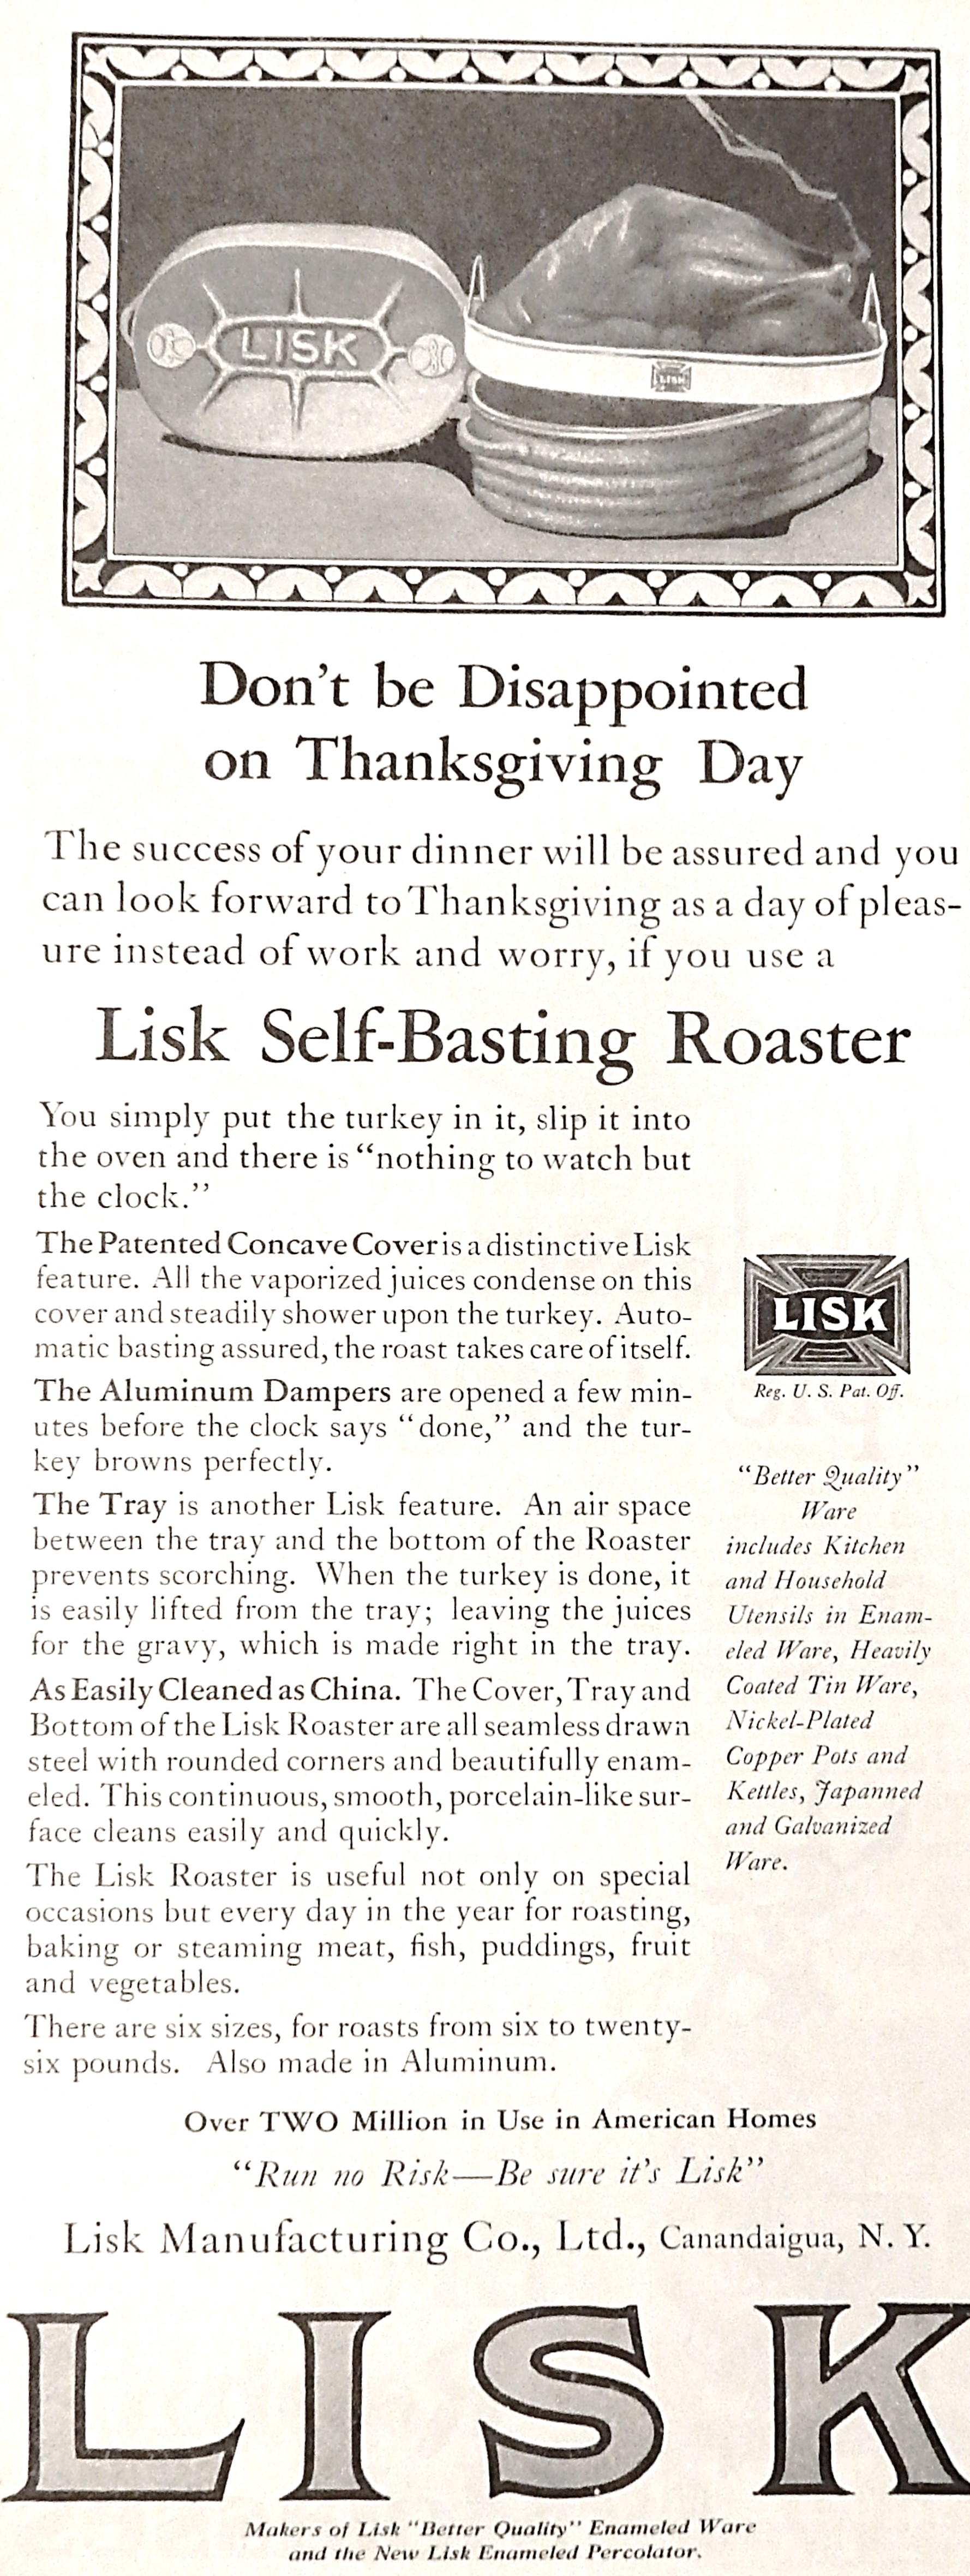
Here’s a hundred-year-old advertisement you might enjoy. So many things to think about when roasting a turkey. Wish I had a Lisk Roaster. The slogan, “Run no Risk – Be sure it’s Lisk” works for me.
HAPPY THANKSGIVING!

Here’s a hundred-year-old advertisement you might enjoy. So many things to think about when roasting a turkey. Wish I had a Lisk Roaster. The slogan, “Run no Risk – Be sure it’s Lisk” works for me.
HAPPY THANKSGIVING!
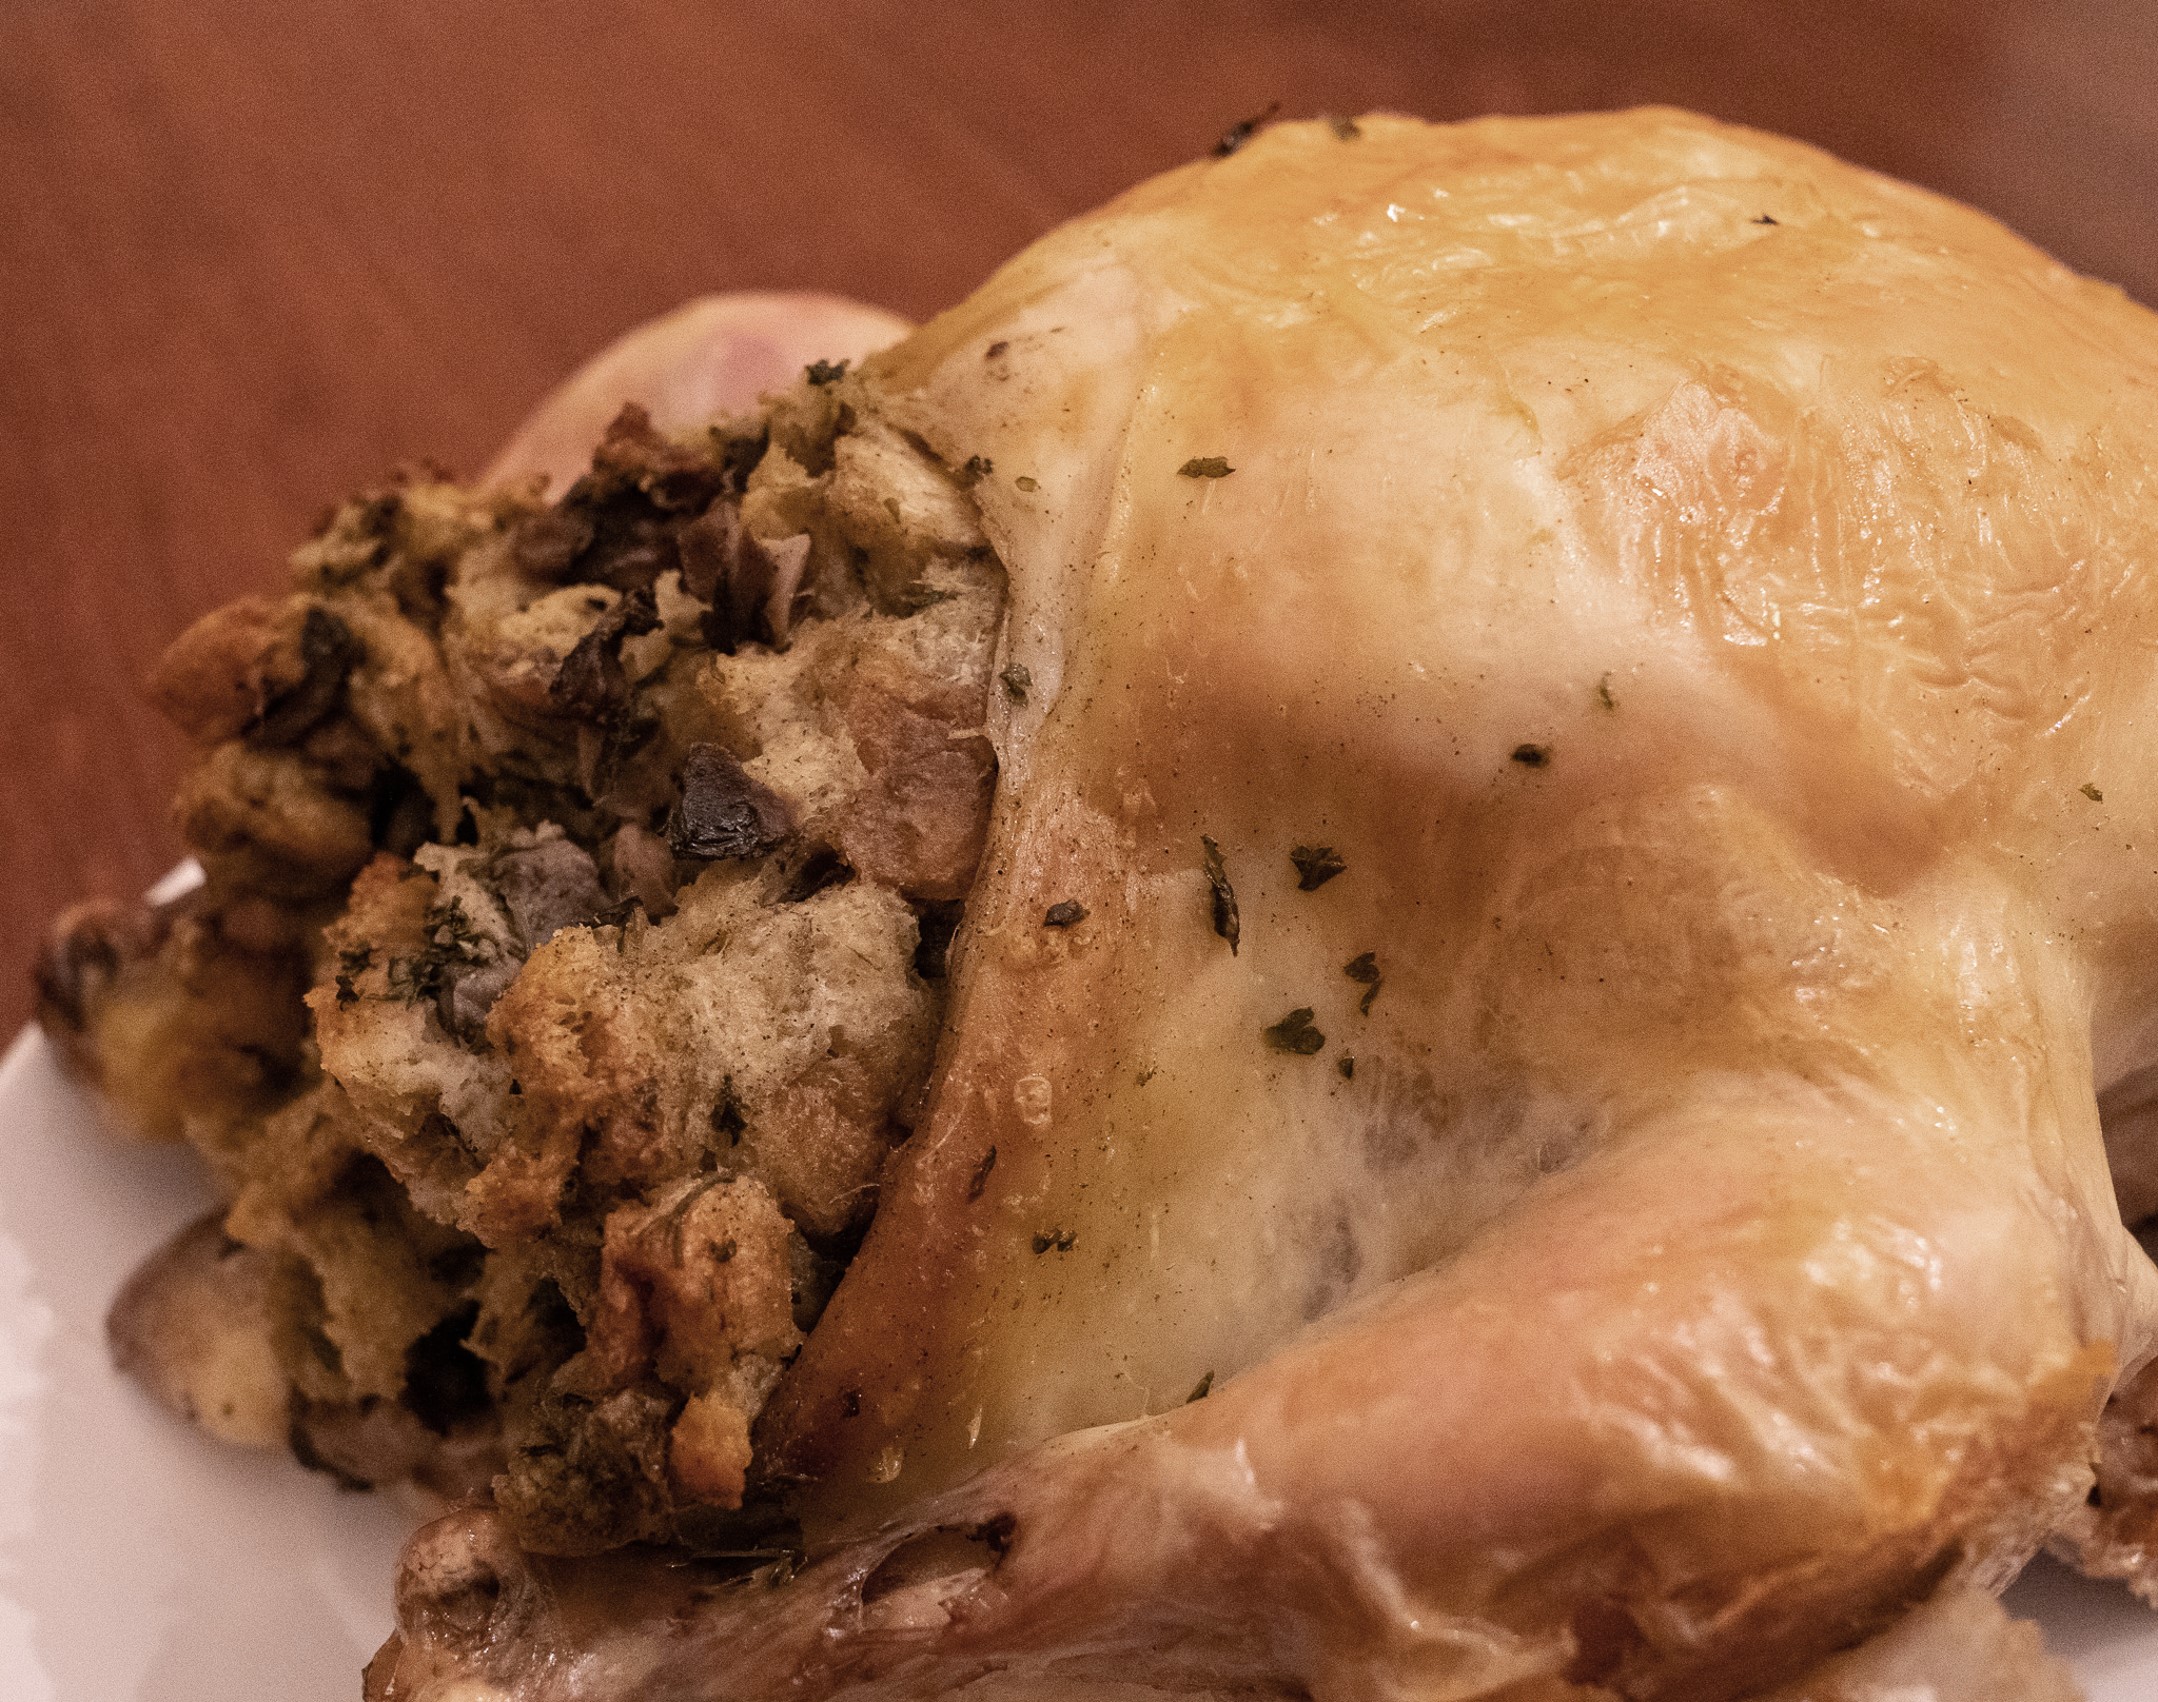
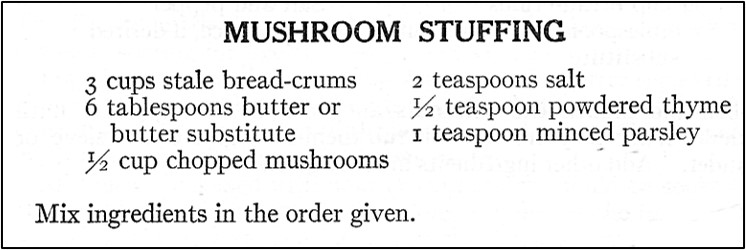
I recently saw a recipe for Mushroom Stuffing in a hundred-year-old cookbook, and decided to give it a try. I used it to stuff a chicken.
Verdict: The Mushroom Stuffing was easy to make and tasted delightful. The seasoning was just right and the mushrooms were a nice change from the usual stuffing that contains celery.
Two teaspoons of salt seemed like a lot, so I reduced it to 3/4 teaspoon which worked fine. I didn’t follow the order listed in the recipe for mixing the ingredients. I combined the butter, salt, and herbs first; then added the mushrooms, and finally stirred in the bread crumbs.
Here’s the recipe updated for modern cooks:

Note: This recipe makes enough stuffing to stuff a 2-3 pound chicken. Double recipe for a 5 – 6 pound chicken; quadruple for a 10-12 pound turkey.
3 cups bread crumbs (tear bread into 1-inch pieces)
6 tablespoons butter, melted
3/4 teaspoon salt
1/2 teaspoon ground thyme
1 teaspoon parsley flakes
1/2 cup mushrooms, chopped
In a large bowl combine butter, salt, thyme, and parsley flakes; stir in chopped mushrooms. Add bread crumbs; stir gently until thoroughly combined. Scoop stuffing into chicken or turkey body and neck cavities. Cook poultry thoroughly. Remove stuffing from poultry, and place in a bowl. Fluff with a spoon or fork, and then serve.
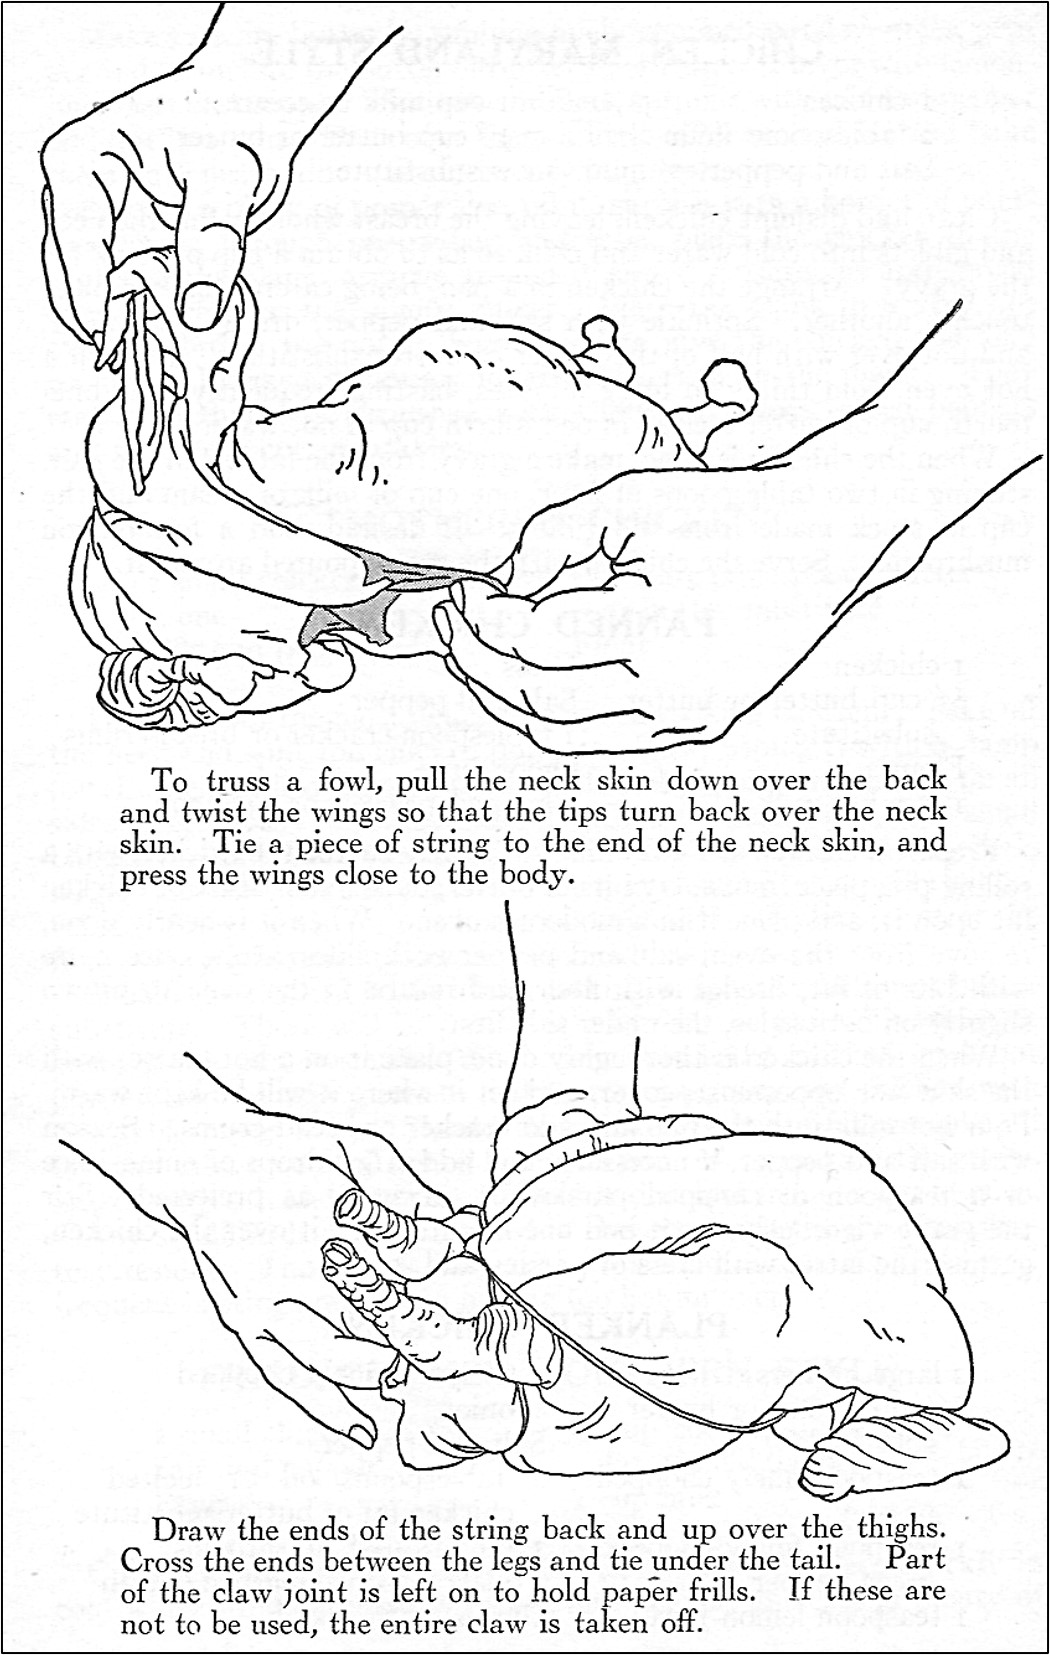
There are so many things to think about when planning a Thanksgiving dinner. Worried that your turkey won’t keep its shape or roast evenly? Maybe you should use string to truss it to pull the bird into a more compact shape that will help ensure that it roasts evenly. Here are the directions in a hundred-year-old cookbook.

Every area has its prominent families. In central Pennsylvania, the Weis family is of those families. Sigmund Weis and his brother founded Weis Supermarkets. The original store was located in Sunbury and the corporate headquarters are still there. There currently are Weis stores throughout the Mid-Atlantic states. The Weis family are major philanthropists in the region. At Susquehanna University, in nearby Selinsgrove, there is the Sigmund Weis School of Business. And, Bucknell University in Lewisburg has the Weis Center for the Performing Arts. According to a Bucknell webpage, “The Performing Arts Center was funded primarily through a 1982 bequest from the estate of Claire Weis, wife of the founder of the Weis Market chain.”
I recently was flipping through a 1924 cookbook from Sunbury, Pennsylvania called the Cook Book of the Susquehanna Valley Country Club, and was amazed to discover that Mrs. Sigmund Weis (Claire Weis) had a recipe for Star Canapes in the book. Stars are cut out of bread slices, the bread is buttered, and then a different ingredient is put on each tip of the star. One tip has capers, others chopped egg white from a hard-boiled egg, mashed egg yolk, chopped sweet pickle, and chopped pimento. A rolled anchovy was put in the center of the star.
The Star Canapes were fun (though tedious) to make, but looked beautiful. They were salty with a strong anchovy and capers taste, but were good.
This recipe definitely felt like a blast from the past. I can picture women a hundred years ago at the country club enjoying these canapes. Or maybe Claire Weis served them as hors d’oeuvres when she hosted guests at her home.
This recipe may have also showcased the wide range of products that were sold at the Weis Store – anchovies, capers, pimento, and so on.
Here’s the original recipe:

I tried toasting the bread before cutting the stars, but the tips broke off the stars when I cut them. It worked much better when I used untoasted bread. (It probably would work to toast the bread after cutting the stars, but I didn’t try that.)
I did not season the white of the hard-boiled egg with salt. The capers and anchovies were very salty, and it didn’t seem necessary.
I mashed the yolk of the hard-boiled egg rather than forcing it through a potato ricer.
Here’s the recipe updated for modern cooks:
(When making this recipe count the number of anchovies in the can; that will determine how many Canape Stars this recipe will make.)
enough thinly sliced bread to cut approximately 9 stars (about 5 – 9 slices, depending upon size)
butter, softened
about 2 tablespoons capers
1 hard-boiled egg (finely chop egg white; mash egg yolk)
about 2 tablespoons finely chopped sweet pickles
1 2-ounce can chopped pimento (If not finely chopped, chop additionally.)
1 2-ounce can anchovies
Drain the capers, sweet pickles, pimento, and anchovies. Put each one (separately) on paper towels and gently squeeze to remove excess liquid. Set aside.
Cut stars from the bread using a star-shaped cutter. Butter the stars. Put capers on one point of the star. Put the chopped egg white on another point, then chopped sweet pickles on a third point, chopped pimento on the fourth, and mashed egg yolk on the last point. Roll the anchovies and then put one rolled anchovy in the center of each star.

I’m currently planning my Thanksgiving menu, and trying to decide if I want to pull in some hundred-year-old recipes. The Thanksgiving menus in the November, 1924 issue of American Cookery give lots of options. Cranberry sauce, pumpkin pie – yes. Brussels sprouts, stuffed olives – maybe; Roast squabs with peanut stuffing, Roquefort cheese – no. By the way, what are bent crackers?
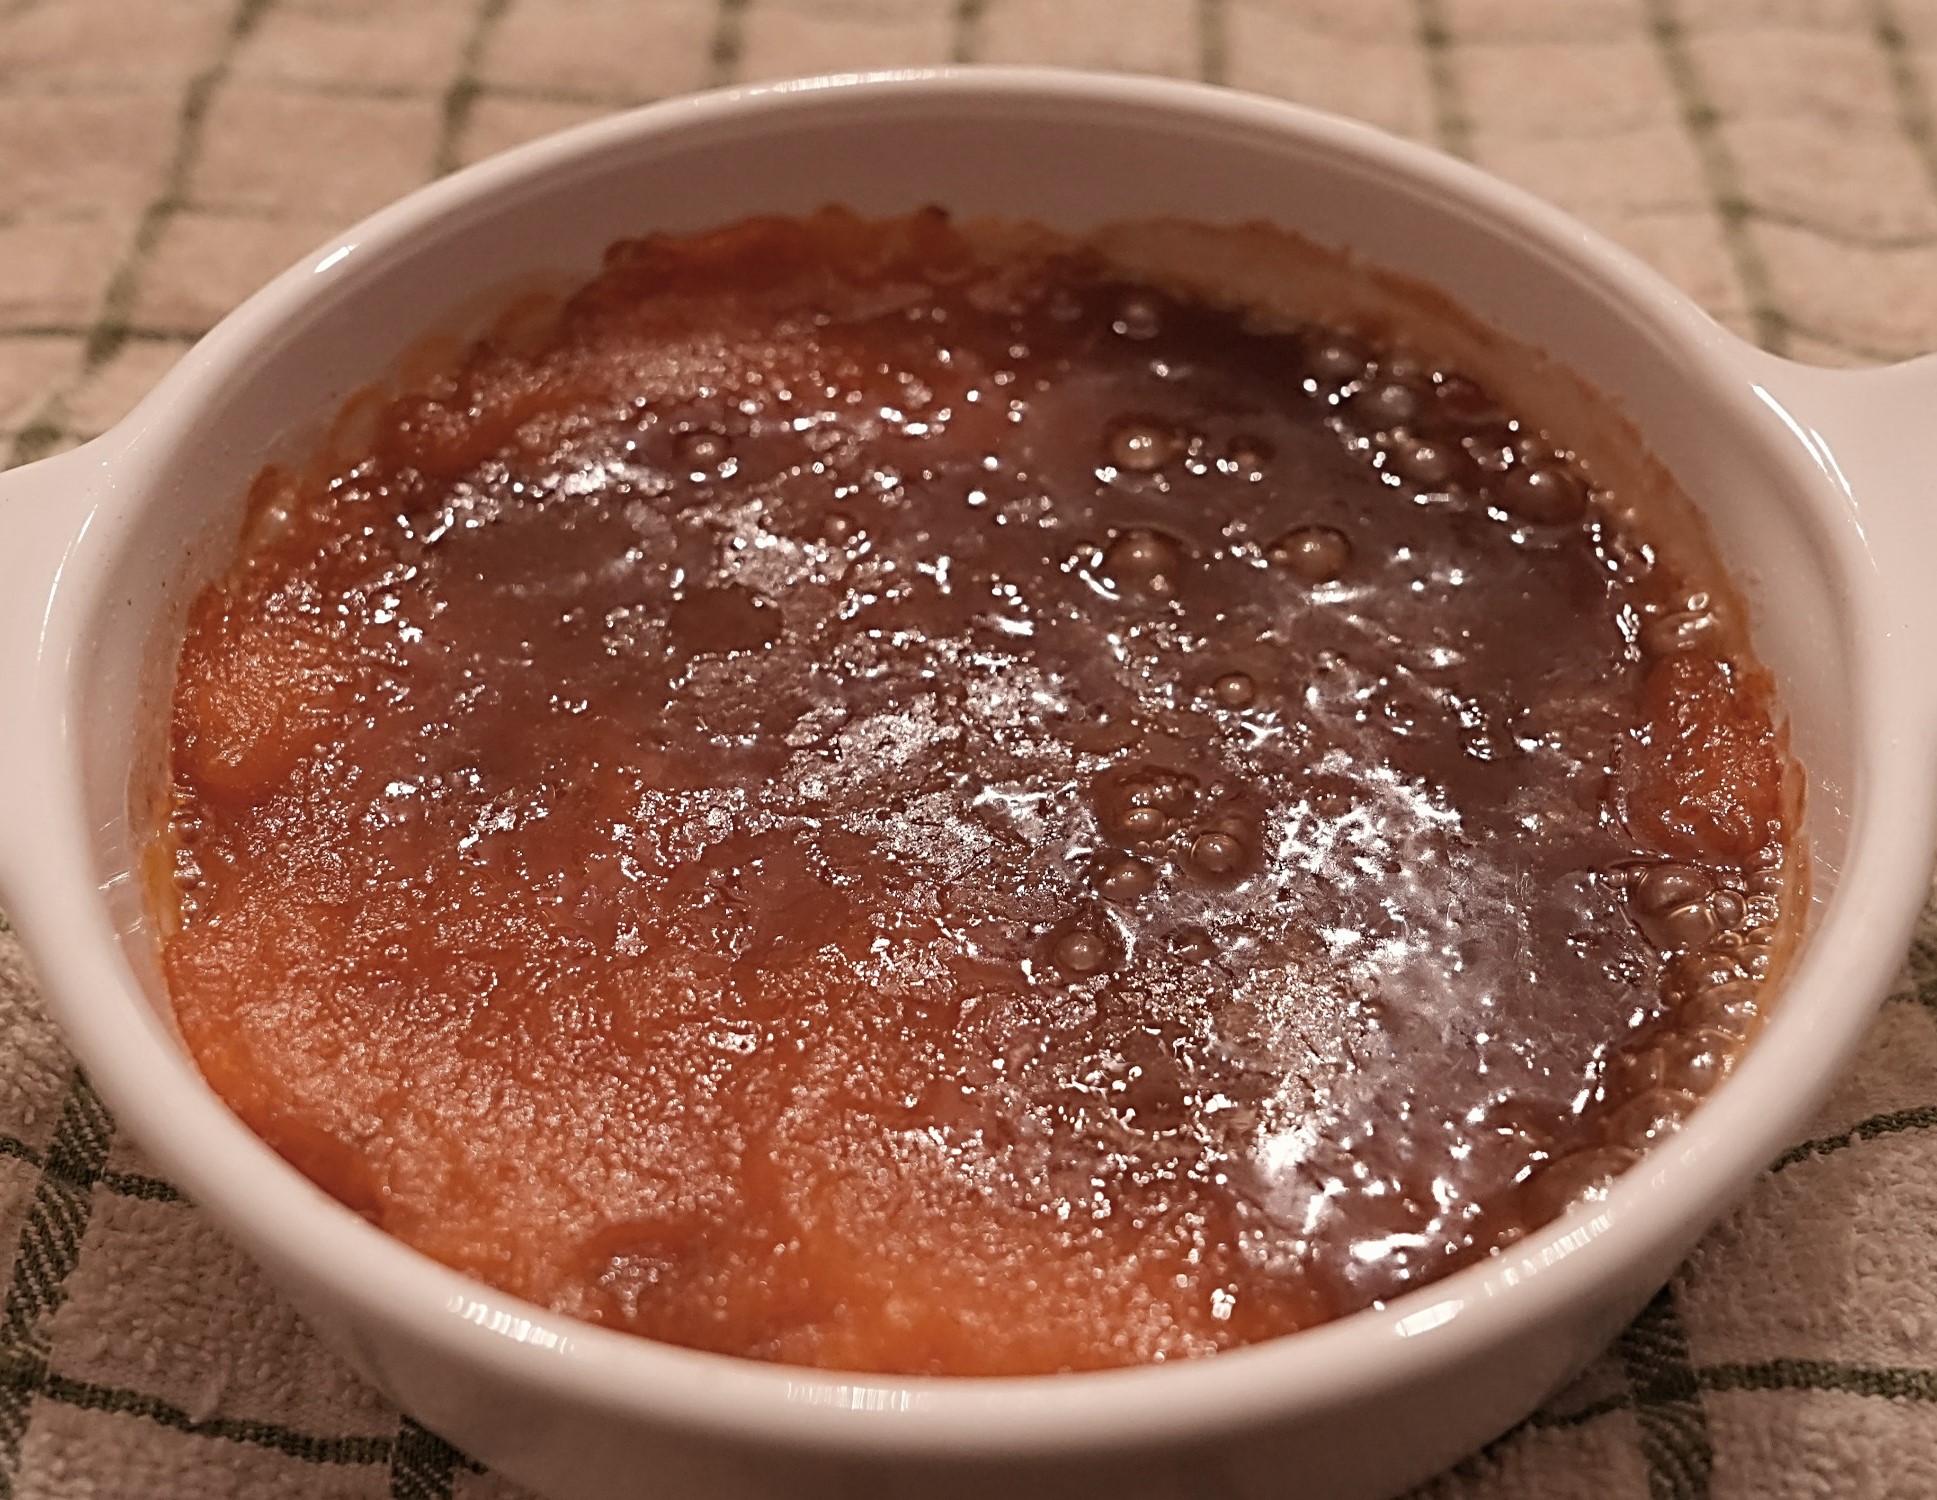
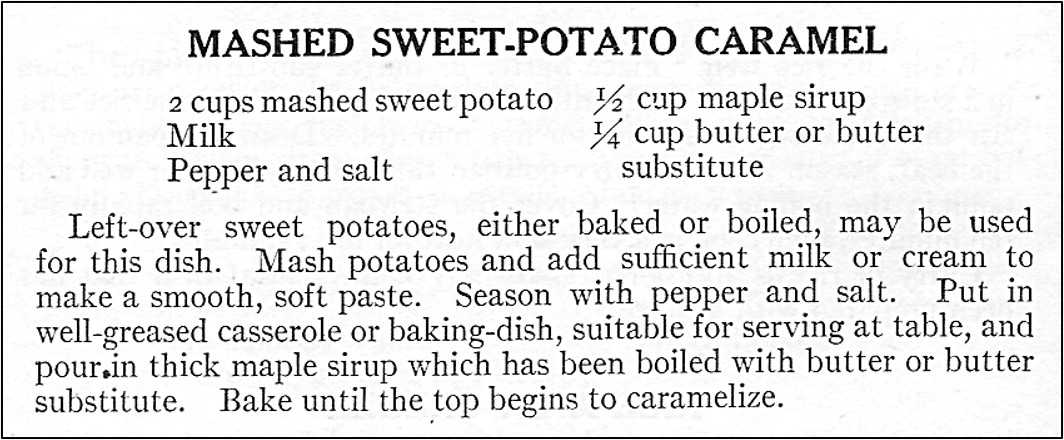
Over the years I’ve often eaten sweet potatoes that were “candied” with brown sugar or baked in a brown sugar sauce. I recently came across a hundred-year-old recipe with a “new” twist. It called for using maple syrup instead of brown sugar, and the sweet potatoes were mashed prior to baking.
The Mashed Sweet Potato Caramel was lovely. The caramelized maple syrup and butter topping was sweet and enchanting.
Here’s the original recipe:
I don’t generally have leftover cooked sweet potatoes in my refrigerator, so I started with whole sweet potatoes when I made this recipe and cooked them. I added about 2 tablespoons of milk to the sweet potatoes after I mashed them, and that seemed like about the right amount of added liquid. I seasoned the mashed sweet potatoes with 1/2 teaspoon of salt and 1/8 teaspoon pepper
Here’s the recipe updated for modern cooks:
3 medium sweet potatoes
2 tablespoons milk
1/2 teaspoon salt
1/8 teaspoon pepper
1/2 cup maple syrup
1/4 cup butter
Put sweet potatoes in a large saucepan and cover with water. Bring to a boil using high heat, then reduce heat and cook until the sweet potatoes are tender when tested by inserting a knife (30-40 minutes). Remove from heat, drain, and cool slightly so the sweet potatoes can be handled. Gently remove the peels from the cooked sweet potatoes, then put in a mixing bowl and mash. Add milk, salt, and pepper; mix until combined. Put the mashed sweet potatoes in a baking dish.
In the meantime, preheat oven to 400° F. Put the maple syrup and butter in a saucepan. Bring to a boil using medium heat, then reduce heat and continue cooking until it begins to thicken (5 – 10 minutes). Pour over the mashed sweet potatoes in the baking dish. Put in oven and bake until hot and bubbly, and the maple syrup mixture begins to caramelize. (I baked for about 25 minutes, but the length of time varies greatly depending upon how hot the mashed sweet potatoes are when placed in the oven.)

I’ve never given much thought as to what I should do with my knife and fork when I finish eating a meal. I typically just put the knife across the top of my plate and let the fork tines lay somewhere on my plate. But apparently a hundred years ago people worried about proper etiquette. Here’s what it said in a 1924 magazine:
What to Do with the Knife and Fork at the Close of Dinner
At the close of dinner, or at the close of a course, the knife and fork should be laid side by side, fork with the tines up, knife with the sharp edge nearest the fork, and a little to the right side of the dinner plate, and at right angles to the edge of the table. This should be the signal that the guest has finished the meal, or the course, and is ready to have his plate removed.
American Cookery (November, 1924)
I decided to see what this looked like, and tried to follow the directions (though used a clean plate rather than one with food scraps after I’d eaten). It looks really strange to me. And, why aren’t there any directions for what to do with the spoon?
