Dishes made using condensed canned soups are stereotypical of mid-20th century cuisine. However, there were recipes that called for canned soups long before that. According to Wikipedia, condensed canned soups were first introduced in 1897. And, recipe authors began listing them as an ingredient in the early 20th century. I recently came across a 1926 recipe for Pork Chops with Tomato Sauce that called for condensed tomato soup.
The Pork Chops with Tomato Sauce were easy to make, made a lovely presentation, and were very tasty. The pork chops were seared on the top of the stove, and then slowly baked in the tomato soup.
I’m sure that I’ll make this recipe again. The pork chops were juicy and tender with a lovely, flavorful tomato sauce.
Here’s the original recipe:

This recipe is very flexible. The original recipe called for 6 to 8 pork chops, but I only made two pork chops. My skillet was large so I used the entire can of condensed tomato soup, but I could have easily just used half of the can of soup, and reserved the remainder to make a serving of soup. Similarly, if desired, as indicated in the original recipe, up to 6 to 8 pork chops could be made using one can of soup.
I seared the pork chops on top of the stove before pouring the tomato soup over them. I then placed them in the oven. The old recipe does not explicitly indicate that the pork chops should be seared, but I decided to do it to help seal in the meat juices.
Here’s the recipe updated for modern cooks:
Pork Chops with Tomato Sauce
2 pork chops*
2 tablespoons cooking oil (avocado oil, canola oil, olive oil)
1/2 can condensed tomato soup*
butter
salt and pepper
* If desired, more than two pork chops may be used, as long as they comfortably fit in the skillet. If additional pork chops are added, or if a large skillet is used, use the entire can of soup.
Step 1. Preheat oven to 350° F.
Step 2. Put the cooking oil in a cast iron skillet (or other heavy oven-proof skillet). On the top of the stove, heat the skillet using medium to medium-high heat. Put the pork chops in the pan and sear for 3 minutes; flip and sear the other side for 3 minutes.
Step 3. Remove from heat and spoon the condensed soup over the pork chops; spread the soup to thickly cover the pork chops. Extra soup should be spooned into the pan.
Step 4. Dot the smothered pork chops with small pieces of butter, then sprinkle with salt and pepper.
Step 5. Cover skillet (the skillet may be covered with aluminum foil if there is no lid) and place in oven. Bake for 1-2 hours depending on the thickness of the pork chops. (Check pork chops after an hour to make sure that there is still sufficient liquid in the skillet.) (I baked medium thick pork chops for about 1 hour and 15 minutes.)


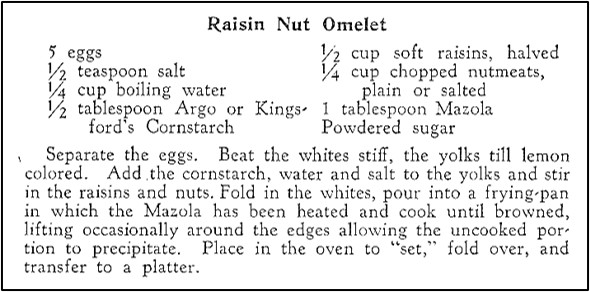
 My weekday breakfasts are boring — think oatmeal or cereal, but I like to make breakfast foods that are a little fancier on weekends, so I was thrilled when I came across a recipe for Raisin Nut Omelet in a hundred-year-old cookbook.