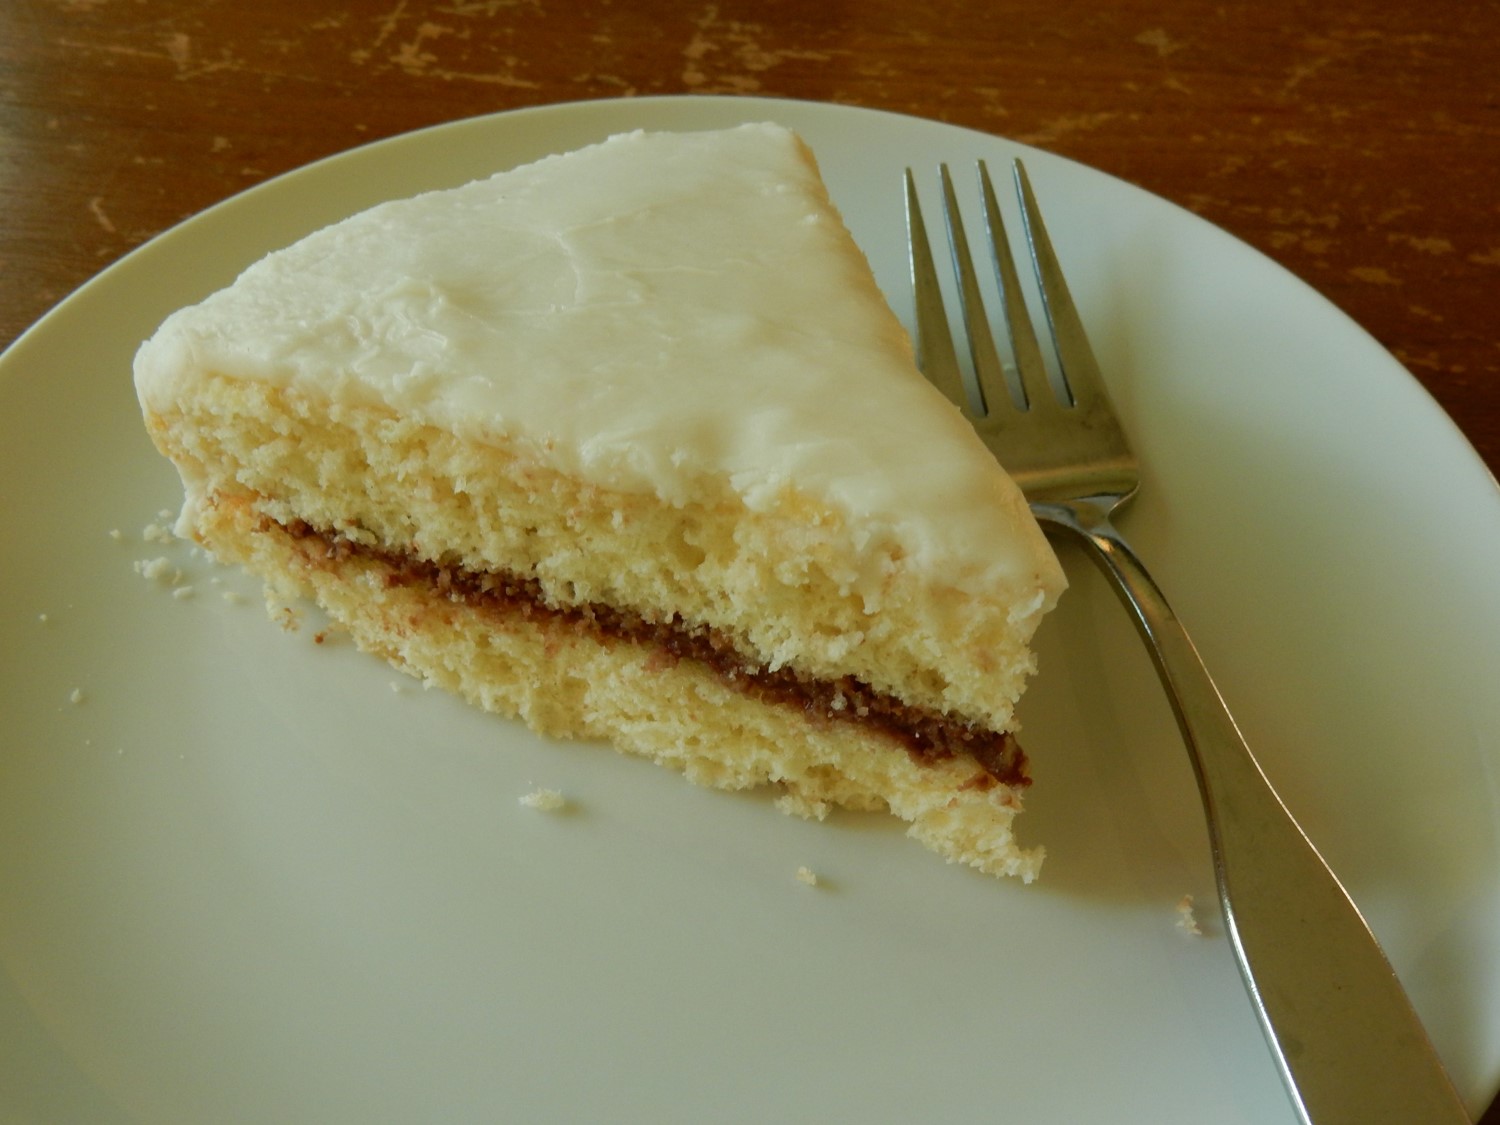
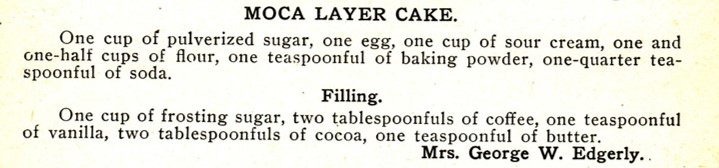
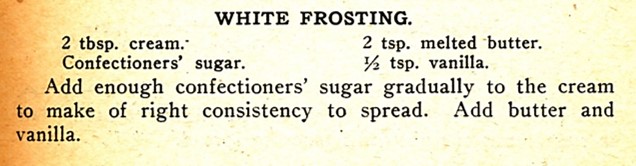
Hundred-year-old Peanut Butter Straws Recipe

Peanut butter is one of my favorite snack foods, so I was thrilled to find a hundred-year-old recipe for Peanut Butter Straws.

This irresistible snack contains peanut butter sandwiched between pieces of flaky pastry. The Peanut Butter Straws  have the essence of peanut butter sandwich crackers – though the shape is different, and they are less crispy.

Here’s the original recipe:

Source: Good Housekeeping (July, 1917)

When I updated the recipe for modern cooks, I changed the recipe name from Peanut Straws to Peanut Butter Straws because it more precisely describes this snack.  Here’s the updated recipe:

Peanut Butter Straws

  • Servings: approximately 75 4-inch straws
  • Difficulty: moderate
  • Print

1 cup flour

1/3 cup shortening

2 to 3 tablespoons cold water

1/3 cup peanut butter

water

milk

paprika

Preheat oven to 425° F.  Put flour into bowl. Cut in shortening  using two knives or a pastry blender. Add water and mix using a fork until dough starts to cling together. If needed, add additional water. (Or make pastry dough using a food processor).  Roll into a 1/8-thick rectangle on lightly floured surface.

Spread peanut butter on one-half the rolled dough. Just “slap” the peanut butter on the dough.  Do not worry if there are places here and there that have no peanut butter. The layers of the straws stick together better if there are places with no peanut butter.

Moisten the edges of the dough with water, then fold the other half of the pastry dough over on top of the dough that had been spread with the peanut butter. Roll lightly, and then prick here and there with a fork to prevent puffing up.

Cut into strips 1/2 inch wide by 4 inches long. Place on a greased cookie sheet, then brush with milk.  Put into oven and bake until straws are light brown (about 10 minutes). Remove from oven and sprinkle with paprika.

Pickled Bananas

I’ve pickled lots of different fruits and vegetables, so when I saw a recipe in a hundred-year-old magazine for Pickled Bananas I just had to give it a try.

The Pickled Bananas were a nice change of pace. The pickling syrup which contained cinnamon, mace, and cloves was delightful. And, much to my surprise, the pickled bananas reminded me a little of pickled beets or other pickled starchy vegetable.

Here is the hundred-year-old recipe:

Source: American Cookery (December, 1917)

And, here is the recipe updated for modern cooks:

Pickled Bananas

  • Servings: 6-8 servings
  • Difficulty: moderate
  • Print

2 cups sugar

1/2 cup vinegar

1/2 teaspoon cinnamon

1/4 teaspoon whole cloves

1/4 teaspoon mace

4  firm (green) bananas, peeled and cut into thirds

Put sugar and vinegar in a saucepan, stir. Then tie the spices into a small bag made of cheesecloth, and place in the saucepan with the sugar and vinegar mixture. (A small amount of the spices will leak out of the bag into the syrup  – that’s okay).   Bring the mixture to a boil using medium heat, then add the banana pieces. Bring the liquid back up to a boil, and then reduce to simmer. Cook until the bananas are tender and can be easily pierced using a wood toothpick. (The length of time will vary greatly depending upon how hard the bananas are. It might take 10 minutes, or it may take 30 minutes or more. Be patient.). Remove from heat. Chill for eat least 4 hours before serving.  Remove from syrup and serve.

I am not as frugal as homemakers a hundred years ago. I did not set the syrup aside for more pickling after I made this recipe.

Old-fashioned Kale with Corned Beef

This rustic, easy-to-make, hundred- year-old Corned Beef with Kale recipe is perfect for St.Patrick Day, and would hit the spot on any brisk March day.

The recipe called for whole kale leaves, and suggests a presentation that features them. I used Lacinato Kale (also known as Dinosaur Kale). It retained its shape when cooked, and its sweet nuttiness worked well with the flavorful corned beef.

Here’s the original recipe:

Source: The Housewife’s Cook Book (Lilla Frich, 1917)

And, here’s the recipe updated for modern cooks:

Corned Beef with Kale

  • Servings: 5 -7
  • Difficulty: easy
  • Print

2-3 pounds corned beef with spice packet

1 bunch kale (about 1 pound)

water

butter, melted (optional)

Put corned beef in a large pot and cover with water. Add spice packet that came with it. Cover and bring to a boil using high heat; reduce heat and simmer 50 minutes per pound or until tender.  Remove from water and let rest for 10 minutes; then thinly slice.

About 45 minutes before the corned beef will be ready to serve, wash and trim kale to remove the bottom portion of the stem and leaves. Gently tie into bunches using cooking twine. Put into a large pot and cover with water. Bring to a boil using high heat. then reduce heat and simmer for 30 minutes.  Remove from water. Untie and, if desired, drizzle with melted butter.

To serve: Put kale leaves on plate, and top with the sliced corned beef.

Old-fashioned Date and Apple Salad

Simple, tasty, attractive salads are the best. I recently found a hundred-year-old recipe that fits the bill. Date and Apple Salad has a light lemon and oil dressing. The apples and dates are cut into “match-stick” pieces which makes a lovely presentation; and the tart, crunchiness of the apples combines beautifully with the sweet, chewy dates. This recipe is a keeper.

Here is the original recipe:sh

Source: American Cookery (January, 1918)

And, here’s the recipe updated for modern cooks:

Date and Apple Salad

  • Servings: 4 - 5
  • Difficulty: easy
  • Print

8 ounces pitted dates

2 apples

juice from  1 lemon

1/2 teaspoon salt

2 tablespoons vegetable oil (I used olive oil.)

lettuce leaves, optional

Cut dates into lengthwise into “match-stick” pieces, and put into a bowl. Peel and core apples, then cut into match-stick pieces. Dip apple pieces in lemon juice, then place in the bowl with the dates. Add salt and oil; then gently toss.  If desired, serve on lettuce leaves.

The hundred-year-old recipe called for six tablespoons of oil. This seemed excessive, so I used two tablespoons of oil.

American Cream with Chocolate-Flavored Whipped Cream

I recently had a delightful molded pudding at a very nice restaurant. It was a little firmer, and jiggled a little more, than traditional puddings–and I wondered how it was made.

Then I saw a recipe in an advertisement in a hundred-year-old magazine for American Cream that looked like it might make a dessert similar to the one I’d eaten in the restaurant, so I  gave it a try.

The American Cream was all that I’d hoped it would be. It was creamy with  just hint of sweetness. And, when topped with Chocolate-flavored Whipped Cream, it was almost decadent.

When I served this dessert, guests enjoyed the American Cream; they absolutely raved about the Chocolate-Flavored Whipped Cream.

Here’s the original recipe:

Source: Ladies Home Journal (May, 1916)
Source: Minute Gelatine advertisement in Ladies Home Journal (May, 1916)

And, here’s the recipe updated for modern cooks:

American Cream with Chocolate Whipped Cream

  • Servings: 4 - 5
  • Difficulty: moderate
  • Print

Pudding

2 eggs, separated

1/4 cup milk + 1 3/4 cups milk

1 envelop unflavored gelatin

2 tablespoons sugar + 2 tablespoons sugar

1/8 teaspoon salt

1/2 teaspoon vanilla

Chocolate-flavored Whipped Cream

1/2 cup heavy whipping cream

2 tablespoons confectioners sugar

1/2 – 1 teaspoon cocoa

Whisk egg yolks until smooth,  add salt. Set aside.

Put 1/4 cup milk in a small dish. Sprinkle gelatin and sugar evenly over the cold milk and allow the gelatin to absorb the milk. Set aside.

Put egg whites in a small bowl, and beat until stiff peaks form. Set aside.

Heat the 1 3/4 cups milk in a saucepan using medium heat until it comes to a boil. Quickly stir in gelatin and sugar mixture; then add the egg yolks while stirring constantly. As soon as it returns to a boil remove from heat, and immediately fold in the beaten egg whites. Stir in the salt and vanilla. If not smooth, press the mixture through a sieve. Put in a serving bowl, or spoon into individual serving cups or glasses.  Chill for at least 3 hours in the refrigerator. Serve with Chocolate-flavored Whipped Cream.

Chocolate-flavored Whipped Cream: Place the whipping cream in a bowl and beat until stiff peaks form. Add confectioners sugar and cocoa, and continue beating until thoroughly mixed.

Mining Camp Cornmeal Pancakes

I’ve eaten stacks of pancakes with  bacon on the side for years  .  . . boring.  So I was thrilled to find a hundred-year-old recipe for Mining Camp Cornmeal Pancakes.

The hearty giant pancakes embedded with bits of bacon are cooked in a skillet, and are cut into triangles to serve.  The pancakes were a delightful taste treat that took me back in time to the days of hungry hard-working gold and silver miners in remote locations.

The old recipe also indicated that, if preferred, smaller, more typically-sized pancakes could be cooked on a griddle.

Here’s the original recipe:

Source: The Cook’s Book which is a KC Baking Powder promotional cookbook (1911)

And, here’s the recipe updated for modern cooks:

Mining Camp Cornmeal Pancakes

  • Servings: 5 - 7
  • Difficulty: easy
  • Print

8 thin slices bacon cut into small 1/4 inch pieces

1 1/2 cups cornmeal

2 1/2 cups all purpose flour

3 teaspoons baking powder

1/4 cup sugar

1/4 cup shortening

2 eggs

2  cups milk

Put the bacon  pieces in a skillet, and cook over medium heat until the bacon just begins to crisp; stir occasionally while cooking. Remove from heat and set aside. Reserve a small amount of the bacon fat to grease skillet.

In the meantime,  put cornmeal, flour, baking powder, sugar, shortening, eggs, and milk in a mixing bowl; beat until combined.

Option 1 – Large Pancakes that are Cut into Triangles: Generously grease a skillet with bacon fat. (I used a 6 inch, cast iron skillet). Heat skillet until hot using medium heat, then spoon 3/4 inch of the batter into the pan, sprinkle with the cooked bits of bacon.  Reduce heat to medium low, cover and cook for about  3-4 minutes or until the batter is bubbly; then turn the pancake over and cook the other side. Remove from heat, and cut into triangles. Cook additional pancakes until all the batter is used.

Option 2 – Regular-sized (3 – 4 inch)  Pancakes: Heat a greased griddle until hot; then spoon or pour approximately 1/4 cup batter onto griddle for each pancake. Sprinkle bits of cooked bacon on the top of each pancake. Cook until the batter is bubbly, then flip pancake and cook the other side.

I made several ingredient adjustments when I made this recipe.  The old recipe called for 1 teaspoon salt. I didn’t use any since the bacon was salty. The old recipe also called for the use of condensed milk and water. In the mining camp far from town, it made sense to use canned condensed milk – but since I had regular milk in my refrigerator, I used substituted it for the condensed milk and water. Additionally, the batter seemed very thick, so I used a little more milk than the combined amount of condensed milk and water called for in the old recipe.

Old-fashioned Vegetable Chowder with Meat

Vegetable Chowder with Meat is the ultimate comfort food. This hundred-year-old recipe makes a delicious hearty soup that is perfect on these cold winter days. This flavorful  soup features carrots, potatoes, cabbage, tomatoes, onion, and celery, as well as a little barley.  I used beef in this recipe, though other meats would also work.

Here is the hundred-year-old recipe:

Source: Good Housekeeping (february, 1917)
Source: Good Housekeeping (February, 1917)

And, here is the recipe updated for modern cooks:

Vegetable Chowder with Meat

  • Servings: 6 - 8
  • Difficulty: easy
  • Print

1 1/2 pounds stewing beef

4 quarts water

2 tablespoons barley

1 cup carrots, diced

1 cup potatoes, diced

1 cup cabbage, shredded

1/2 cup onion

1/2 cup celery

2 cups tomatoes, diced (or use 1 16-oz. can of tomatoes)

1 1/2 teaspoons salt

1/2 teaspoon pepper

1 tablespoon finely chopped parsley

Put the meat and water in a stewing pot or dutch oven. Cover and bring to a boil using high heat, reduce heat to medium and simmer for one hour. Add barley and cook for an additional half hour.  Add carrots, potatoes, cabbage, onions, celery, and tomatoes. Continue cooking for an additional hour. Add salt, pepper, and parsley. Remove the meat from the pot and cut into bite-sized pieces. Return the meat to the pot. Reheat until the soup is hot, and then serve.