Rice puddings are a classic comfort food, so I was intrigued when I saw a recipe in a hundred-year-old cookbook for Rice Caramel Pudding. I decided to give it a try. The recipe made a baked rice pudding that contained apples. It called for using brown sugar rather than the more typical white sugar.
The Rice Caramel Pudding was rich and sweet with lovely caramel undertones. I used coarsely chopped apples. The apple variety I used softened and lost their shape when cooked. This worked well, though for the apples to be more prominently featured in this recipe, an apple variety could be selected that keeps its shape when cooked and they could be sliced rather than chopped.
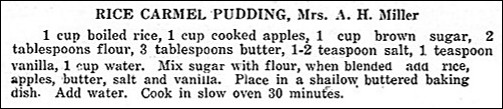
Here’s the original recipe:
The recipe called for 1 cup of water. It does not list when the water should be added to the pudding, except to say that water should be added after the rice pudding was put in a baking dish. I found this confusing. It seemed like the 1 cup of water should be stirred into the pudding mixture before it was put in the baking dish (which is what I did), and that the “add water” referred to setting the baking dish in a pan with water so there would be a water bath while it baked. That said, I may not have understood the recipe writer’s directions.
For this recipe, I interpreted a “slow oven” to mean 325° F. I cooked the pudding for about 45 minutes.
Here’s the recipe updated for modern cooks:
Rice Caramel Pudding (with Apples)
1 large apple (2 medium apples), peeled and coarsely chopped or sliced (I chopped the apples.)
1 cup cooked rice
1 cup brown sugar
2 tablespoons flour
3 tablespoons butter, softened
½ teaspoon salt
1 teaspoon vanilla
1 cup water + additional water
Step 1. Preheat oven to 325° F.
Step 2. Put apples in a saucepan; add a little water so the apples won’t stick to the pan, then heat with medium heat. Cook until the apples they soften (about 5 – 7 minutes), then remove from heat.
Step 3. Put the brown sugar and flour in a mixing bowl; stir to combine. Then add the butter, rice, cooked apples, water, salt, and vanilla; stir to mix the ingredients.
Step 4. Put the mixture in a 1-quart baking (or similar-sized shallow) baking dish.
Step 5. Set the baking dish in a pan with 1-inch of hot water, then place in oven and bake until the rice pudding is hot and has thickened (approximately 45 minutes).