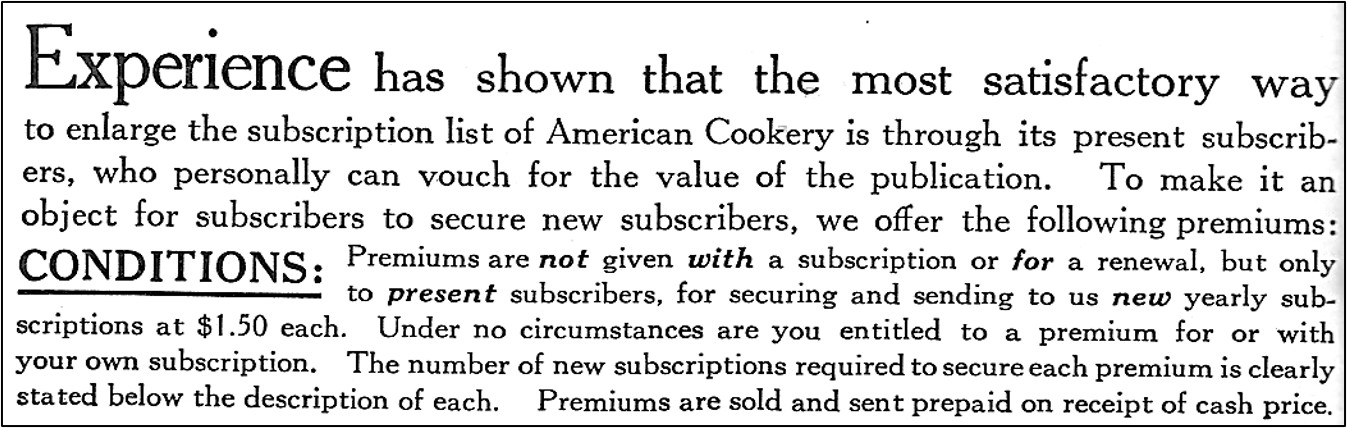
A hundred years ago, American Cookery magazine encouraged readers to get their friends to subscribe to the magazine. The magazine offered premiums for securing new subscribers.
Source: American Cookery (May, 1925)
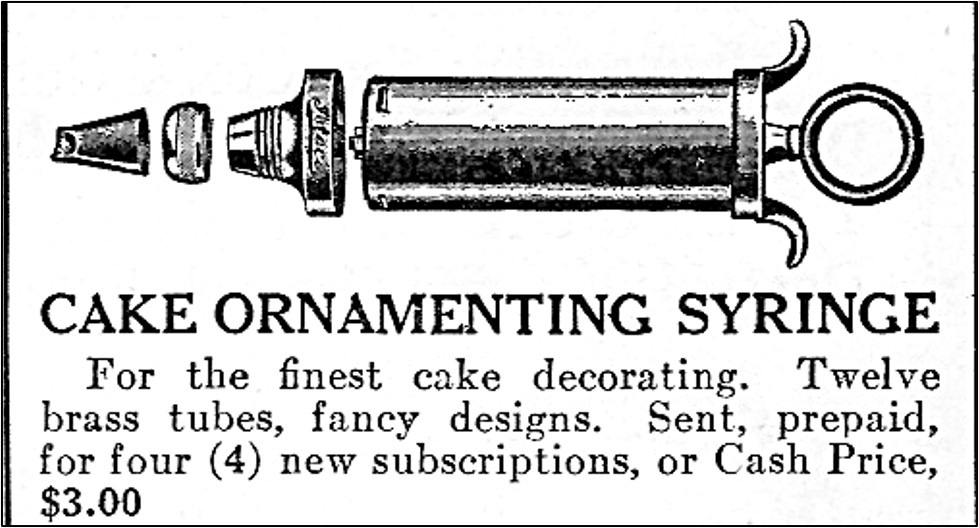
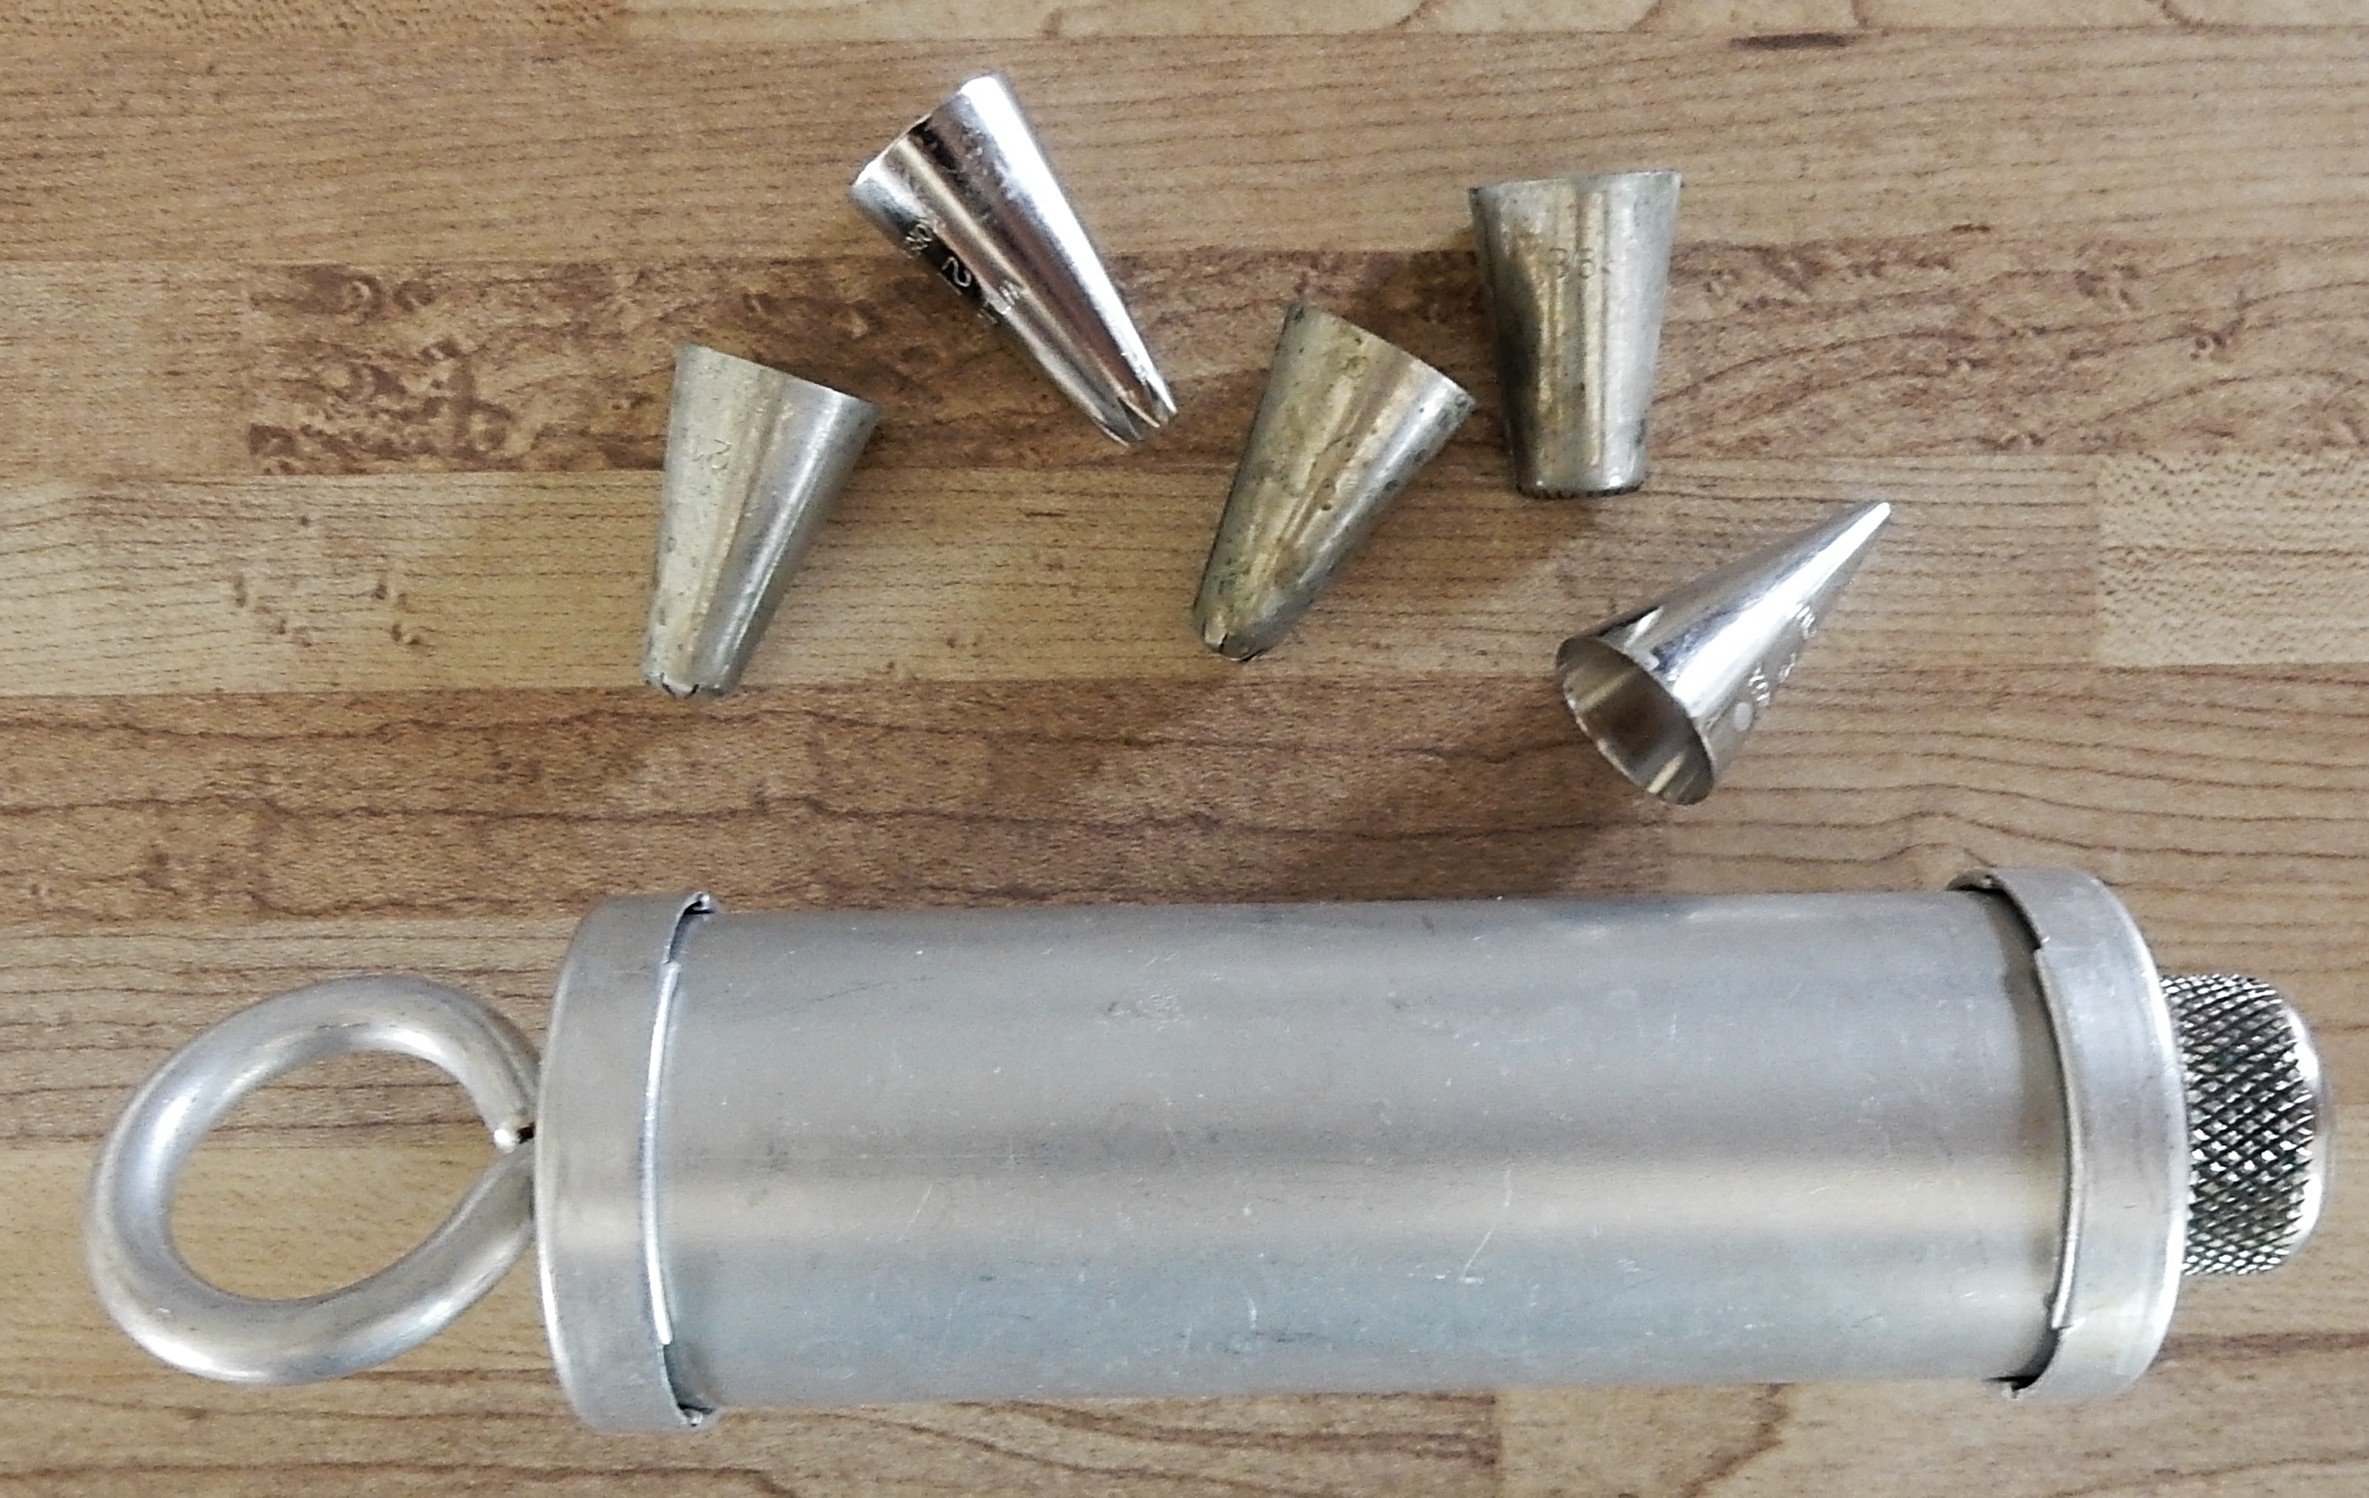
A premium offered in the May, 1925 issue for getting four new subscribers was a cake ornamenting syringe.
Maybe cooks a hundred years ago considered this a wonderful gift; but, in my opinion, the premium doesn’t seem like a very large reward for all the effort that would be involved in getting four people to subscribe to the magazine.
When I saw the cake decorating syringe, I immediately thought of a very similar one that I have – though I’ve always called it a “cake decorator.”
My cake ornamenting syringe once was my mother’s, and she had it for as long as I can remember. I’m now wondering if it is older than I thought, and if my mother got it from her mother.
The decorating tips for my syringe are a little beat up, but it still works great. I used it frequently to decorate cakes when my children lived at home, and I still occasionally use it to pipe frosting, whipped cream, or other similar foods. It brings back wonderful memories of the various themed birthday cakes we made over the years. There was a spaceman cake, a teddy bear cake, and a clown cake, as well as the lamb cake we made every Easter.
Layer cakes with a filling between the layers were very popular a hundred years ago. Modern cookbooks often have a few frosting recipes and maybe one or two cake filling recipes at the end of the Cake chapter, but some old cookbooks have so many filling and frosting recipes that they have a separate chapter for them. For example, a 1925 cookbook, the Rumford Complete Cookbook, has a chapter titled Cake Fillings, Frostings, and Icings. There are eleven cake filling recipes including Fig Filling, Maple Filling, Orange and Walnut Filling, Orange and Coconut Filling, Mocha Filling, Marshmallow Filling, Prune Almond Filling, and Caramel Nut Filling.
All the fillings looked either intriguing or tasty, but I only wanted to make one cake, so I had to pick one. Some of the fruit fillings tempted me, but in the end I decided to make Caramel Nut Filling. I thought that a white cake would work well with this filling, so I flipped back to the Cake chapter and found a recipe for White Layer Cake.
After I assembled the cake with the filling in the middle, I iced it with a Buttercream Frosting. There were no Buttercream Frosting recipes in the Rumford Complete Cookbook. I guess that the author assumed that cooks knew how to make it without a recipe.
The cake was excellent. The cake itself was moist, light, and tender with a delicate vanilla flavor. The filling was a lovely fusion of a rich caramel and crunchy nuts. (I used walnuts.)
Here’s the original cake recipe:
Source: Rumford Complete Cook Book (1925)
The recipe does not specify which type of “flavoring extract” should be used. I used vanilla. The old recipe says to bake the cake for about twenty minutes. I baked the cake at 350° F. and it actually took about 25-30 minutes until a wooden pick inserted in the center came out clean.
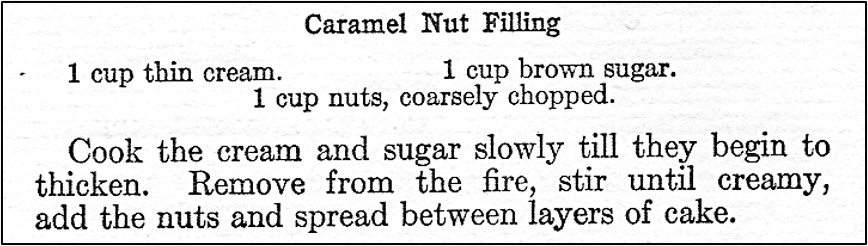
Here’s the original Caramel Nut Filling recipe:
Source: Rumford Complete Cook Book (1925)
When I read the Caramel Nut Filling recipe, I was not sure what it meant when it said to cook the cream and sugar “till they begin to thicken.” I interpreted it to mean to cook it until it reached the soft ball stage (235° F.). This worked fine, and the filling turned out well.
Preheat oven to 350° F. Grease two 9-inch round cake pans; line with waxed paper or parchment paper, then grease again and lightly flour.
Put egg whites into a mixing bowl, and beat until peaks form. Set aside.
Put butter and sugar in a large mixing bowl, then beat to cream. Add milk and vanilla, then add the baking powder, salt, and flour. Beat until well-mixed. Gently fold in the beaten egg whites. Pour half of the batter into each of the two cake pans.
Bake the layers for 25 to 30 minutes or until a wooden pick inserted in center comes out clean. Cool 10 minutes. Remove from pans. Cool the layers before assembling the cake.
Trim cake layers if needed to make even, then put a cake layer on a plate. Spread with the Caramel Nut Filling, and then top with the other layer. If desired, frost the cake. (I used a Buttercream Icing.)
Caramel Nut Filling
1 cup half and half
1 cup brown sugar
1 cup nuts, coarsely chopped (I used walnuts.)
Put the half and half and the brown sugar in a saucepan. Stir to combine, bring to a boil using medium heat. Reduce heat and simmer gently until the mixture reaches the soft ball stage (235° F.). Remove from the heat and stir in the chopped nuts. Spread between the layers of cake.
My husband recently said to me, “You don’t make hard boiled eggs right. The Wall Street Journal says that there are 16 steps involved in making good hard boiled eggs.”
I said, “Is that so there isn’t a green line around the yolk?”
He said, “No, it’s so the yolk has a nice texture.”
After reading the article, I said, “That’s stupid. You just put the eggs in a pan of water, bring it almost to a boil, reduce the heat so it stays just below boiling, and time them for 20 minutes. Then you drain them and put them in a pan of cold water for a couple of minutes. Sometimes people make things unduly complicated. If you want 16-step eggs, you’ll have to make them yourself.”
But, the article did make me curious about how people historically made hard boiled eggs. That sent me to a hundred-year-old cookbook to see how they made hard boiled eggs in 1925:
To cook eggs so that they will be firm all the way through and yet not tough or indigestible, put them in a saucepan of boiling water, cover closely and place on the part of the stove where the water will remain very hot, but not boil and let stand for twenty minutes.
The Rumford Complete Cook Book (1925)
I then decided to see what the directions for making hard boiled eggs were midway between a century ago and now. I have a Betty Crocker cookbook published about 50 years ago (actually 49 years ago). It gave both cold water and boiling water methods:
Cold Water Method: Place eggs in saucepan; add enough cold water to come at least 1 inch above eggs. Heat rapidly to boiling. Remove from heat; cover. Let stand 22 to 24 minutes. Immediately cool eggs in cold water to prevent further cooking. . .
Boiling Water Method: Place eggs in bowl of warm water to prevent shells from cracking. Fill saucepan with enough water to come at least 1 inch above eggs; heat to boiling. With spoon, transfer eggs from warm water to boiling water. Reduce heat to below simmering; cook 20 minutes. Immediately cool eggs in cold water to prevent further cooking.
Betty Crocker’s Cookbook (1976)
The way I make hard boiled eggs is a variation of the 100-year-old directions as well as of the 50-year-old ones. I may be set in my ways, but I’m sticking with how I’ve always made hard boiled eggs. My bet is that the 16-step method is just a fad.
Sometimes recipe titles in old cookbooks do not provide much information about a recipe. For example, I recently came across a recipe for Surprise Salad in a hundred-year-old church cookbook. When I read the recipe, I was surprised to discover (maybe that’s why it’s called Surprise Salad) that it was a fruit salad that called for canned pineapple slices, canned peach halves, and fresh strawberries with marshmallows and a dollop of whipped cream for good measure. The salad is served on lettuce leaves. The ingredients are stacked with a focus on presentation.
I enjoyed the salad (though in some ways- especially if I skipped the lettuce – it seems more like a dessert than a salad). I would make it again. Occasionally, I have friends over and serve a meal based on hundred-year-old recipes. Surprise Salad would be perfect for one of those meals. The ingredients and presentation are different from modern recipes, which could lead to a fun conversation, but I also think that they would enjoy it,
Here’s the original recipe:
Source: Diamond Jubilee Recipes (Compiled by The Sisters of Saint Joseph, St. Paul, Minnesota, 1925)
I tried dipping the whole strawberries that go on the top in powdered sugar, but I did not like the way it looked so I washed the powdered sugar off the berries.
1/4 cup miniature marshmallows, each cut into two pieces
lettuce leaves
3 slices of canned pineapple
3 canned peach halves
1/4 cup whipped cream
Cut the strawberries in half (reserving 3 small strawberries that are left whole). If the berries are large, cut each berry into several pieces. Put the cut berries and cut marshmallows in a small bowl, then add sugar and gently stir to distribute the sugar. Set aside.
For each serving, arrange lettuce leaves on plate, then put a pineapple slice on the lettuce. Place a peach half (with the center up) in the center of the pineapple slice. Fill the peach cavity with the strawberry and marshmallow mixture. Keep the strawberry/marshmallow mixture as level as possible to make a firm foundation for the whole strawberry that goes on the very top. Top with a spoonful of whipped cream, then garnish with a small whole strawberry.
Source: School and Home Cooking by Carlotta C. Greer (1925)
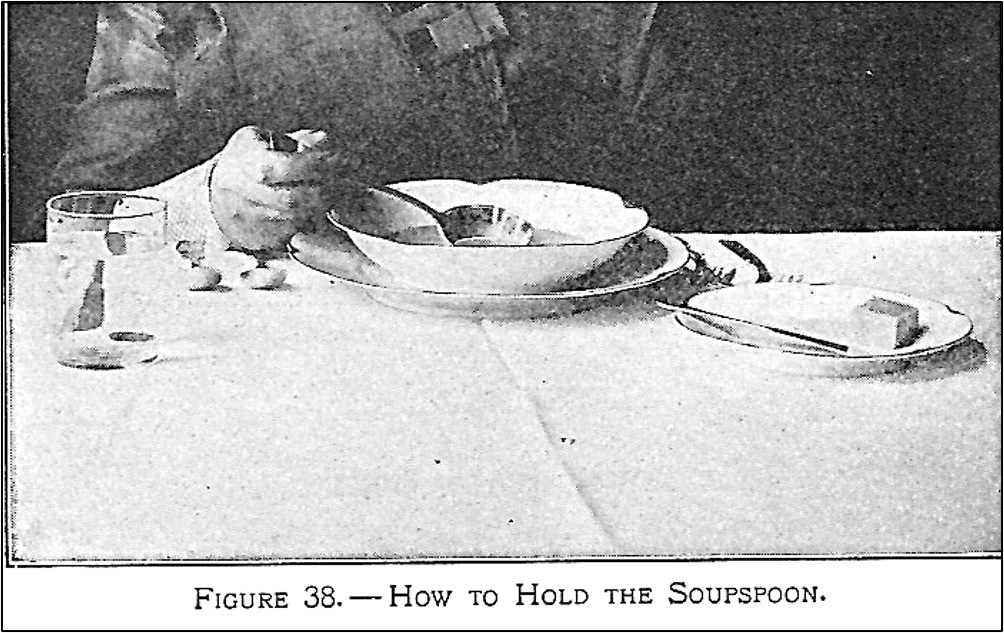
I know that when I eat soup, I’m supposed to use my spoon to scoop it away from me in the bowl, but that’s one, of many, etiquette “do’s and don’ts” that I don’t always follow. Directions for eating soup haven’t changed in a hundred years:
When using a spoon for serving, or for sipping soup, there is less danger of spilling the food if the spoon is moved away from, rather than toward, oneself (see Figure 38).
School and Home Cooking by Carlotta c. Greer (1925)
Want a cross between a cracker and a cookie? If so, I have just the recipe for you. I recently was browsing through a hundred-year-old cooking magazine and came across a recipe for Honey Tea Crackers. The name of the recipe made me salivate, and I was ready to give the it a try. But, when I looked at the recipe a little more, I was a little confused. The recipe called for putting an almond or walnut half on top of each cracker. Crackers don’t generally have nuts on top of them. And, when I thought about it, I realized that most crackers are salty or savory, not sweet.
The more I looked at the recipe, the more I was intrigued I became – and I soon was mixing up a batch of the crackers. Since it seemed unusual to put nuts on crackers, I did not put a nut on top of some of the crackers.
The recipe turned out well, though Honey Tea Crackers are not typical of modern crackers. In addition to honey, the crackers contain allspice as well as some lemon juice and grated lemon rind. The crackers were sweet with the complex undertones of honey and lemon, and a hint of allspice. They have the texture of a cut-out cookie that had been rolled out very thin. I put almonds on some crackers and walnuts on others. Both types of nuts worked well, and I don’t have a preference, but I definitely preferred the crackers that had a nut on top over the plain ones. In hindsight, I wish that had just followed the old recipe and put a nut on top of all of them.
Here’s the original recipe:
Source: American Cookery (May, 1925)
I did not dissolve the baking soda prior to adding to the other ingredients, and it worked fine. The mixture, however, seemed very dry, so I added a little more than the 1 teaspoon of water called for in the recipe.
The recipe calls for pricking the crackers “all over.” I was surprised how long it took to prick a lot of crackers, so be sure to allow sufficient time.
1 teaspoon water (add more if needed) + 2 tablespoons water
almonds or walnut halves (if desired)
Preheat oven to 350 degrees F. In a small bowl, mix together 2 tablespoons honey and 2 tablespoons water. Set aside.
Sift together flour, salt, allspice and baking soda. Add eggs, grated lemon rind, lemon juice, 3 tablespoons honey, and 1 teaspoon water; stir to mix. If the dough is too dry, add additional water. On a prepared surface, roll the dough out until it is very thin (1/4 inch or a little less). Cut into circles using a round cutter. (I used a cutter that was 2 inches in diameter.) Put the crackers on a lightly greased baking sheet. Prick all over each cracker with a fork. Brush the crackers with the honey and water mixture. If desired, press an almond or walnut half into the center of each cracker. Put into oven, and bake for 15-20 minutes or until lightly browned.


 My husband recently said to me, “You don’t make hard boiled eggs right. The Wall Street Journal says that there are 16 steps involved in making good hard boiled eggs.”