Old-fashioned Salmon Croquettes

Salmon Croquettes on Plate

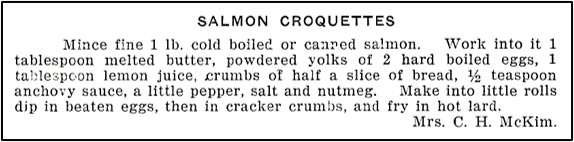
I seldom buy canned salmon, yet when  I recently  flipped through a hundred-year-old cookbook, a recipe for Salmon Croquettes caught my eye. It brought back warm memories of eating various canned salmon dishes when I was a child. Long story short, I bought a can of salmon the next time I went to the store, and soon was making Salmon Coquettes. The crispy croquettes only took a few minutes to make and were a tasty comfort food.

recipe for Salmon Crocuqettes
Source: Cement City Cook Book (1922, compiled by First Baptist Church, Alpena, Michigan)

Here’s the recipe updated for modern cooks:

Salmon Croquettes

  • Servings: 4 - 6
  • Difficulty: moderate
  • Print

1 can salmon (14.75 oz.), flaked

1 tablespoon, butter, melted

2 hard-boiled egg yolks, mashed

1 tablespoon lemon juice

1/2 slice bread, torn into small pieces to make crumbs

1/2 teaspoon anchovy sauce

dashes of salt, pepper, and nutmeg

1 egg, beaten

approximately 3/4 cup cracker crumbs (I put saltine crackers in a Ziplock bag and rolled with a rolling pin to make crumbs.)

lard, shortening, or cooking oil

Put salmon into a mixing bowl. Add melted butter, mashed hard-boiled egg yolks, lemon juice, bread crumbs, anchovy sauce, salt, pepper, and nutmeg. Shape into small balls about 1 1/2 inches in diameter. (If the mixture is too juicy to make balls, add additional bread crumbs.)

Put the beaten egg in a bowl. In another bowl put the cracker crumbs. Roll the salmon balls in the egg and then in the cracker crumbs.

Put  lard, shortening, or cooking oil in skillet and heat until hot using medium heat.  (It should be about 1/2 inch deep.) Add salmon balls. When the bottom of the balls have lightly browned (about 1 1/2 – 2 minutes), gently roll to brown the other sides.  Remove from skillet and drain on paper towels, then serve.

http://www.ahundredyearsago.com

Old-fashioned Cabbage with Caraway Seeds

I recently found a hundred-year-old recipe for Cabbage with Caraway Seeds. It has an old-fashioned goodness, and makes a lovely side dish.

Here’s the original recipe:

recipe for Cabbage with Caraway Seeds
Source; Good Housekeeping’s Book of Menus, Recipes, and Household Discoveries (1922)

Here’s the recipe updated for modern cooks:

  • Servings: 4 - 5
  • Difficulty: moderate
  • Print

1 pound cabbage (about 1/2 of a medium cabbage), shredded

1/2 small onion, finely chopped

1/2 teaspoon salt

1/8 teaspoon pepper

1 teaspoon caraway seeds

1/2 cup water

2 tablespoons fat (I used butter.)

1/4 cup vinegar

Put cabbage, onion, salt, pepper, caraway seeds, butter and water in a large saucepan. Bring to a boil using medium heat, then reduce heat and simmer until the cabbage is tender; stir frequently. If needed, add additional water. After the cabbage is soft (about 30 minutes), add the vinegar and cook an additional 5 minutes.

http://www.ahundredyearsago.com

Old-fashioned Cream of Mushroom Soup

Cream of Rushroom Soup

I am so fortunate to have such wonderful readers, and am humbled  by their kindness and thoughtfulness. Recently one reader, Judy L., gave me a special hundred-year-old cookbook out of her collection. The book is called For Luncheon and Supper Guests by Alice Bradley. Judy  is not sure, but the cookbook may have belonged to her grandmother. The small book has 10 menus and more than 100 recipes that are:

Suitable for company luncheons, Sunday night suppers, afternoon parties, automobile picnics, evening spreads, and for the tea room, lunch room, coffee shops, and motor inns.

The book’s author dedicated it to:

The thousands of women who like to entertain their friends and prepare for them something new and delicious to eat.

The book is a joy to browse through, and I can picture cooks a hundred years ago using it to plan lovely events. Judy, thank you!

The first recipe I made out of the book was the recipe for Cream of Mushroom Soup. I tend to associate Cream of Mushroom Soup with the condensed canned soup and think of it as more of a recipe ingredient than something to eat on its own. Yet the old cookbook recommended it as a special dish to serve guests, so I decided to give it a try.

This recipe is for a delicate, velvety smooth mushrooms soup that was perfect on a cold winter day – and that would be delightful for a light lunch with friends.

Here’s the original recipe:

Recipe for Cream of Mushroom Soup
Source: For Luncheon and Supper Guests (1922) by Alice Bradley

When I made this recipe I bought an 8-ounce box of whole button mushrooms – and chopped the entire mushrooms rather than buying more mushrooms and only using the stems and skins. (By the way, what is a mushroom skin?)

The old recipe says to serve the soup in bouillon cups which made me think about presentation. How would a hostess in days gone by serve  this soup to her lunch guests? I then remembered some vintage luncheon plates way in the back of the top shelf of my kitchen cabinets. They have an indentation for a  small matching bowl. I pulled my step stool over, climbed up and got one of the plates and bowls out. I then made a sandwich to go with my soup. And, suddenly, with just a little imagination, my boring Saturday lunch was transformed into a beautifully presented luncheon in a different time and place.

Cream of Mushroom Soup

  • Servings: 4 - 6
  • Difficulty: moderate
  • Print

Here’s the recipe updated for modern cooks:

2 cups milk

1/2 pound (8 oz.) mushrooms, chopped

1/4 cup onion, chopped

3 cups chicken broth

4 tablespoons butter

4 tablespoons flour

1 1/2 teaspoons salt (Use less if the chicken broth contains salt.)

1/4 teaspoon  pepper

Put milk in a saucepan, and using medium heat, heat until it is scalded (just begins to boil); stir occasionally. Remove from heat and set aside.

Put the mushrooms,  onions, and chicken broth in another saucepan, and bring to a boil using high heat. Reduce heat and simmer for 20 minutes. Remove from heat, and strain; keeping the liquid. (The vegetables can be discarded or served separately.

In the meantime, melt the butter in a large saucepan. Stir in the flour, salt, and pepper, then gradually add the mushroom broth while stirring constantly, Using medium heat bring to a boil while continuing to stir occasionally;  then stir in the scalded milk and reheat until hot and steamy.

Note: This recipe is for a silky smooth mushroom soup, but if desired, the cooked chopped mushrooms and onions that were strained out when making the mushroom broth, can be stirred back into the soup for a more robust chunky soup.

http://www.ahundredyearsago.com

Old-fashioned Grapefruit Pie

Grapefruit Pie

I was intrigued by a hundred-year-old recipe for Grapefruit Pie, and decided to give it a try. The pie was bursting with a sunny grapefruit flavor. It reminded me of lemon meringue pie, but was a little less tart.

Here’s the original recipe:

Grapefruit Pie

Recipe for Grapefruit Pie

Source: American Cookery (March, 1922)

Rather than squeezing a grapefruit to get juice to make the pie, I purchsed a bottle of grapefruit juice. A typical grapefruit contains about 3/4 cup of juice.. When I made this recipe, the pie filling was a little juicy, so when I updated the recipe I added an additional egg yolk, (The original recipe called for 2 yolks and 3 egg whites. Using an additional yolk eliminates the need to figure out what to do with an extra yolk.). I also added an additional 1/2 tablespoon of cornstarch when I updated the recipe to further thicken the filling.

Here’s the recipe updated for modern cooks:

Grapefruit Pie

  • Servings: 6 - 8
  • Difficulty: moderate
  • Print

Pie

1 cup sugar

1 cup water

3 1/2 tablespoons cornstarch

1/8 teaspoon salt

3/4 cup grapefruit juice

3 egg yolks, beaten

1 9-inch pie shell, baked

Meringue

3 egg whites

6 tablespoons sugar

2 teaspoons grapefruit juice

Place water, sugar, cornstarch, salt, and grapefruit juice in a saucepan, stir until thoroughly mixed and smooth. Using medium heat, bring to a boil while stirring occasionally. Reduce heat and simmer for 5 minutes. Add a small amount of the hot mixture to the beaten egg yolks, while stirring constantly, and then slowly add to the contents in the saucepan while stirring constamtly. Remove from heat. If not smooth, stain the mixture. Allow the mixture to cool.

In the meantime, preheat oven to 400 ° F. and  make the meringue. Place egg whites in a bowl, and beat the egg whites until they form stiff peaks. Gradually add 6 tablespoons sugar while continuing to beat; add the 2 teaspoons of grapefruit juice and beat.  Then spoon on top of the pie and swirl. Place pie  in the oven and bake for  8 – 10  minutes or until the meringue is lightly browned.

http://www.ahundredyearsago.com

Several Hundred-Year-Old French Dressing Recipes

Salad and Salad Dressing
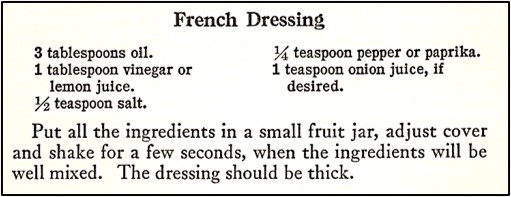
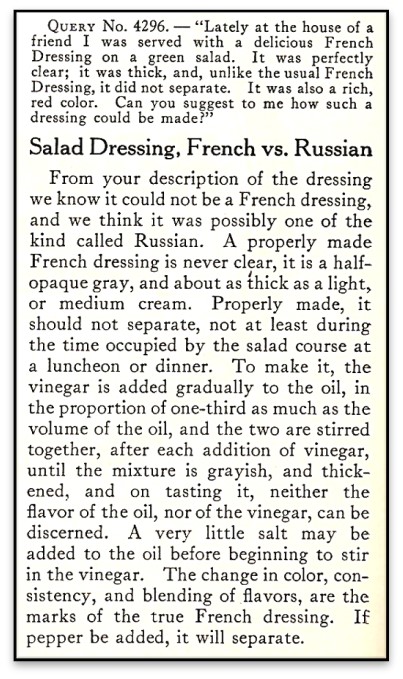
Some recipes don’t change across the years; others do.  As tastes and preferences change, recipes are updated. In other cases, lack of availability of an ingredient might lead to tweaking of an old recipe. Also, for commercially-prepared foods, government regulations can affect their composition.  Last week I was amazed to discover that the government regulated French Dressing for many years.

On January 13,  the Wall Street Journal had an article titled “The U.S. Federal Government Deregulates French Dressing.”  The government established the standard for French Dressing 72 years ago, and “according to the original 1950 standard, a French dressing should include vegetable oil, and a vinegar and/or lemon or lime juice, and could be seasoned with ingredients such as salt, sugar, tomato paste or puree, and spices such as mustard are paprika.”

This article made me remember the many French Dressing recipes that I’ve seen in hundred-year-old cookbooks over the years, and how those recipes differed from today’s seemingly ubiquitous creamy orange dressing. Back then the dressing was often more of a vinaigrette. Here are two French Dressing recipes from 1922 cookbooks:

French Dressing Recipe
Source: Mrs. DeGraf’s Cook Book (1922)

French Dressing RecipeSource: Good Housekeeping’s Book of Menus, Recipes, and Household Discoveries (1922)

I made the French Dressing in the photo using the first recipe.

Several years ago, I did a post with a recipe for Endive Salad with Homemade French Dressing that contained three 1912 French Dressing Recipes. Here are those recipes:

3 French Dressing Recipes
Source: Lowney’s Cook Book (1912)

And, here is a 1922 magazine article that responds to a reader’s question about French Dressing. The response differentiates between French Dressing and Russian Dressing -though it is mostly focused on French Dressing:

magazine article
Source: American Cookery (June/July, 1922)

Whew, my head is spinning. Who would have guessed that for a least a hundred years people have been giving lots of thought to exactly what comprises French Dressing?

The Glace Nut Disaster


Glace Nuts

People often ask me if I ever have cooking disasters when making hundred-year-old recipes. And, I usually say, “No, that’s very rare. I like some recipes better than others, but most recipes turn out fine. A few I really like and they become part of my regular recipe repertoire, and I make  them many times.”

But today’s post is an exception – I made a hundred-year-old recipe for Glace Nuts that was a disaster.  Let me explain.

Recipe for Glace Nuts
,  Source:: The Boston Cooking-School Cook Book (1921 Edition)

I wasn’t quire sure about using a pin to dip the nuts in the syrup as described in the old recipe, but I had some fairly long pins so decided to give it a try. (Did they use hat pins a hundred years ago when making Glace Nuts?)

First, I put the ingredients a saucepan and brought the mixture to a boil. I regularly checked the temperature with a cooking thermometer – 240° F. . . . 264° F . . . 285 ° F . . . 296° F.  I decided that it was time to  get some waxed paper (it probably was similar to oiled paper) out to put the nuts on after I dipped them in the sugar syrup.. I put pieces of waxed paper on several plates, and then looked at the boiling syrup – oh dear, it was brown. I turned off the heat and grabbed the candy thermometer. – 320°. Maybe the syrup was only slightly discolored.

I put some cold water in the sink and lowered the saucepan into it for a few seconds. Then I put some water in the microwave to heat. When it was  hot, I poured it into a shallow pan, and then set the saucepan with the syrup in it. I inserted a pin in a walnut and carefully dipped it into the syrup; then I removed the sugar-coated walnut, and laid it on the waxed paper. I repeated the process with four more nuts – as the syrup rapidly began to thicken and then harden in the pan. Clearly not watching the cooking syrup closely enough and letting it reach a temperature of 320° was causing problems. I also noticed that the dipped nuts were sticking to the waxed paper.

I decided to make a fresh batch of the sugar syrup. Sugar doesn’t cost much. It would only take a few minutes to make the syrup, – and I’d watch it like a hawk to ensure that I took it off the stove at exactly 310°.

Twenty minutes later I had a another batch of the sugary liquid. I  put it in cold water then, then set the saucepan in some hot water. And, I inserted a pin in a nut and began dipping once again.

One nut. . two. . . three. . . four. . . five nuts. . . the syrup again began to get very thick. I inserted a pin in the sixth nut, and immersed it into the syrup. The rapidly thickening syrup began to pull the nut off the pin. I instinctively reached with my  hand to grab the nut before it fell off the pin – and my middle finger and thumb slipped into the hot sticky syrup. OUCH! I’m burned!

Dang it! My fingers hurt – but then I smiled. I always seem to have a minor crisis or disaster during the mad rush in the days before Christmas. This apparently is my disaster this year.

I do not recommend this recipe – and since I don’t recommend it, I not going to update it for modern cooks.

Fig and Cranberry Pie

slice of fig and cranberry pie

I’m always on the lookout for new pie recipes that I might make for Thanksgiving, and fresh, seasonal cranberries are one of my favorite November foods. So when I saw a hundred-year-old recipe for Fig and Cranberry Pie, I decided to give it a try.

The pie turned out beautifully with a lovely purple filling. The sweetness of the figs and the tartness of the cranberries perfectly balanced each other. If you didn’t tell your holiday guests which fruits were in the pie, I don’t think that they’d ever guess. My husband said that the pie wasn’t too sweet and it wasn’t too sour, but (ala Goldilocks) it was just right.

The recipe is a keeper.

Here’s the original recipe:

Recipe for Fig and Cranberry Pie
Source: American Cookery (November, 1921)

Here’s the recipe updated for modern cooks:

Fig and Cranberry Pie

  • Servings: 6 - 8
  • Difficulty: moderate
  • Print

1/2 pound (8 ounces) figs, chopped

2 cups water

2 cups cranberries

1 cup sugar

1/4 cup flour

2 tablespoons butter

juice from 1/2 of small lemon

milk

sugar

pastry for 2-crust 10-inch pie (It might possibly fit in a 9-inch pie shell, but it would be really full.)

Put chopped figs and water in a saucepan. Bring to a boil using high heat, then reduce heat and simmer until the figs are tender (about 15 minutes). Add the cranberries and continue cooking until the cranberries pop.

In the meantime, put the sugar and flour in a small bowl, and stir until combined.

Once the cranberries have popped, gradually add the flour and sugar mixture while stirring constantly. Continue cooking and stirring until the mixture comes to a boil. Remove from heat and stir in the butter and lemon juice.

Preheat oven to 425° F. Turn cooked fig and cranberry mixture into pastry-lined pie pan. Cut the second pie dough circle into strips and make a lattice top crust and flute edges. Brush crust with a small amount of milk; sprinkle with sugar.  Bake in oven for 10 minutes; then reduce heat to 350 degrees. Bake an additional 20 to 30 minutes or until crust is lightly  browned and juice just begins to bubble.

http://www.ahundredyearsago.com