Tasty, fresh, ripe tomatoes from the garden or farmers’ market are at their peak, so I browsed through my hundred-year-old cookbooks for a tomato recipe. I found a recipe for Creole Tomatoes and decided to give it a try. The recipe called for cutting tomatoes in half, topping with chopped onion and green pepper (and a sprinkle of cayenne pepper), and then baking until hot and tender. The baked tomatoes are served on squares of toast that are surrounded by a lovely sauce made with browned flour.
I knew this recipe was a winner when my husband, after his first bite, said, “This is really good.” The tender, sweet tomatoes paired perfectly with the slightly bitter and tangy onions and green peppers, while the cayenne pepper added a bit of heat – and the toast and sauce provided additional delightful textures and flavors.
Here’s the original recipe:
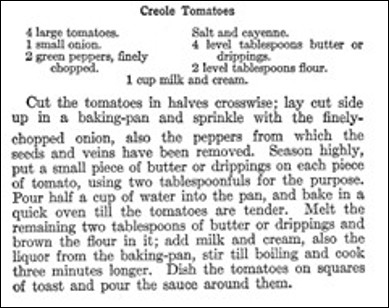
This recipe called for four large tomatoes – which would probably make four (if everyone had two squares of toast and a whole tomato) to eight (if everyone had a square of toast with 1/2 tomato) servings. This seemed like a lot of servings, so I halved the recipe when I updated it (though I did use the total amount of water called for in the original recipe). One-half cup of water was needed to adequately cover the bottom of the baking dish when baking the tomato halves.
I used butter rather than meat drippings when I made this recipe (though bacon drippings might add a nice additional dimension). The recipe called for using a mixture of milk and cream when making the sauce; I just used milk which worked fine, though the sauce was probably slightly less rich than if the mixture had been used.
This recipe called for melting the butter, then stirring in the flour and browning. I think that the usual way to brown flour is to put it in a heavy skillet, then heat using medium heat for a few minutes while stirring constantly, so that is what I did. After the flour was lightly browned, I added the butter and continued stirring until it was melted and combined with the browned flour.
I trimmed the edges off the toast and cut the pieces into squares as directed in the recipe, but whole slices of toast would work fine.
Here’s the recipe updated for modern cooks:
Creole Tomatoes (on Toast)
2 large tomatoes
1/3 cup onion, finely chopped
1/3 cup green pepper, finely chopped
salt
cayenne (red) pepper
1/2 cup water
1 tablespoon + 1 tablespoon butter or meat drippings (I used butter.)
1 tablespoon flour
1/2 cup milk
4 slices toast
Preheat oven to 425° F. In a small bowl, combine the chopped onion and green pepper. Set aside.
Remove the stem from the tomatoes, then cut them in half crossways. Lay the cut tomatoes (cut side up) in a baking dish. (I used an 8-inch square baking dish.) Evenly spread the chopped onion and green pepper mixture over the top of cut tomatoes. Sprinkle with salt and cayenne pepper. Use 1 tablespoon of the butter to put small dabs of butter on top of tomatoes. Pour the water into the baking dish around the tomatoes. Put in oven and bake until the tomatoes are tender and hot (about 20 – 25 minutes).
In the meantime, put the flour in a small heavy skillet (a cast iron skillet works well). Using medium heat, lightly brown the flour while stirring constantly. When the flour is lightly browned, add the butter. Continue stirring until the butter is melted, and the butter and flour are combined. Slowly stir in the milk and the liquid from the baking pan (after the tomatoes are baked); bring to a boil while stirring constantly.
If desired, remove the crusts from the toast and trim the toast into squares. (Whole slices of toast would also work.)
To serve, put a baked tomato half on each square of toast. Pour the sauce around the toast squares.