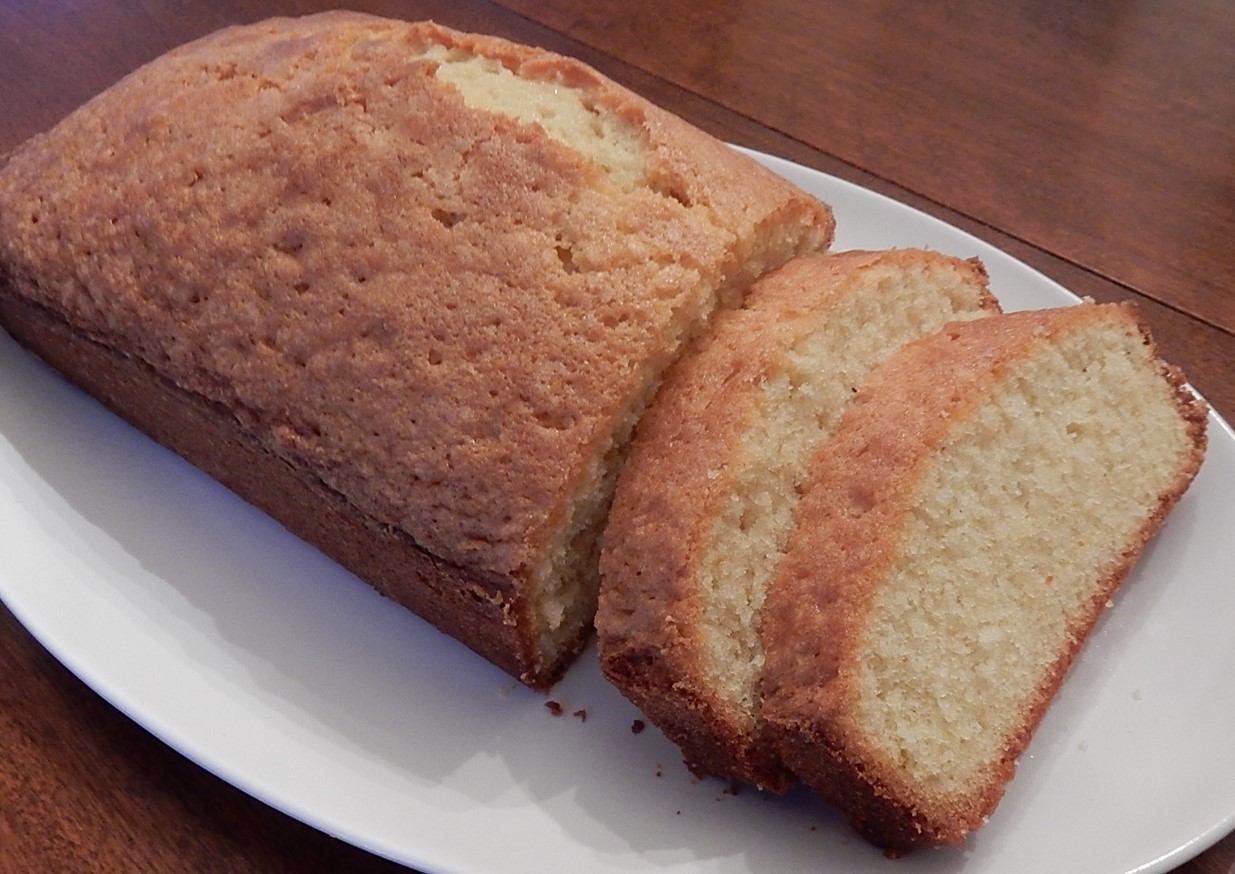
Old-time pound cake recipes often called one pound each of flour, sugar, butter, and eggs. However, a 1920 promotional cookbook for Snowdrift shortening contained a recipe for “Modern” Pound Cake that called for Snowdrift instead of butter; and didn’t call for equal proportions of the other ingredients.
Source: A New Snowdrift Cook Book (1920)
The recipe may not be a traditional pound cake recipe – though the use of shortening doesn’t exactly seem modern either – but, in any case, “Modern” Pound Cake turned out wonderfully. The cake is moist and rich, with a hint of lemon.
Preheat oven to 350° F. Grease and flour a loaf pan. Put sugar and shortening in a mixing bowl; beat until combined. Then beat in the eggs, one at a time. Add the vanilla and lemon extracts, milk, baking powder, salt, and (if desired) mace; beat until combined. Add flour and beat until well blended. Pour into prepared pan.
Bake 45 to 50 minutes, or until wooden pick inserted in center comes out clean.
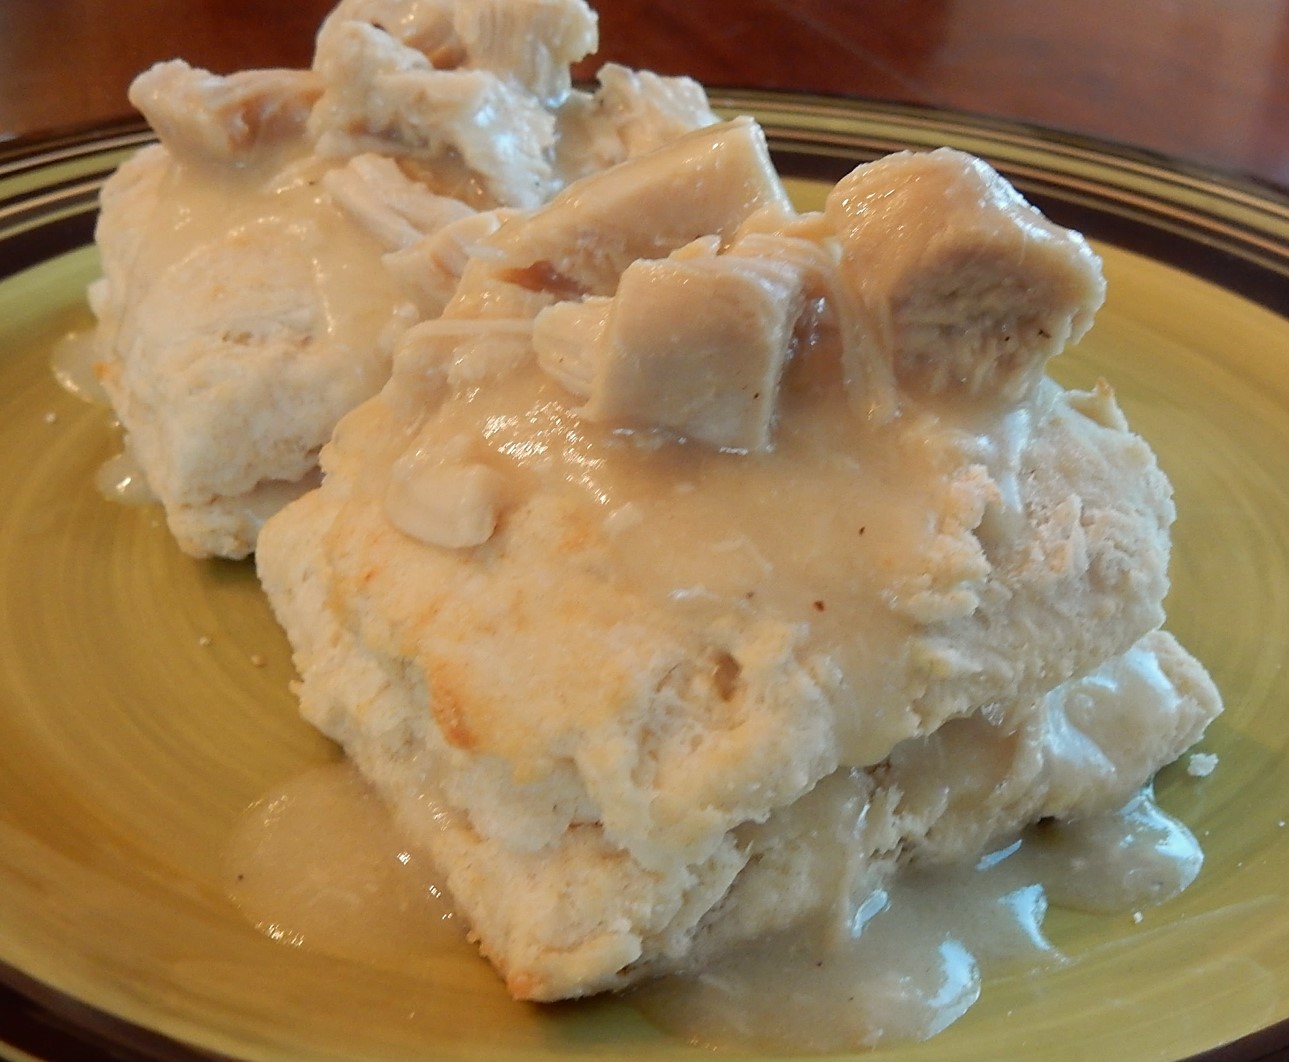
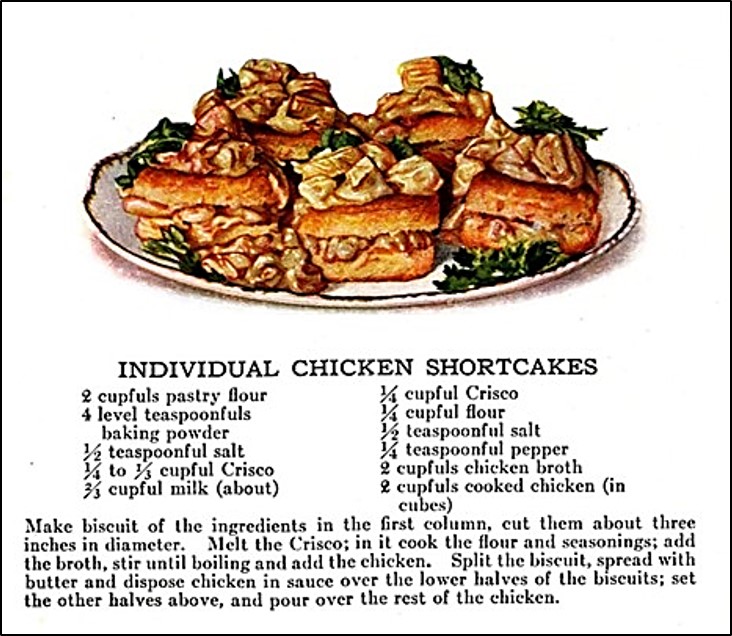
With all that is happening in the world, I’m in the mood for homey and comforting foods. So when I came across a hundred-year-old recipe for Individual Chicken Shortcakes, I had to give it a try. This is really a recipe for old-fashioned Chicken and Biscuits. Whatever it is called, this dish hit the spot. The biscuits were flaky, and the chunky chicken gravy was warm and hearty.
Here is the original recipe:
Source: Balanced Daily Diet by Janet McKenzie HIll (1920)
When I updated the recipe, I used butter instead of shortening when making the chicken gravy.
2 cups pastry flour (all-purpose flour also works if pastry flour is not available)
4 teaspoons baking powder
1/2 teaspoon salt
1/4 cup shortening
approximately 2/3 cup milk
butter, if desired (use when assembling)
Chicken Gravy
1/4 cup butter
1/4 cup all-purpose flour
1/2 teaspoon salt
1/4 teaspoon pepper
2 cups chicken broth
2 cups cooked chicken (coarsely chopped into approximately 1/2-inch cubes)
To Make Biscuits: Preheat oven to 450° F. Combine flour, baking powder, and salt in a mixing bowl. Cut in shortening. Add most of the milk and mix using a fork until dough starts to cling together. Add more milk if needed. Roll dough on a prepared floured surface into a rectangle 1/2-inch thick. Cut into 3-inch squares. Place squares on a baking sheet. Bake for approximately 10 -15 minutes (or until lightly browned).
To Make Chicken Mixture: Using medium heat, melt butter; then stir in the flour, salt, and pepper. Gradually, add chicken broth while stirring constantly. Continue stirring until it thickens. Add the chicken, and stir to combine.
To Assemble: Split the biscuits, and butter, if desired. Put 1-2 heaping tablespoons of the chicken mixture on the bottom half of each biscuit. Put other half on top, and spoon another 1-2 heaping tablespoons of the chicken mixture on top. Serve.
When I recently was browsing through a hundred-year-old cookbook, and came across a recipe for Cinnamon Toast, memories came flooding back. I have warm, fuzzy memories of eating Cinnamon Toast, as well as fun memories of making Cinnamon Toast that bring to mind people I hadn’t thought of in years.
When I was a child, Cinnamon Toast was the perfect after-school snack. Open the door, take off coat, put a couple slices of bread in the toaster, and toast. Then spread with butter, sprinkle with cinnamon and sugar, and voila – a delightful, sweet treat.
I also remember how my mother always made Cinnamon Toast when I didn’t feel well, and how it always made a miserable day seem a just little bit better. Similarly, I always made it for my children when they were ill, and not hungry for the usual foods. And, I’ve noticed that, as adults, they make Cinnamon Toast for themselves when they are sick.
When I make Cinnamon Toast, no recipe is needed. It is so simple to make. But seeing the hundred-year-old recipe for Cinnamon Toast reminded of another day, many years ago when I did make Cinnamon Toast using a recipe.
It was my first day in junior high, and I was feeling very grown up going from one class to another. Then I was brought back to earth when I got to home economics, and the teacher said, “Today we are going to learn how to make Cinnamon Toast.” And, she actually gave us a recipe. My friends and I tried to suppress giggles. A few of the more daring girls (only girls took home economics back then; the boys took shop) whispered, “This is stupid. Doesn’t everyone know how to make Cinnamon Toast? Does she think we’re little kids?”
But the bottom line is – recipe or no recipe – Cinnamon Toast is the ultimate comfort food.
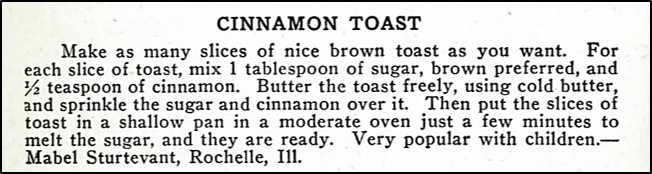
Here’s the original recipe:
Source; The Cook Book of Left-Overs (1920) compiled by the More Nurses in Training Movement
The hundred-year-old recipe calls for brown sugar, while I typically use white. Either type of sugar works. When brown sugar is used, the Cinnamon Toast has a slight hint of caramel.
Put the brown sugar and cinnamon in a small bowl; stir until mixed. Set aside.
Toast bread then spread with butter. Sprinkle with the sugar and cinnamon mixture. (Save any extra of the sugar and cinnamon mixture to use on another piece of toast.)
If desired, melt the sugar mixture on the toast – Preheat oven to 350° F. Place the toast on a baking sheet or in a shallow baking dish, and put in the oven for 1-3 minutes or until the sugar is melted; remove from oven and serve immediately.
I recently came across a hundred-year-old recipe for Cocoa Cookies that I just had to try. This recipe was actually a cut-out cookie recipe. The cookies had a crispy exterior with a softer, cake-like interior, and just the right amount of sweetness. They are lovely with coffee (or milk).
Here is the original recipe:
Source: New Royal Cook Book (1920), published by Royal Baking Powder Co.
When I followed the recipe, the cookie dough was extremely dry and crumbly, so I added a second egg to make the dough a better consistency for rolling.
Preheat oven to 400° F. Cream butter (or shortening) and sugar; then stir in milk and eggs. Add the baking powder, salt, and cocoa; stir until combined. Add the flour and stir until well mixed. Roll out to 1/4 inch thick; then cut into shapes. Place on greased baking sheets. Bake 9-12 minutes or until lightly browned.
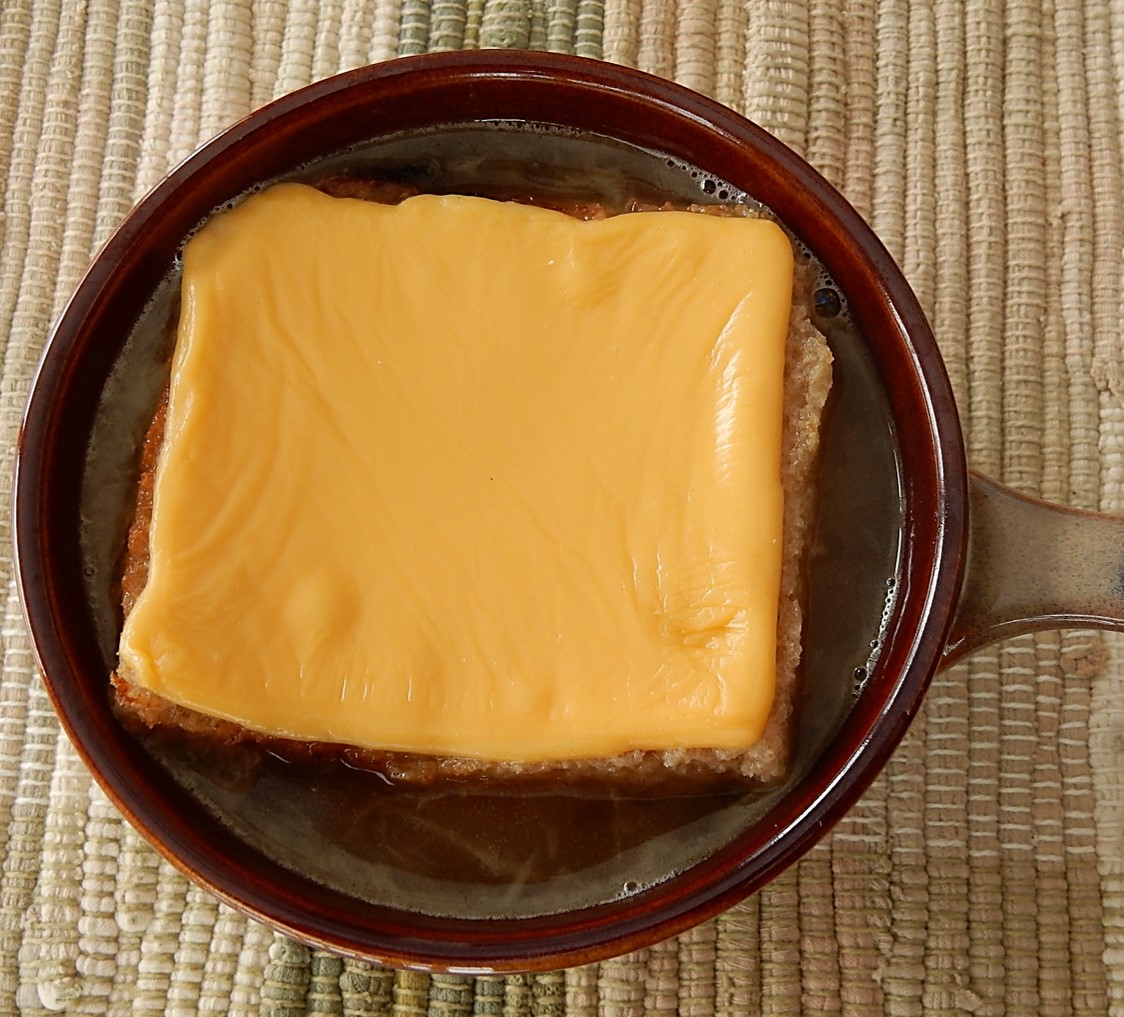
French Onion Soup topped with toast and Swiss or Gruyere cheese is my favorite “restaurant soup,” so I was intrigued when I saw a recipe for French Onion Soup in a hundred-year-old cookbook. I could immediately tell the old recipe wasn’t exactly like a modern one because the soup was topped with toast and American cheese.
I have a somewhat negative stereotype of American cheese (and it just isn’t the same as Swiss or Gruyere cheese), so my expectations weren’t very high for this recipe. But I was pleasantly surprised. The resulting soup tasted similar to modern French onion soups–and the melted American cheese was yummy (and not the least bit jarring) when immersed in the soup. My husband even said that he liked how the cheese was “less stringy” than the cheese on the typical French Onion Soup.
Here’s the original recipe:
Source: A New Snowdrift Cook Book (1920) by Mrs. Ida C. Bailey Allen
Old cookbooks often just use the generic term “cheese.” This is the first time I’ve seen a hundred-year-old recipe explicitly call for American cheese. According to Serious Eats, James Kraft patented a method for making process American cheese in 1916, and it apparently was widely available by 1920.
This recipe is from a promotional cookbook for Snowdrift published by The Southern Cotton Oil Trading Company. Snowdrift was a shortening made from cottonseed oil. When I made the recipe, I substituted butter for the Snowdrift.
1 slice American cheese for each bowl of soup (Use 2 slices per bowl if the slices are thin.)
Melt butter in a Dutch oven or stock pot, then add onion slices. Using medium heat sauté until the onions have softened and caramelized while stirring occasionally. It will take approximately 45 minutes for the onions to caramelize. Add the soup stock, and bring to a simmer.
In the meantime, lightly toast bread. Cut toast into squares small enough to fit the soup bowls; then cut the American cheese into squares slightly smaller than the toast. Top the toast with the squares of American cheese. Put under the boiler until the cheese melts (about 1 minute); remove from oven.
To serve: Ladle soup into bowls, and top with the toast squares/melted cheese.
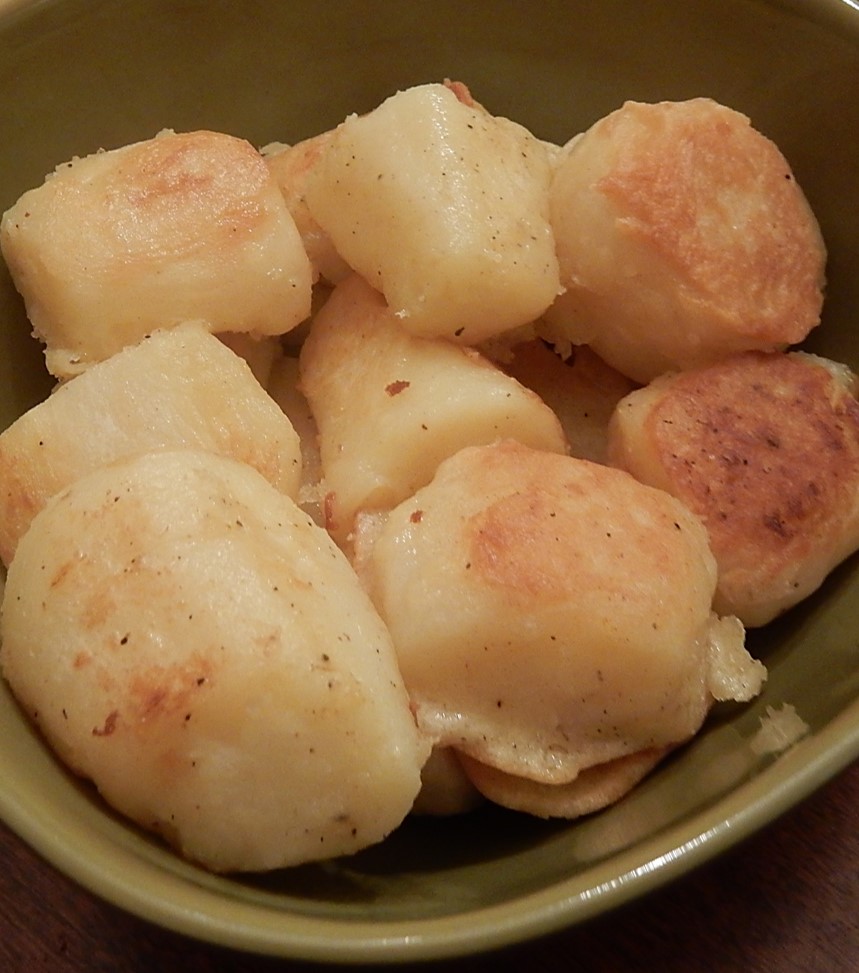
When I recently saw a hundred-year-old recipe for Fried Parsnips, I decided to give it a try. As winter begins to wind down, I’m enjoying some of the less common vegetables.
The parsnips are cut into large chunks. After they are cooked, each piece is dipped into a batter and then fried. The Fried Parsnips had a delightful earthy, sweetness which was accentuated by the crispy coating.
Here is the original recipe:
Balanced Daily Diet (1920) by Janet McKenzie Hill
I could not figure why the cooked parsnips were supposed to stand in the butter for half an hour, or why the batter was to sit for half an hour – so I didn’t include extended wait times when I updated the recipe.
I also substituted butter for some of the Crisco, and any shortening or lard works for frying.
Peel parsnips and cut into 2 1/2 inch chunks. Place in a saucepan and cover with water. Bring to a boil using high heat, then reduce heat and simmer until tender (approximately 20 – 25 minutes). Drain.
While the parsnips are cooking, make the batter. In a mixing bowl place the egg, milk, flour and 1/4 teaspoons salt. Beat until smooth; set aside.
Melt butter in skillet, then add cooked parsnips. Sprinkle with salt and pepper, then gently roll in the melted butter. Remove parsnip pieces from the skillet, then add enough shortening or lard to the skillet so that there is 1/2 inch of shortening once it is melted.
Dip each piece of parsnip in the batter to coat, remove from batter, let any excess batter drip off, then put the batter-coated parsnips pieces into the hot fat. Cook until lightly browned on the bottom, then gently roll several times to brown other sides. When browned, remove parsnip pieces from the skillet with a fork. Drain on paper towels, then serve.
Sometimes it is a challenge to make a recipe in an old cookbook. The cookbook may make assumptions about the knowledge level of the cooks who will use the cookbook that totally miss the mark when it comes to modern cooks; or one recipe may refer to another recipe which might then refer to still another.
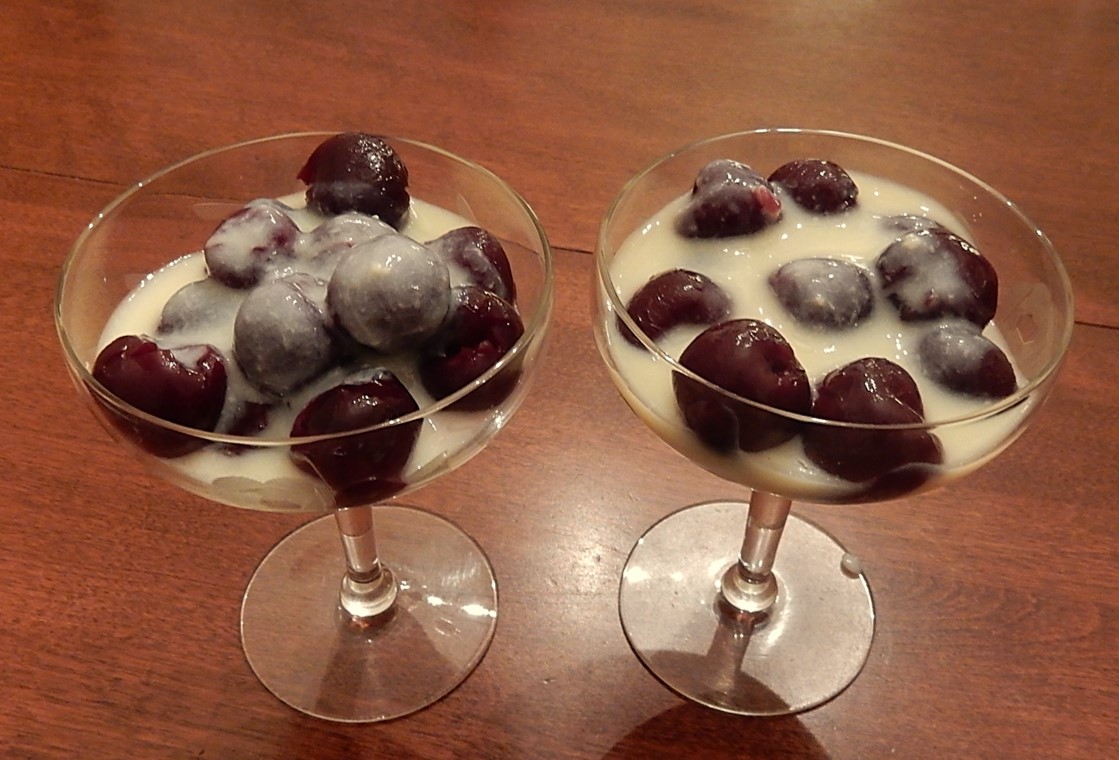
For example, I recently found a hundred-year-old recipe for Canned Fruit Custard that at first appeared very simple – Make a thin (soft) custard and pour it over drained canned fruit. But there was just one problem; the cookbook did not contain a recipe for thin custard. Apparently cooks were just supposed to know how to make thin custard.
Source: The Cook Book for Left-Overs (1920) Compiled by The More Nurses in Training Movement (Illinois)
Unfortunately I am not as knowledgeable as cooks a hundred year ago, and didn’t know how to make a thin (soft) custard, so I searched through other old cookbooks for a recipe. I finally found a soft custard recipe in a 1920 home economics textbook.
Source: School and Home Cooking (1920) by Carlotta Greer
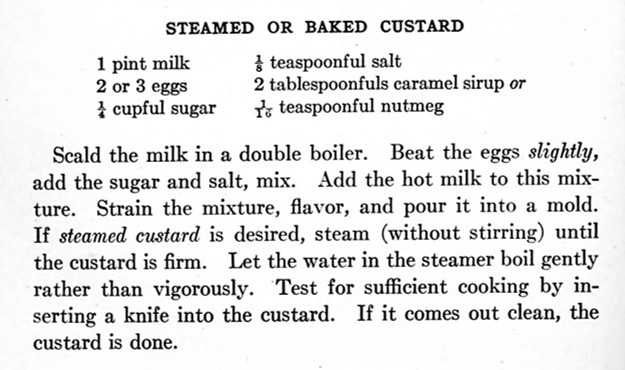
All was good, but I then was surprised to discover that I needed to find still another recipe. The Soft Custard recipe said to “mix the materials in the same way as for steamed or baked custard.”
Source: School and Home Cooking (1920) by Carlotta Greer
Whew, this was getting complicated. After I found all three recipes, I took a stab at synthesizing all the directions, I finally made Canned Fruit Custard using canned sweet dark cherries. The dessert was lovely, with the cherries coated with a creamy, slightly sweet custard sauce, but the whole process has left me feeling drained.
So that others don’t need to go through the process of synthesizing the recipes, here is the Canned Fruit Custard recipe updated for modern cooks.
2 pints canned fruit (15-16 ounce cans) – I used canned dark sweet cherries.
Custard
2 eggs, separated
2 cups milk
1/4 cup sugar
1/8 teaspoon salt
1/2 teaspoon vanilla
To make the custard, first scald the milk. To do this, put the milk in a heavy sauce pan (use a double boiler if available); then heat using medium heat. Stir frequently until the milk just barely begins to bubble, then remove from the heat.
In a bowl beat egg whites until stiff peaks form. Set aside.
In a separate bowl, beat egg yolks slightly, then add sugar and salt. Beat to combine. Then place a small amount (approximately 1 – 2 tablespoons) of hot milk into bowl with the egg mixture, stir quickly. Add this mixture to the hot milk and stir. (This helps prevent the egg from coagulating when the egg is introduced to the hot liquid.) Return to stove and cook, using medium heat while stirring constantly until the mixture begins to thicken or coat a spoon. Quickly stir in the beaten egg whites. Remove from heat. Strain and then stir in the vanilla. Chill at least 3 hours.
To Serve
Drain canned fruit. Put the fruit in dessert dishes, and spoon the soft custard over the fruit.