1 cup mushrooms, sliced (or 1 8-ounce can of mushrooms)
1/2 teaspoon salt
1 teaspoon Worcestershire sauce
4 eggs
4 slices toast
Put tomato sauce and mushrooms in a skillet. Using medium heat, heat until hot and bubbly, and the mushrooms are tender. Add salt and Worcestershire sauce.
Break eggs into a bowl, and then slip into the hot tomato and mushroom mixture. Break yolks and stir gently until the mixture thickens. Serve on toast.
I occasionally see recipes in hundred-year-old cookbooks where the name of the recipe doesn’t seem quite right – and I think that either the spelling of the name has changed across the years, the recipe author didn’t know how to spell, or that there was a typo. This is one of the times. The recipe is for Rice Ressetto, but I think that it is really a tomato risotto recipe.
This dish contained rice, tomatoes, and green peppers. It turned out okay, but was much less spicy than similar recipes typically would be today.
Source: Cement City Cook Book (1922) published by First Baptist Church, Alpena, Michigan
I’m not sure how Spanish sweet pepper differs from green pepper, so I only used green pepper when I made the recipe. The ratio of rice to water is less than typical for cooking rice which means that the rice was still semi-firm when prepared. It was quite dry, and did not need to be drained. This semi-cooked rice then absorbed juice from the tomatoes and softened while baking.
Preheat oven to 350° F. Put water in a large saucepan; bring to boil. Stir in rice, butter, salt, and pepper, then put cover on pan and reduce heat to low. Cook for five minutes, then turn off heat. Let rice sit for at least 10 minutes. (The rice will still be somewhat firm.) In the meantime put the tomatoes and green pepper in another saucepan. Heat until hot and bubbly, then stir in the rice. Put into a casserole dish and cover. Heat in the oven for 20 minutes, then remove and serve.
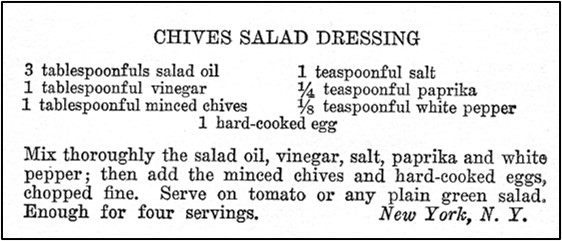
I’m always looking for recipes for healthy, easy-to-make homemade salad dressing, so was pleased to find a recipe for Chives Salad Dressing in a hundred-year-old cookbook.
Chives Salad Dressing was a lovely vinaigrette with chopped chives and chopped hard-boiled egg.
Here’s the original recipe:
Source: Good Housekeeping’s Book of Menus, Recipes, and Household Discoveries (1922)
Put vegetable oil or olive oil, vinegar, salt, paprika, and white pepper in a small bowl; stir to combine. Add chives and chopped egg. Serve on tomato, lettuce, or other similar salads.
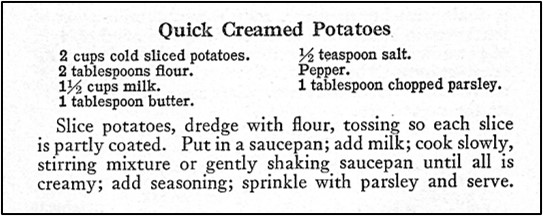
Creamed Potatoes are a delightful comfort food, so I was pleased to find a hundred-year-old recipe for Quick Creamed Potatoes.
Here’s the original recipe:
Source: Mrs. DeGraf’s Cook Book (1922)
I am unclear whether this recipe calls for raw potato slices or previously cooked potato slices. When I made this recipe, I used raw potato slices and had issues with the milk scorching on the bottom of the pan. I tried to gently stir the potato mixture while it was cooking, but it took about 15 minutes for the potatoes to soften and it was really difficult to stir well enough to prevent scorching.
Put potato slices in a bowl; dredge with flour and toss until the potato slices are partially coated with flour. Put in a saucepan and add milk. Gently cook using medium heat until the milk is hot; reduce heat to medium low and continue cook until the potato slices are soft while frequently gently lifting the potato slices and stirring. (Be sure to stir to the very bottom of the pan, since the milk will easily scorch). Remove from heat. Add butter, salt, and pepper; gentry stir to combine. Put in serving dish and sprinkle with parsley.
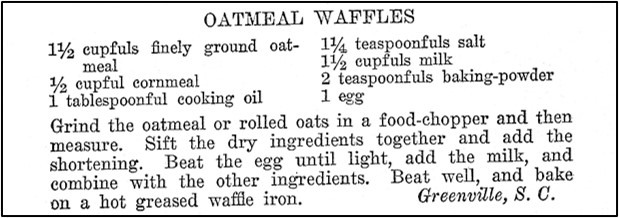
I often get requests for gluten-free recipes, so I was excited to find a hundred-year old recipe for Oatmeal Waffles. The waffles are made with oatmeal and cornmeal. The Oatmeal Waffles were hearty, and delightful with syrup.
Here’s the original recipe:
Source: Good Housekeeping’s Book of Menus, Recipes, and Household Discoveries (1922)
Finely grind the oatmeal. (I used a blender.) Put all the ingredients in a mixing bowl; beat until thoroughly combined. Let sit for 5 minutes to allow the mixture to thicken a little as the oatmeal absorbs the liquids, then bake in a hot waffle grill.
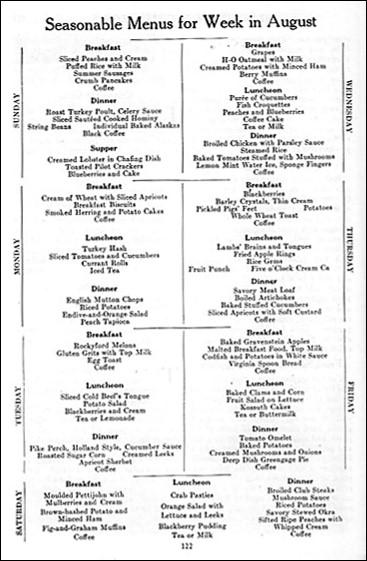
A hundred-year-old magazine had seasonal recipes for various days of the week. Here are the August menus. Some suggestions still work (Savory Meat Loaf); others not so much (Lamb’s Brain and Tongue).
I love old-fashioned baked custards. They are easy to make, and make a delightful dessert, so I was intrigued by a hundred-year-old recipe for Marshmallow Custard. The recipe called for putting a marshmallow in the bottom of each custard cup. The marshmallows floated to the top of the custard mixture, and then melted while baking. This resulted in a lovely sugary top layer on the custard that reminded me a bit of Crème Brûlée.
Here’s the original recipe:
Good Housekeeping Book of Menus, Recipes, and Household Discoveries
I think that the custard cups that I used were larger than the ones used by the recipe author because there was only enough of the custard mixture to fill 4 custard cups rather then the 6 indicated in the recipe. Because of the larger size of each cup -they also took longer to bake than indicated in the old recipe.
Preheat oven to 325° F. Put eggs in mixing bowl and beat slightly. Add sugar, half and half, and vanilla; beat until thoroughly combined. Put a marshmallow in the bottom of each custard cup. ( 4 – 6 custard cups will be needed. The number of custard cups needed will vary depending upon the size of the custard cups.) Pour the custard mixture over the marshmallows. Leave at least 1/2 inch at the top of each custard cup. Place the custard cups in a pan with hot water that comes to about an inch below the top of the cups. Bake for 40 – 60 minutes or until a knife inserted in center of the custard comes out clean. May be served warm or cold.