Rice and Celery Croquettes

Cooks are always looking for tasty recipes that use left-overs. A hundred-years-ago croquettes were a popular way to use left-over vegetables, meats, and other foods. Often the croquettes were shaped into balls or small cylinders, and then fried.

I don’t make croquette recipes very often because I worry about whether fried foods are healthy. But I recently came across a recipe for Rice and Celery Croquettes that called for baking the croquettes rather than frying them, so I decided to give the recipe a try. The croquettes had a nice breaded coating, and a delicate onion and celery flavor.

Here’s the original recipe:

Recipe for Rice and Celery Croquettes
Source: Good Housekeeping’s Book of Menus, Recipes, and Household Discoveries (1922)

500° F. seemed like a very high temperature and I was concerned that the top of the croquettes would burn before the centers got hot, so I baked the croquettes at 425° F.

The ingredient list called for strained tomatoes, but the directions referred to tomato juice, so I used tomato juice. Rather than grating the onion, I finely chopped it.

Here’s the recipe updated for modern cooks:

Rice and Celery Croquettes

  • Servings: 4-6
  • Difficulty: moderate
  • Print

2 cups cooked rice

1/2 cup celery, finely chopped

1/4 cup onion, finely chopped

2 tablespoons tomato juice

2 eggs

1/8 teaspoon beef extract or bouillon powder

1/2 teaspoon salt

1 cup fine plain bread crumbs

2 tablespoons cold water

2 tablespoons butter

Preheat oven to 425° F. Put the beef extract powder or bouillon powder and tomato juice in a small bowl. Stir to dissolve the extract/bouillon powder Set aside.

Mix together rice, celery, onions, 1 egg, salt, and tomato juice with beef extract/bouillon. Shape into croquettes. I made round croquettes that were about 1-inch in diameter.

Put bread crumbs on a plate, then roll the croquettes in the breadcrumbs. Dip the coated croquettes in a beaten egg that has been mixed with two tablespoons water, then roll again in the bread crumbs.

Put the croquettes in a ovenproof baking dish or skillet. (I used a cast iron skillet). Dot top of croquettes with small pieces of butter. Place in oven and bake until the croquettes are lightly browned (about 35 minutes). If they are not sufficiently browned, increase oven temperature to 500° F. and bake for several additional minutes. Remove from oven and serve.

www. ahundredyearsago.com

Old-fashioned Steamed (Winter) Squash

Steamed squash in bowl

Yesterday my husband and I made our annual trip to a farm where the farmer sells pumpkins and squash from a farm wagon. We’ve purchased pumpkins and squash from the same farmer for more than ten years, and always look forward to a conversation about the weather, how young people don’t know that Hubbard squash is a squash, and tend to think of it as a decorative gourd, and so on.

We weren’t disapointed. The farmer had three farm wagons filled with orange, yellow, green, and white pumpkins, and butternut, acorn, Hubbard, and other types of squash.

When I got home, I flipped through my hundred-year-old cookbooks and found a recipe for Steamed (Winter) Squash. The recipe is very simple. Sometimes simple is best. Chunks of squash are steamed, then mashed. Butter, salt, pepper, and a small amount of sugar are then stirred into the squash. The mashed Steamed Squash was delightful. It’s a perfect comfort food, and  brings warm memories of eating a similar vegetable dish when I was a child.

Here’s the original recipe:

Recipe for Steamed Squash
Source: Mrs. DeGraf’s Cook Book (1922)

I found this recipe a little difficult to follow, but I interpreted it to mean that fairly large chunks of winter squash that have not been peeled should be put into the steamer. After steaming, the pulp is removed from the squash shell, then mashed.

Since there are no amounts listed in this recipe, I made a judgement about how much of each ingredient to use to make 3-4 servings of the Steamed Squash.

Squash chunks in steamer

Here’s the recipe updated for modern cooks:

Steamed Winter Squash

  • Servings: 3-4
  • Difficulty: moderate
  • Print

About 1 pound winter squash (I used 1/2 of a butternut squash)

1 tablespoon butter

1/3 teaspoon salt

1/8 teamspoon pepper

1 teaspoon sugar

Cut squash into large chunks (if necessary remove seeds), each about 4 inches across, Do not peel. Put the chunks of squash in a large pan that contains a steamer. Add water to the pan, so that it comes to just below the steamer. Cover pan. Using high heat, bring water to a boil, then reduce heat so the water continues gently boiling. Keep pan covered and steam until the squash is tender (about 20-30 minutes).  Remove from heat. Using a spoon scrape the squash pulp from the shell. Put into a mixing bowl and mash. Stir in butter, salt, pepper, and sugar. Put in serving bowl and serve immediately.

http://www.ahundredyearsago.com

Old-fashioned Breakfast Apples

Breakfast applesI’m always looking for new recipes for simple, yet tasty ways to serve apples – and I recently found an excellent new (old) recipe. The hundred-year-old recipe was for Breakfast Apples, though they are work equally well at lunch or dinner.

The Breakfast Apples were delightful. Apple slices were sautéed in butter then sprinkled with cinnamon and sugar.

Here’s the original recipe:

Recipe for Breakfast Apples
Source: Good Housekeeping’s Book of Menus, Recipes, and Household Discoveries (1922)

And, here is the recipe updated for modern cooks:

Breakfast Apples

  • Servings: 2-3
  • Difficulty: easy
  • Print

4 large tart apples (Braeburn, McIntosh, Granny Smith, etc.)

2 tablespoons butter

1/4 teaspoon salt

1/4 teaspoon cinnamon

1 tablespoons sugar

Core and slice the apples (do not peel them). Melt butter in a skillet using medium heat; add salt and stir to combine. Add sliced apples, then put lid on pan. Cook for 5 minutes, then remove lid and use a spatula to turn over the apple slices so they evenly cook on both slides. Put lid back on the pan and cook for another 5 minutes. Remove lid and check to see if the apples are soft. (If they are not soft, cook for several additonal minutes.)

In the meantime, put the cinnamon and sugar in a small bowl, and mix together.

Sprinkle the cooked apples with the cinnamon and sugar mixture. Serve hot.

http://www.ahundredyearsago.com

Old-fashioned Ginger Pears

jar of ginger pears

Pears are in season, and I’m always looking for tasty ways to serve them, so was intrigued by a hundred-year-old recipe for Ginger Pears. This is a recipe for canned pears with ginger. The sweet, warm, slightly peppery tang of the ginger added a new dimension to the pears, and turned what could be a mundane canned fruit into a taste treat.

Here’s the original recipe:

Jar of Ginger Pears
Source: Good Housekeeping’s Book of Menus, Recipes, and Household Discoveries (1922)

I assumed that “green ginger root” was just a more detailed term for ginger root.

And, here’s the recipe updated for modern cooks:

Ginger Pears

  • Servings: 3 -4 pints
  • Difficulty: moderate
  • Print

4 pounds hard, green pears (about 12-15 pears)

3 pounds sugar

2 ounces ginger root, peeled and very finely chopped (about 1/2 cup)

juice from 2 lemons

Peel and core pears, then thinly slice. Put the pears in a bowl and cover with sugar; let sit for two hours. Put the pears, including any liquid in a Dutch oven or large pan; add lemon juice and chopped ginger root. Bring to a boil using medium heat, then reduce heat and simmer until the pears are translucent and the syrup clear and thick (about 20 minutes). Periodically, gently stir while cooking.

Pack the pear slices and syrup into hot pint jars; fill to 1/4 inch of top. Wipe jar rim and put lid on. Process in boiling water bath for 15 minutes.

http://www.ahundredyearsago.com

Old-fashioned Bacon Muffins

Bacon Muffins on plate

When browsing through hundred-year-old cookbooks I sometimes come across recipes that are different modern recipes, yet sound intriguing. This was one of those times. I found an old recipe for Bacon Muffins which sounded a bit unusual – yet similar enough to some modern foods (think bacon and egg muffins minus the eggs) that I decided to give it a try.

The recipe turned out well. The muffins are a nice way to add variety to a breakfast or brunch menu.

Here’s the original recipe:

Recipe for Bacon Muffins
Source: Good Housekeeping’s Book of Menus, Recipes, and Household Discoveries (1922)

The bacon that I used was salty, so I didn’t add any additional salt when I made this recipe.

Here is the recipe updated for modern cooks:

Bacon Muffins

  • Servings: approximately 15-20 muffins
  • Difficulty: moderate
  • Print

1/4 pound bacon

1 tablespoon sugar

1 egg, beaten

1/12 cups milk

2 1/2 cups bread flour

5 teaspoons baking powder

Preheat oven to 400° F. Chop bacon into small pieces; put into a small skillet and fly until crisp. Drain the bacon fat; reserving 2 tablespoons of the fat (as well as the bacon pieces).

Put the sugar and 2 tablespoons bacon fat in a mixing bowl and stir to combine, then add the egg and milk and stir until mixed. Stir together the flour and the baking powder, then add to the mixture in the mixing bowl; stir to combine. Then fold in the bacon pieces. Pour into greased muffin pans. Fill each muffin cup about 2/3 full. Put in oven and bake about 25 minutes or until lightly browned. Best when served warm.

http://www.ahundredyearsago.com

Old-fashioned Hawaiian Delight

Hawaiian Delight on plate
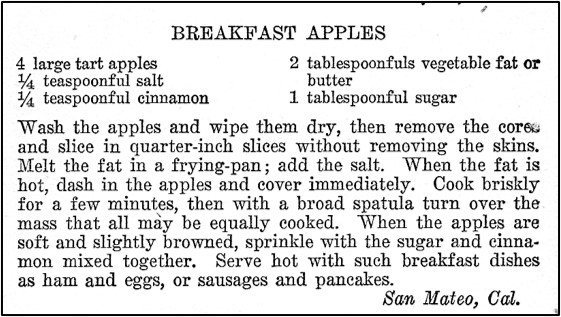
I remember enjoying cakes with pineapple when I was young, so was intrigued by a hundred-year-old recipe for Hawaiian Delight. Hawaiian Delight is a cake that includes a cinnamon and sugar topping – which is then served with crushed pineapple spooned on top of cake pieces.

The recipe was easy to make. The Hawaiian Delight is an old-fashioned classic type of dessert and was quite tasty.

Here’s the original recipe:

Recipe for Hawaiian Delight
Source: Good Housekeeping’s Book of Menus, Recipes, and Household Discoveries (1922)

The list of ingredients for this recipe includes shortening, but the directions refer to butter, so when I updated the recipe, I listed butter rather than shortening. I think that grated canned pineapple is just an older name for crushed pineapple, so I used a can of crushed pineapple. The recipe called for pastry flour, which is difficult to find where I live, so I used all-purpose flour, and it worked fine.

The old recipe said that Hawaiian Delight should be served hot – though I enjoyed it both hot and cold.

Here’s the recipe updated for modern cooks:

Hawaiian Delight

  • Servings: 8 - 10
  • Difficulty: easy
  • Print

1 1/2 cups all-purpose flour

3 teaspoons baking powder

1/2 teaspoon salt

1 tablespoon sugar + 1 tablespoon sugar

1 egg

3/4 cup milk

1 tablespoon butter, melted

1/4 teaspoon cinnamon

1 can crushed pineapple, 20 oz.

Preheat oven to 400° F.  Put flour, baking powder, salt, 1 tablespoon sugar, egg, milk, and butter in a mixing bowl; beat until smooth. Put in a greased and floured 8-inch square cake pan.

Put cinnamon and 1 tablespoon sugar in a small bowl. Stir together, then sprinkle the top of the cake batter with the cinnamon and sugar mixture. Bake for 20 minutes or until a wooden pick inserted in the center comes out clean.

To serve, cut into squares, and spoon crushed pineapple on top. May be served hot or cold.

http://www.ahundredyearsago.com

Eggs and Mushrooms on Toast

Eggs and Mushrooms on Toast

I recently came across a recipe for Eggs and Mushrooms in a hundred-year-old cookbook. The Eggs and Mushrooms are served on toast.

The recipe was quick and easy to make – though I found the Eggs and Mushrooms to be a little bland.

Eggs and Mushrooms Recipe
Source: Mrs. DeGraf’s Cookbook (1922)

Here’s the recipe updated for modern cooks:

Eggs and Mushrooms

  • Servings: 4
  • Difficulty: easy
  • Print

1 8-ounce can tomato sauce

1 cup mushrooms, sliced (or 1 8-ounce can of mushrooms)

1/2 teaspoon salt

1 teaspoon Worcestershire sauce

4 eggs

4 slices toast

Put tomato sauce and mushrooms in a skillet. Using medium heat, heat until hot and bubbly, and the mushrooms are tender. Add salt and Worcestershire sauce.

Break eggs into a bowl, and then slip into the hot tomato and mushroom mixture. Break yolks and stir gently until the mixture thickens. Serve on toast.

http://www.ahundredyearsago.com