When my children were young they used to enjoy making Eggs in a Hole where a hole is cut out of a slice of toast and an egg is dropped into the hole. So when I saw a recipe in a hundred-year-old cookbook for Baked Eggs that looked similar to Eggs in a Hole, but with a twist, I had to give it a try. Instead of just cutting one circle in the toast, two circles are cut to create a ring of toast. The egg is then dropped into the ring. It gave an old classic a new twist -though that’s not quite right. Maybe I should say that I found an old twist for a classic recipe.
I enjoyed making this recipe, and anticipate making it again when children or grandchildren visit.
Source: The Metrolpolitan Cook Book (published by the Metropolitan Life Insurance Company, 1924)
The old recipe says that the hole the egg is put into is created by removing a little of the center. I interpreted this to mean that a small circle should be cut out of the center of the toast.
Preheat oven to 350° F. Lightly grease an oven-proof skillet with butter. Cut a large round circle out of the toast. (I used an inverted champagne glass to cut the circle). Then cut a smaller circle out of the center of the circle. (I used a round cookie cutter to cut the small circle. A small inverted juice glass would also work.) Put the resulting toast ring in the skillet, then gently break the egg and put the contents in the hole. Sprinkle with salt and pepper, and dot with a few small pieces of butter. Spoon the milk over the egg. Put in oven and bake until the egg is cooked (about 10-15 minutes).
Sometimes I know that I want to make a recipe for a particular seasonal food. This week is one of those times. I had some rhubarb, so began going through my hundred-year-old cookbooks and magazines looking for a rhubarb recipe. I found two that looked like possibilities Rhubarb and Figs and Bread and RhubarbPudding. I leaned towards making the Rhubarb and Figs. The Bread and Rhubarb Pudding recipe seemed complicated and I couldn’t quite picture what it would be like. However, my husband said that he didn’t like figs, and my daughter said that she thought the Bread and Rhubarb Pudding sounded awesome, so I decided to give it a try.
I’m glad that my family talked me into making Bread and Rhubarb Pudding. This recipe is a winner. Rhubarb and slices of bread are layered in a baking dish, then a milk, egg, and nutmeg mixture is poured over it. The dish is baked in the oven, and then jelly is spread over it. (I used current jelly – though the old recipe suggested using grape jelly.) I served the Bread and Rhubarb Pudding with whipped cream. The dish definitely was a hit with my family. My daughter said that it had just the right amount of sweetness, and my husband said that I should make it again.
One thing that I’d do differently if I made it again is to try to work a bit more on the presentation. My baking dish and the bread slices that I used when making this recipe didn’t exactly align in size and I had to cut some of the bread slices. If I made it again, I might either use another dish, bread slices that were a different size, or cut every slice of bread (and not just the ones that didn’t fit when whole).
Here’s the original recipe:
Source: American Cookery (March, 1924)
I cut the rhubarb into 1-inch pieces; 2 inches seemed a bit long to me. I decided that the egg and milk mixture that is poured over this dish made about enough to cover 8 slices of bread and 4 cups of diced rhubarb.
The recipe called for using sugar in the amount of “half the bulk” of the rhubarb (plus 4 additional tablespoons for the milk mixture). I decided to go with 1 1/2 cups of sugar, which may be a little less than half the bulk, but the Bread and Rhubarb pudding had just the right amount of sweetness so that’s the amount I put in the updated recipe.
I don’t have whole nutmeg, so I used 3/4 teaspoon of ground nutmeg.
I decided to serve with whipped cream rather than going the meringue route.
grape or other flavor of jelly (I used current jelly.)
whipped cream
Preheat oven to 400° F. Put the rhubarb and 1 1/2 cups sugar in a bowl; stir to coat the rhubarb with sugar. Then put half of the rhubarb mixture in a 7 1/2 ” X 12″ X 2″ (or similar sized) baking dish. (The dish I used was about the right size as far as volume goes, but I had to cut some of the bread slices, so if I made it again, I may use a different dish.)
Spread butter on 4 of the bread slices. Arrange the slices (buttered side down) on top of the rhubarb. Then put the remaining rhubarb over the bread slices. Spread butter on the other 4 bread slices, and place buttered side up on top of the rhubarb. Set aside.
Put the egg, 4 tablespoons sugar, and nutmeg in a mixing bowl; beat until smooth. Add milk and beat until combined. Pour the milk mixture over the rhubarb and bread. Cover (I used aluminum foil to cover), and then put in the oven. Bake for approximately 30 minutes or until the rhubarb is tender, and hot and bubbly. (Periodically check on how the baking is coming along. When I made this dish, liquid boiled over and onto my oven while I had the dish covered.)
Once the rhubarb is hot and bubbly remove cover, and continue baking until the bread is lightly browned (about another 10-15 minutes). Remove from oven and spread with jelly. Serve with whipped cream. I served this warm, though it could also be served cold.
I love old-fashioned baked custards so decided to try a hundred-year-old recipe for Raisin Custard. The raisins are on the bottom of the custard. I want to say that they sank to the bottom, but I think that the recipe author intended for there to be plain custard on the top and a raisin-custard mixture on the bottom.
The Raisin Custard was very delicate, but the recipe didn’t call for any sugar, so the custard was not sweet (though the raisins added a bit of sweetness when I got to the bottom).
Preheat oven to 325° F. Put eggs in mixing bowl and beat until smooth. Add milk, salt, and nutmeg; beat until thoroughly combined. Pour mixture into custard cups. Place the custard cups in a pan with hot water that comes to about an inch below the top of the cups ( 4 – 6 custard cups will be needed. The number of custard cups needed will vary depending upon the size of the custard cups.) Bake for 60-90 minutes or until a knife inserted in center of the custard comes out clean. May be served warm or cold.
When browsing through a hundred-year-old magazine, I came across a recipe for Hot Slaw with Sour Cream Sauce, and decided to give it a try.
The Hot Slaw was mild, rich, and creamy. The recipe called for only 1 tablespoon of vinegar (and no sugar), so the flavors were much more nuanced than many modern slaws.
1 head of cabbage (approximately 2 pounds; The cabbage should be firm and white.)
2 teaspoons salt
4 tablespoons butter
1 tablespoon flour
1 tablespoon water
1 cup sour cream
1 tablespoon tarragon vinegar or apple cider vinegar (I used apple cider vinegar.)
Grate or finely shred the cabbage. Stir the salt into the cabbage. Let sit for 30 minutes, then drain and rinse. Press to squeeze out excess water.
In a skillet or large saucepan, melt the butter. Stir in the cabbage. (Do not add water.) Cover and cook over low heat for 10 minutes. Several times remove lid and stir to keep the cabbage from scorching, then replace lid. (The idea is to stir enough to prevent scorching, but to keep the steam in as much as possible as the cabbage cooks.) Cook for 10 minutes.
In the meantime, stir water into the flour to make a thick paste. Then stir in the sour cream. Stir the sour cream mixture into the hot cabbage, and cook for 1-2 additional minutes while stirring. Stir in the vinegar and serve.
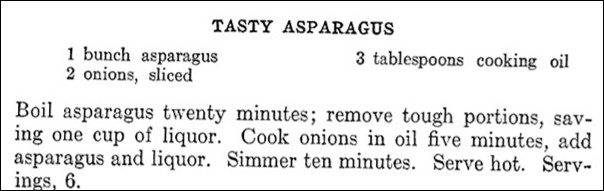
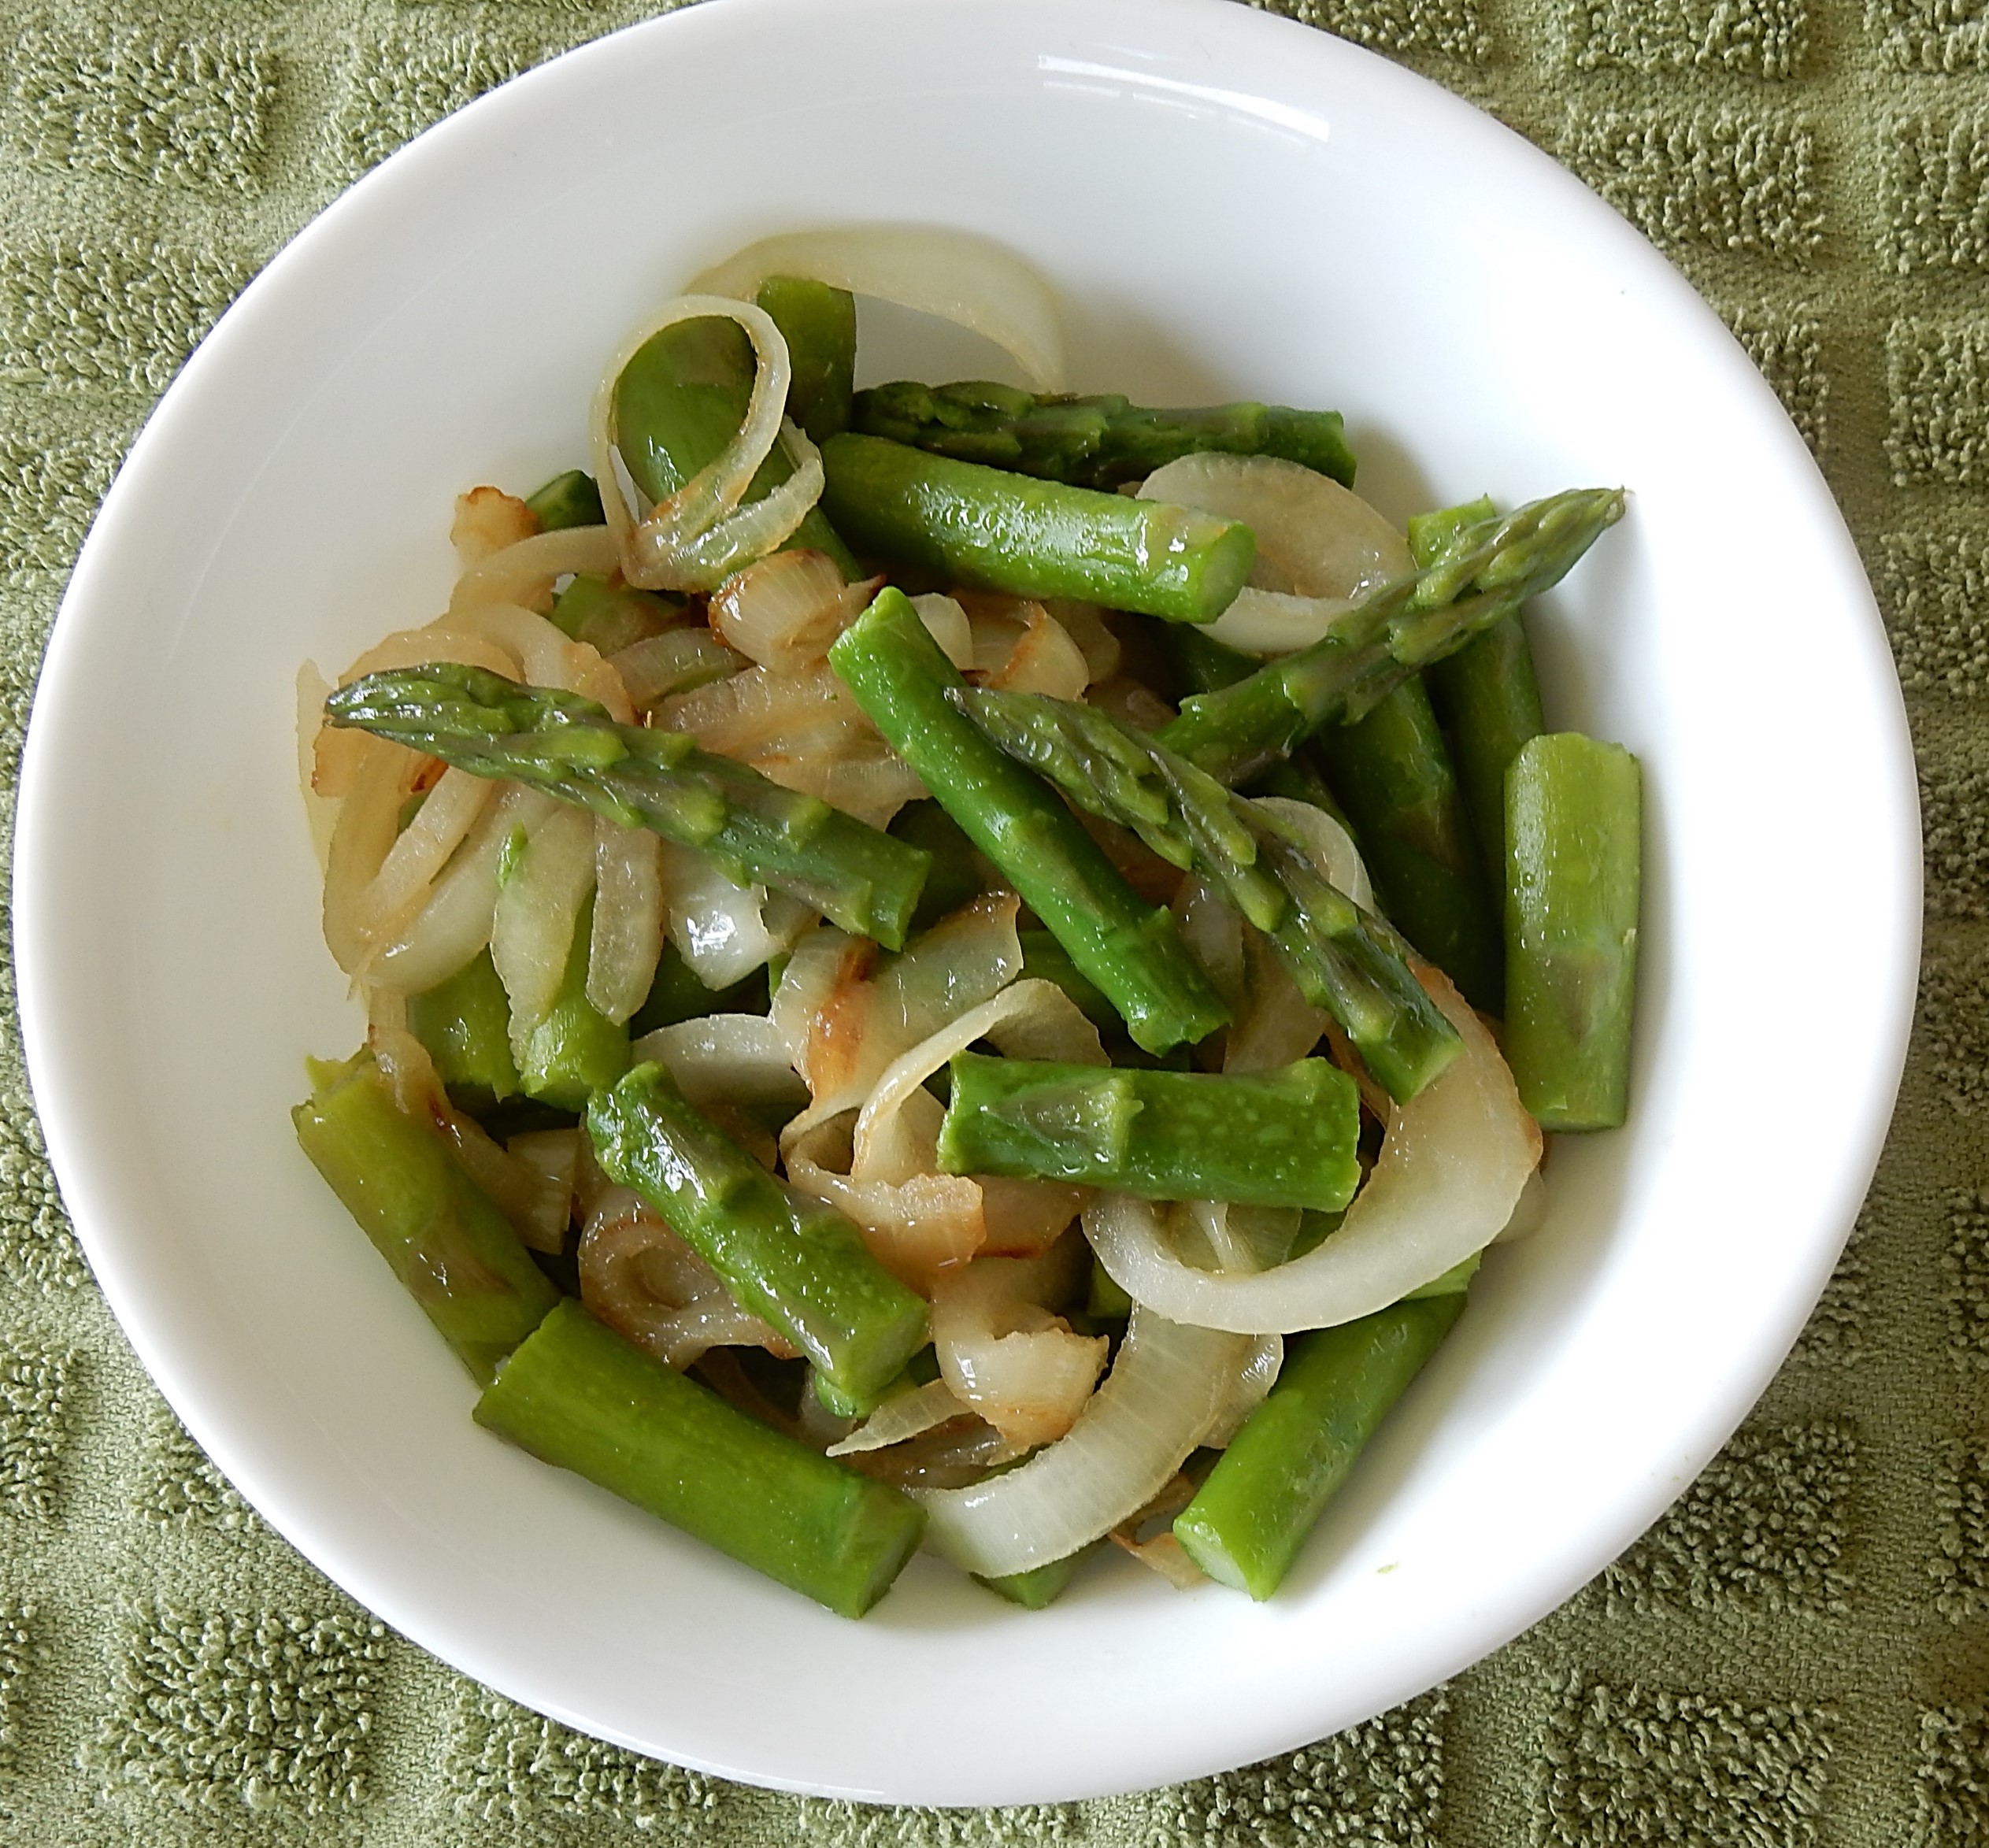
Some recipes in old cookbooks have the strangest titles. For example, I recently came across a hundred-year-old recipe for Tasty Asparagus. In one way the title was very descriptive – it clearly says that the asparagus is tasty. However, in another way, the description is very inadequate. How is the asparagus prepared? What are the main ingredients? I tend to skip over recipes with titles like this, but was intrigued when I saw that this was a recipe for asparagus and onions, and decided to give it a try.
I agree with the recipe author. Tasty Asparagus is tasty. Asparagus and onions make a really nice combination. And, it was quick and easy to make. This recipe is a keeper.
Here’s the original recipe:
Source: Modern Priscilla Cook Book (1924)
By today’s standards, cooking asparagus for half an hour is excessive, so when I updated the recipe I reduced the cooking time substantively. For the cooking oil, I used olive oil. I’m not sure why the old recipe calls for adding the water used to cook the asparagus to the asparagus and onion mixture. I drained some of the excess liquid off before serving.
Trim off the woody ends of the asparagus, and then cut into 1-inch pieces. Put in saucepan, and add about an inch of water. Bring to a boil using high heat, then reduce heat and simmer for 4 minutes. Remove from heat. Drain, but save 1 cup of the water used to cook the asparagus.
In the meantime, put the olive oil in a skillet. Heat oil using medium heat, then add the sliced onions. Cook until the onions are transparent, then add the cooked asparagus pieces and 1-cup of the water in which the asparagus was cooked. Bring to a boil using medium heat, then reduce heat and simmer for 3 minutes. Remove from heat and serve.
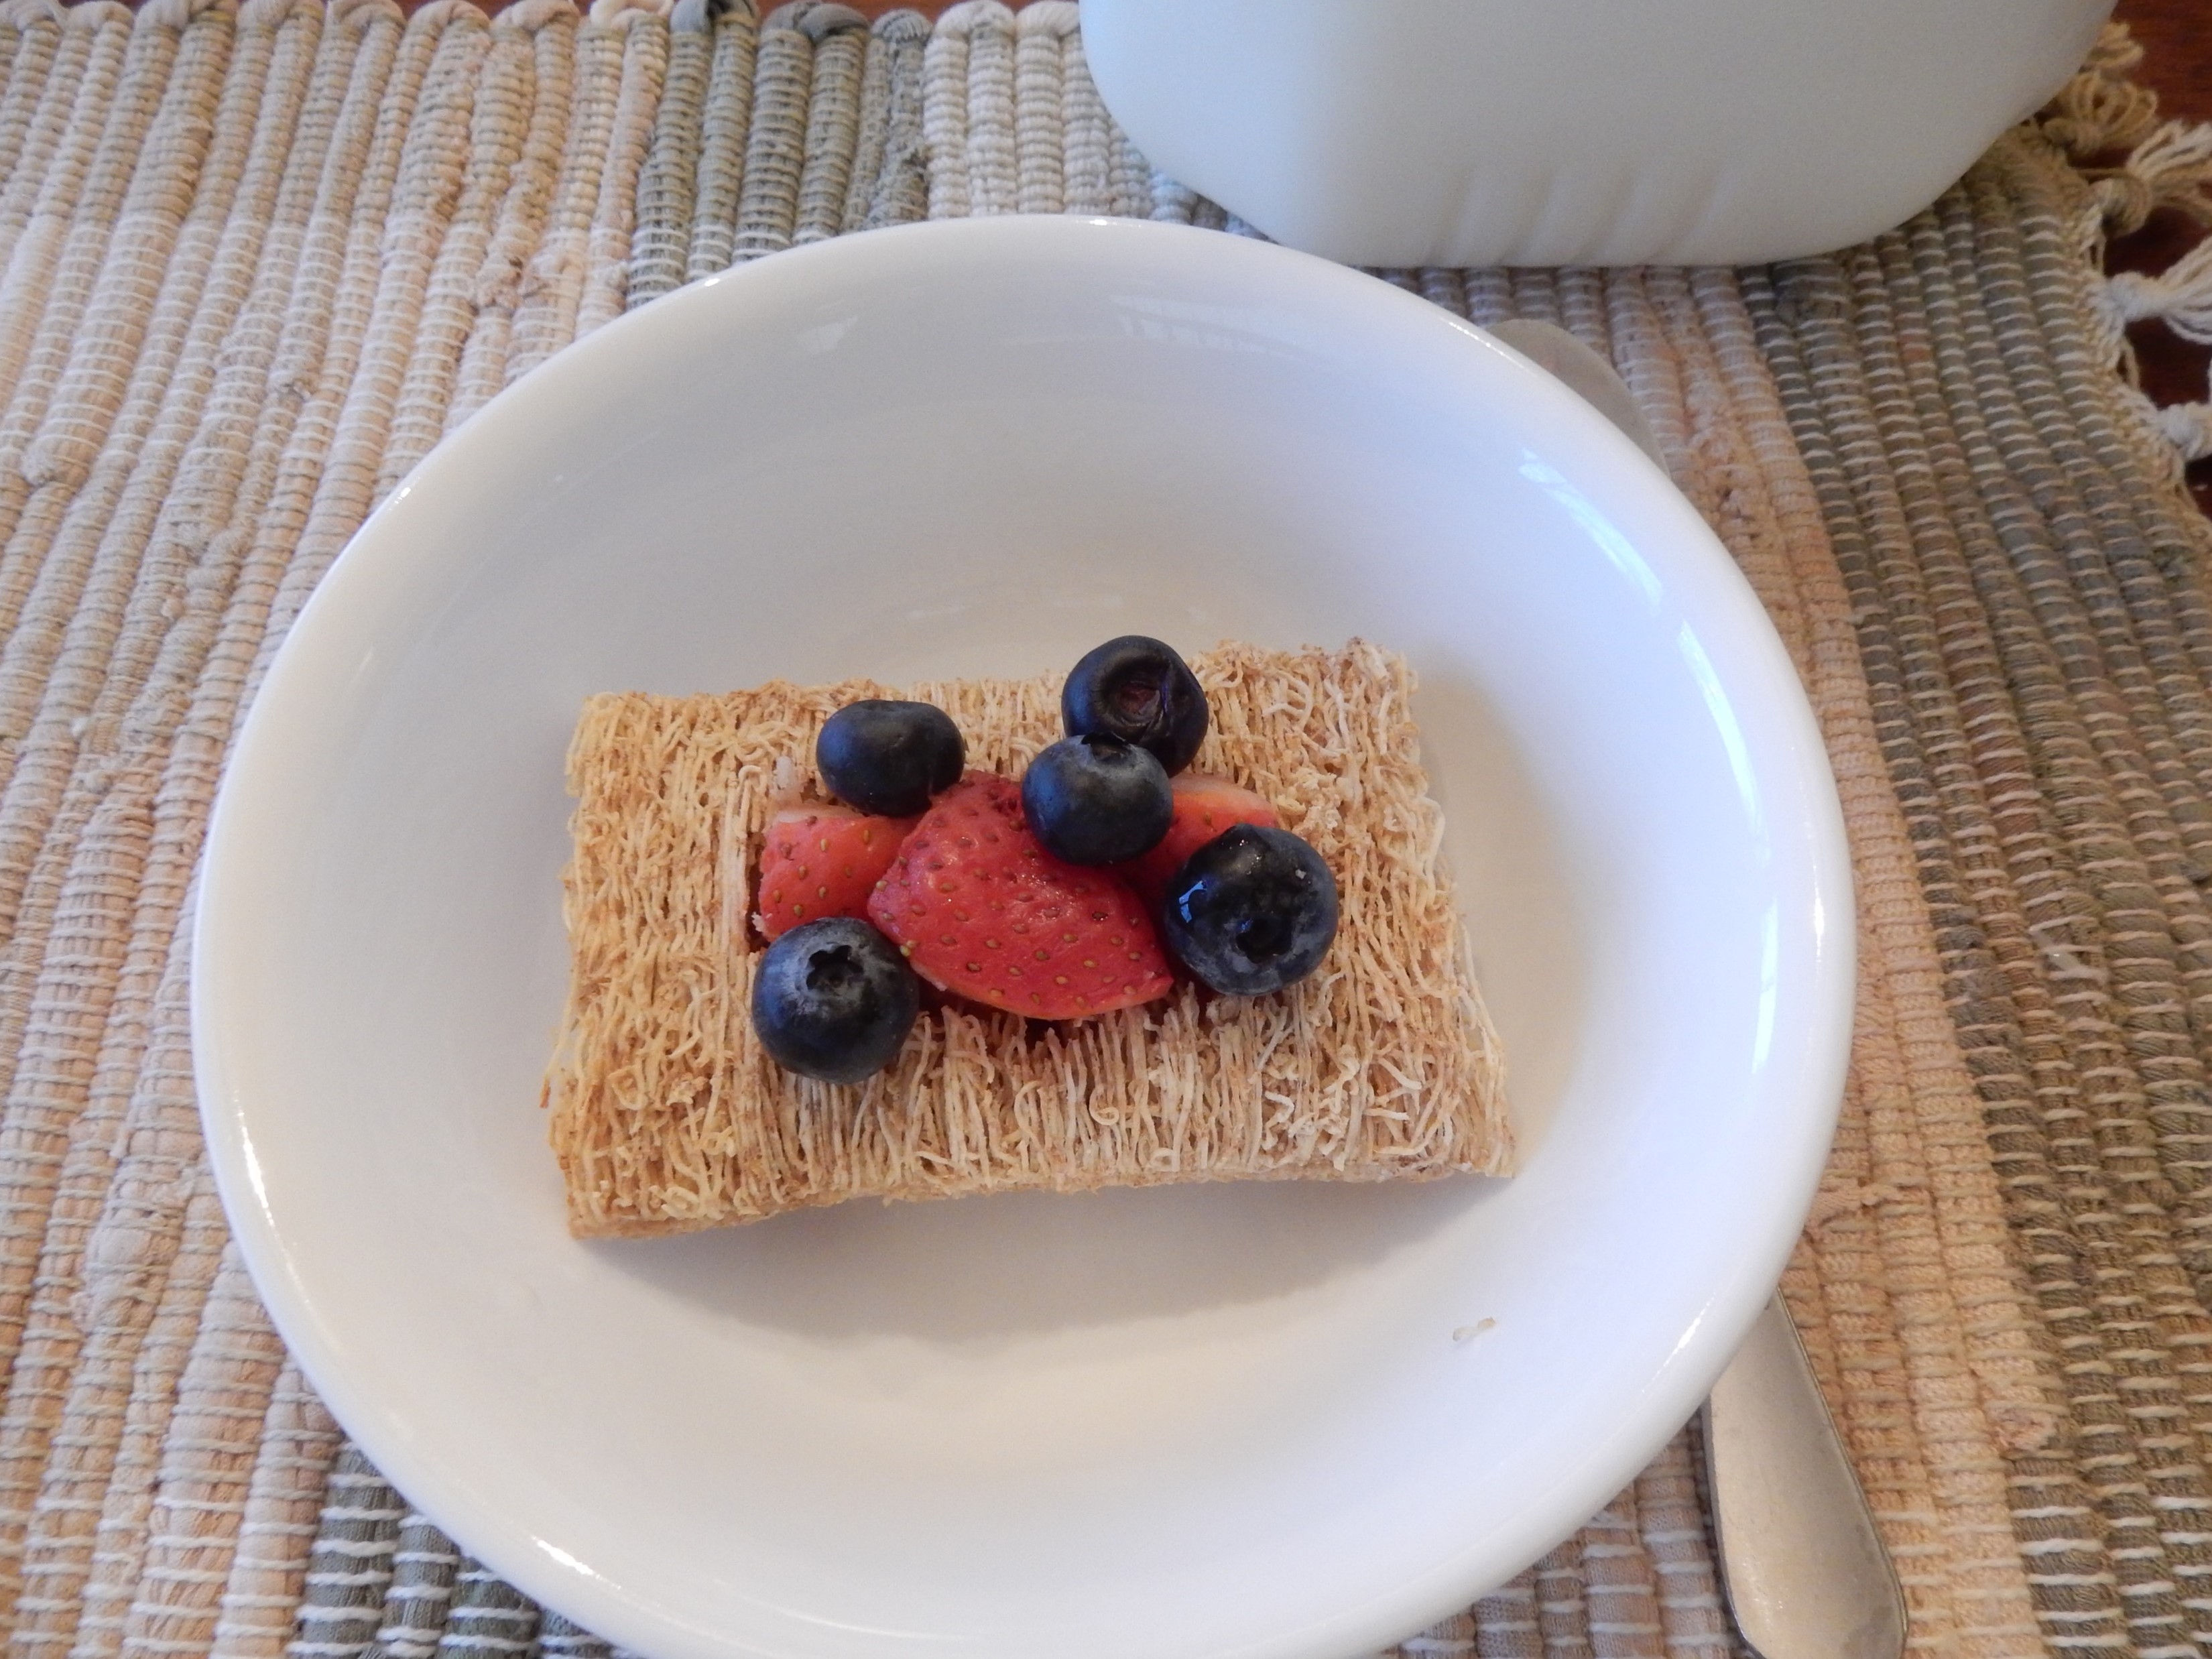
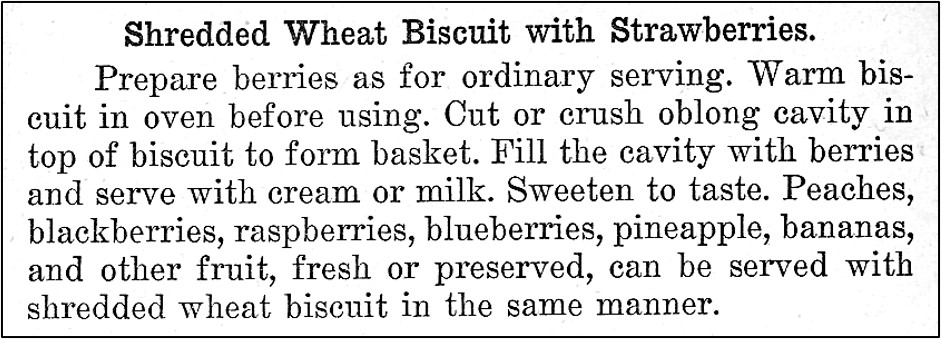
I enjoy shredded wheat, but it always seems like a basic breakfast food, so I was surprised to see a recipe in a hundred-year-old cookbook for Shredded Wheat Biscuit with Strawberries (and an option for making it using other berries or fruits). A hole is made in the top of the biscuit to create a basket, which is then filled with the berries.
Here’s the original recipe:
Source: The New Home Cook Book, 1924 Edition (Published by Illinois State Register, Springfield, Illinois)
Since the old recipe gave the option of using a variety of different berries or other fruit, when I made this recipe I decided to use a mixture of strawberries and blueberries. When I updated the recipe I changed the name of it from Shredded Wheat Biscuit with Strawberries to Shredded Wheat Biscuit with Berries since it better describes some of the options.
The shredded wheat was lovely with berries.
I didn’t warm the shredded wheat biscuit in the oven. There didn’t seem to be a need. Perhaps the biscuits were more likely to be stale a hundred years ago, and heating in the oven may have made them crispier.
strawberries (quarter if large), blueberries, raspberries, blackberries, etc.
sugar, if desired
milk or cream
Cut or crush an oblong hole in the shredded wheat biscuit to create a basket. Fill the hole with berries or other fruit. Serve with milk or cream, and sugar (if desired).
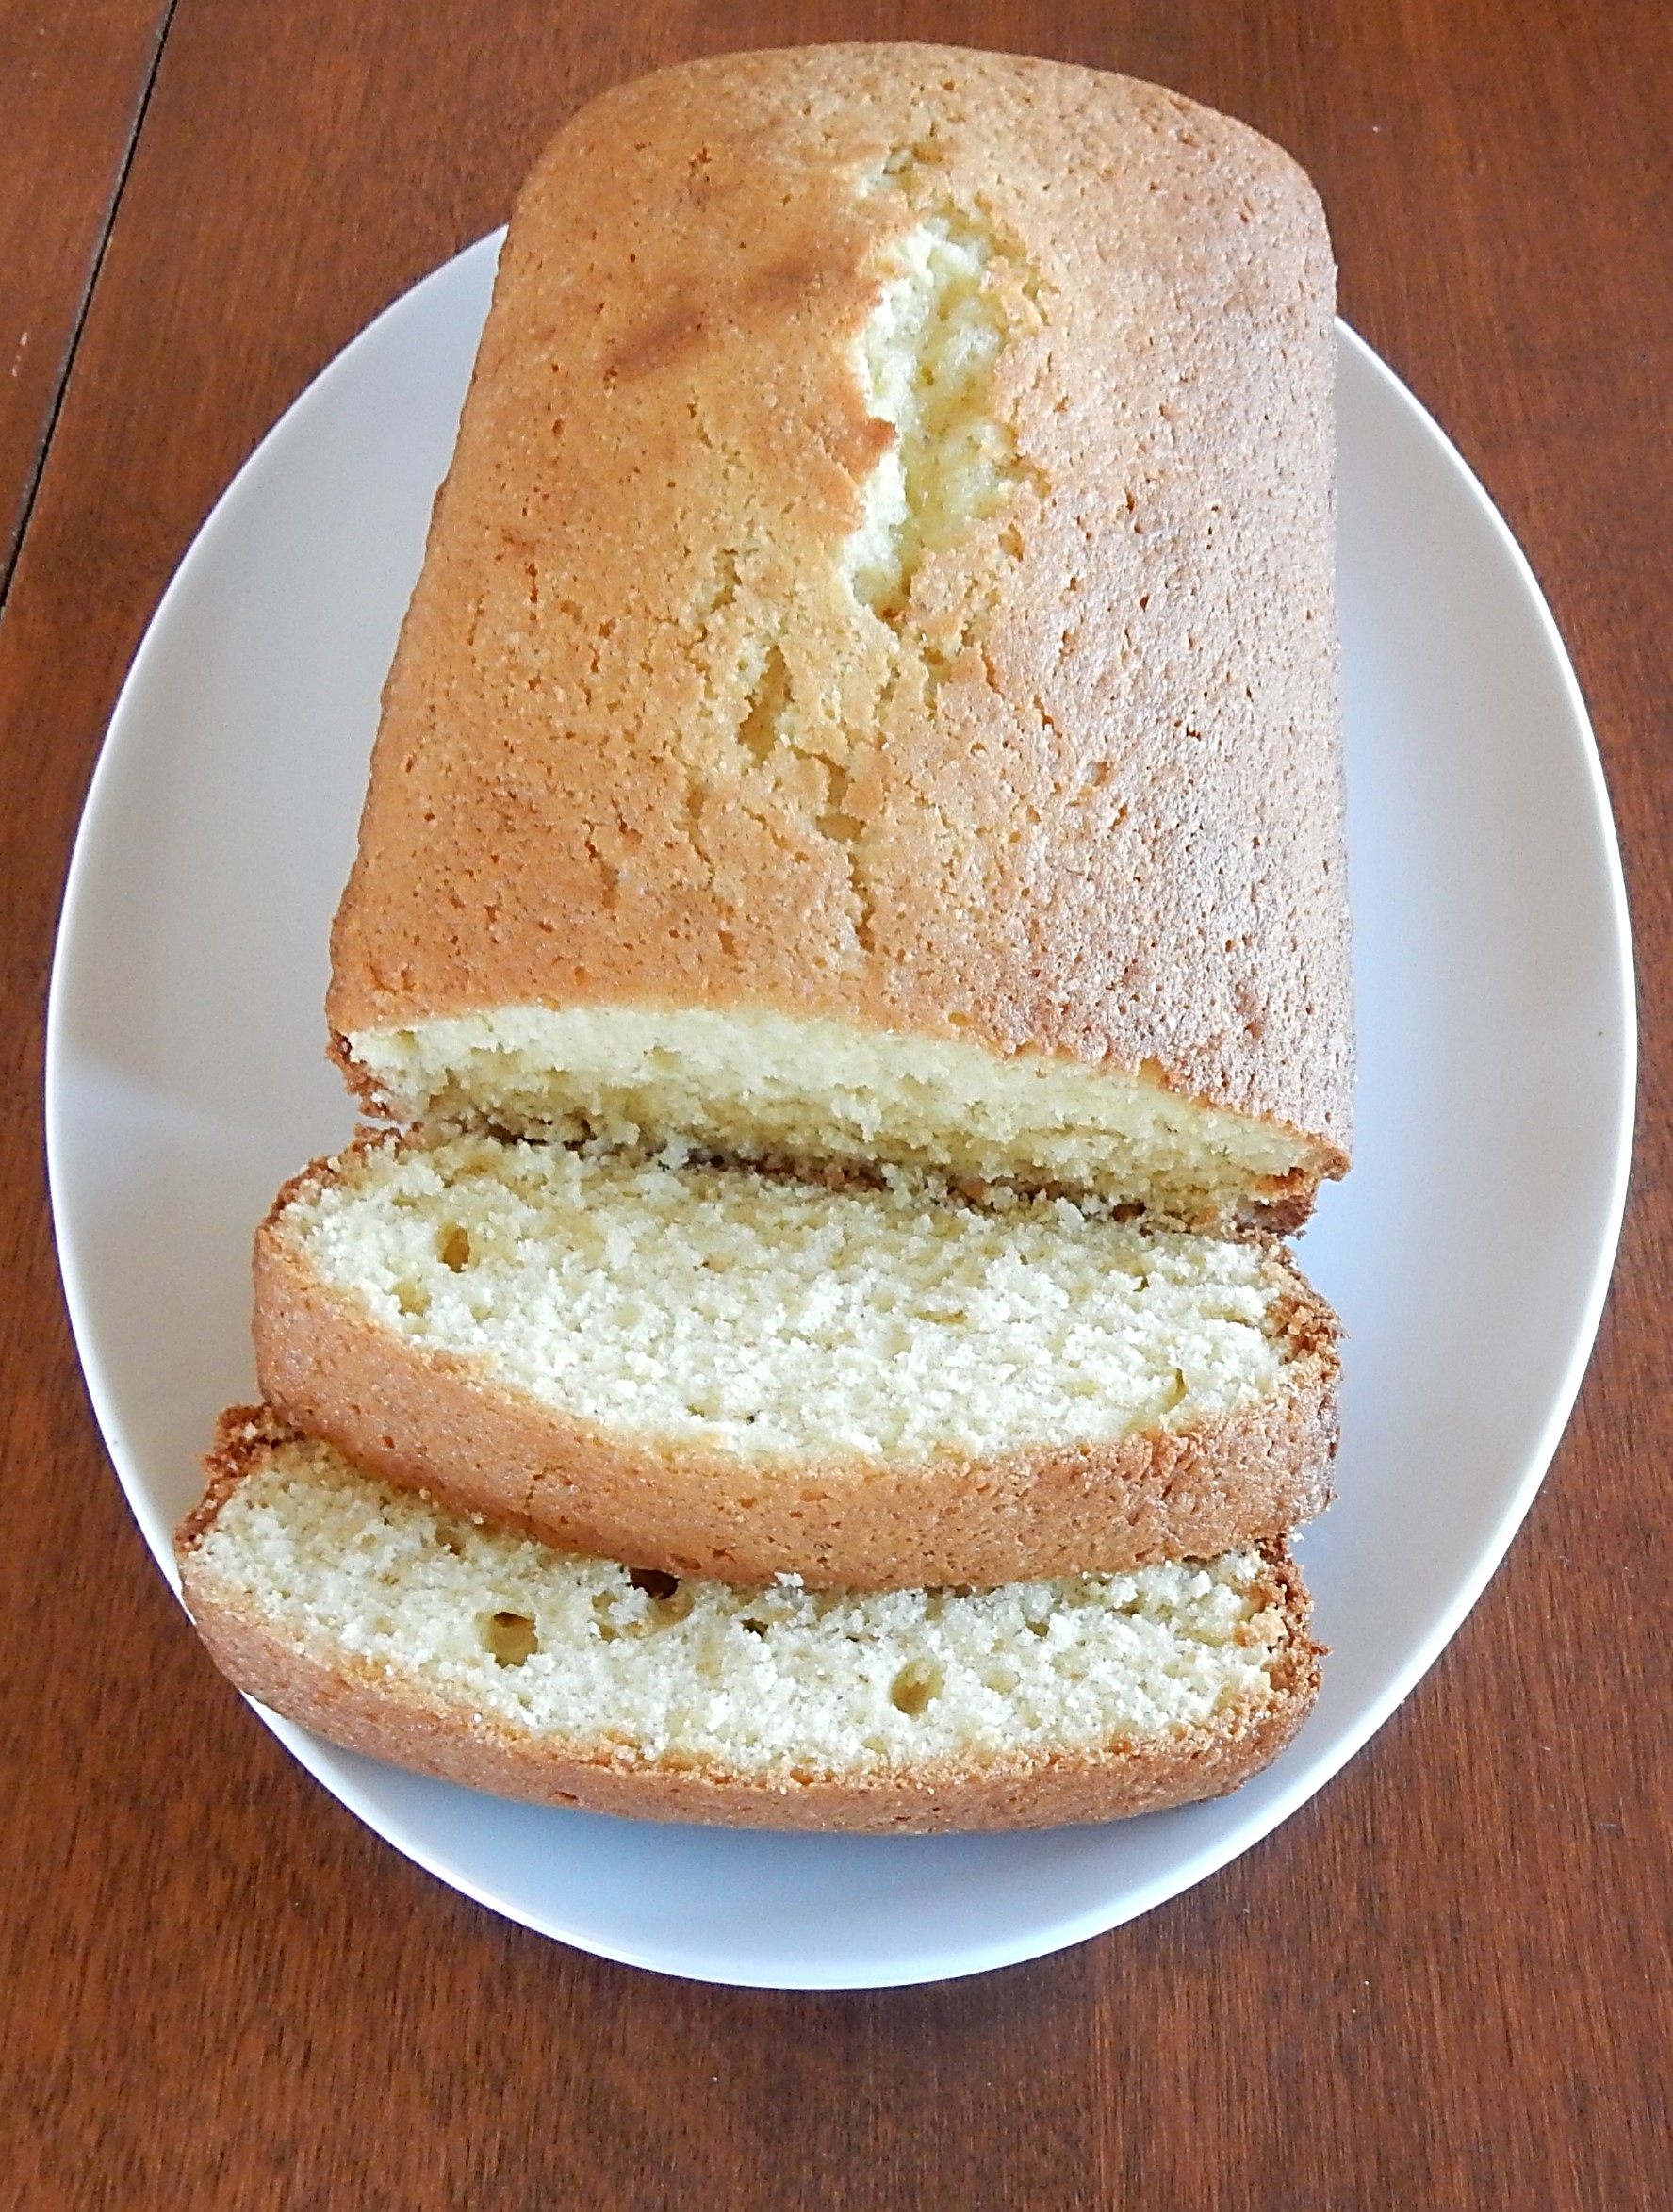
I got a request for a “healthy cake” that was low fat and low sodium, so looked through my hundred-year-old cookbooks and magazines for something that might work. I found a recipe for Orange Loaf Cake that I think fits the bill.
The recipe only calls for 1/3 cup of butter, and just 1/2 teaspoon of baking soda and no salt. So this loaf cake is both low fat and low sodium. The cake was very easy to make, had a nice texture, and a delightful sunny, orange flavor.
Preheat oven to 375° F. Grease and flour a loaf pan. Put butter and sugar in a mixing bowl; beat until combined. Then beat in the eggs. Add the flour, baking soda, orange juice, and lemon juice; beat until combined. Stir in the grated orange rind. Pour into prepared pan.
Bake 35 to 40 minutes, or until wooden pick inserted in center comes out clean.


 Some recipes in old cookbooks have the strangest titles. For example, I recently came across a hundred-year-old recipe for Tasty Asparagus. In one way the title was very descriptive – it clearly says that the asparagus is tasty. However, in another way, the description is very inadequate. How is the asparagus prepared? What are the main ingredients? I tend to skip over recipes with titles like this, but was intrigued when I saw that this was a recipe for asparagus and onions, and decided to give it a try.