19-year-old Helena Muffly wrote exactly 100 years ago today:
Saturday, November 21, 1914: <<no entry>>
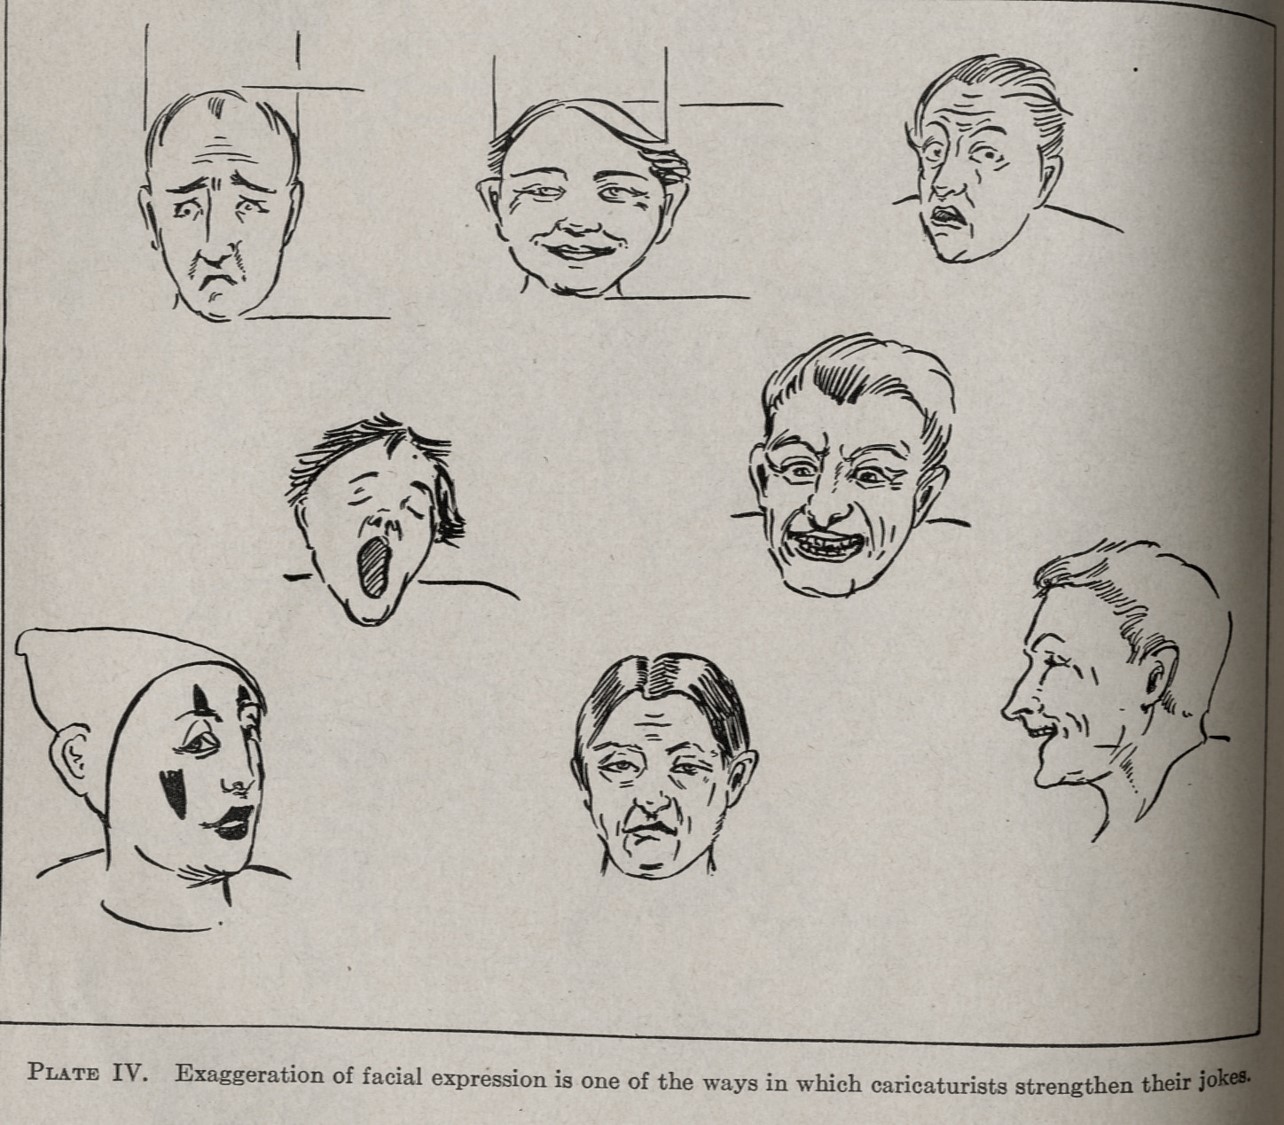
Source: School Arts Magazine (December, 1914)
Her middle-aged granddaughter’s comments 100 years later:
Since Grandma didn’t write anything a hundred years ago today, I thought that you might enjoy some pictures and quotes from an article about how to draw caricatures that appeared in a hundred-year-old magazine for art teachers.
Caricature will furnish a legitimate outlet for the energy that creates disorder in the school. The study of humorous drawing develops the ability to make jokes. The teaching of caricature does not necessarily result directly in successful jokes in the classroom; it bears its best fruit in the increased skill and appreciation of the pupils. In this respect the teaching of caricature does not differ from any other lesson.
Youthful caricaturists need to be taught that kindness should be their guide in making a selection of the qualities which they exaggerate, and that the best sense of humor is that which we call good humor.
Clever boys especially are inclined to be cruel in their attempts at jokes; they need training to see that deformity, ignorance, and misfortune are pitiful rather than funny, that a joke must be considered from the point of view of the person joked as well as from that of the joker, that the greatest of strength lies in its gentleness.
Teach a child what is really funny and he will scorn to perpetrate, or even to tolerate, laughter at what is not. So through, the study of humor the teacher can make his worst enemy serve as his best friend.
19-year-old Helena Muffly wrote exactly 100 years ago today:
Wednesday, October 21, 1914: << no entry>>
Her middle-aged granddaughter’s comments 100 years later:
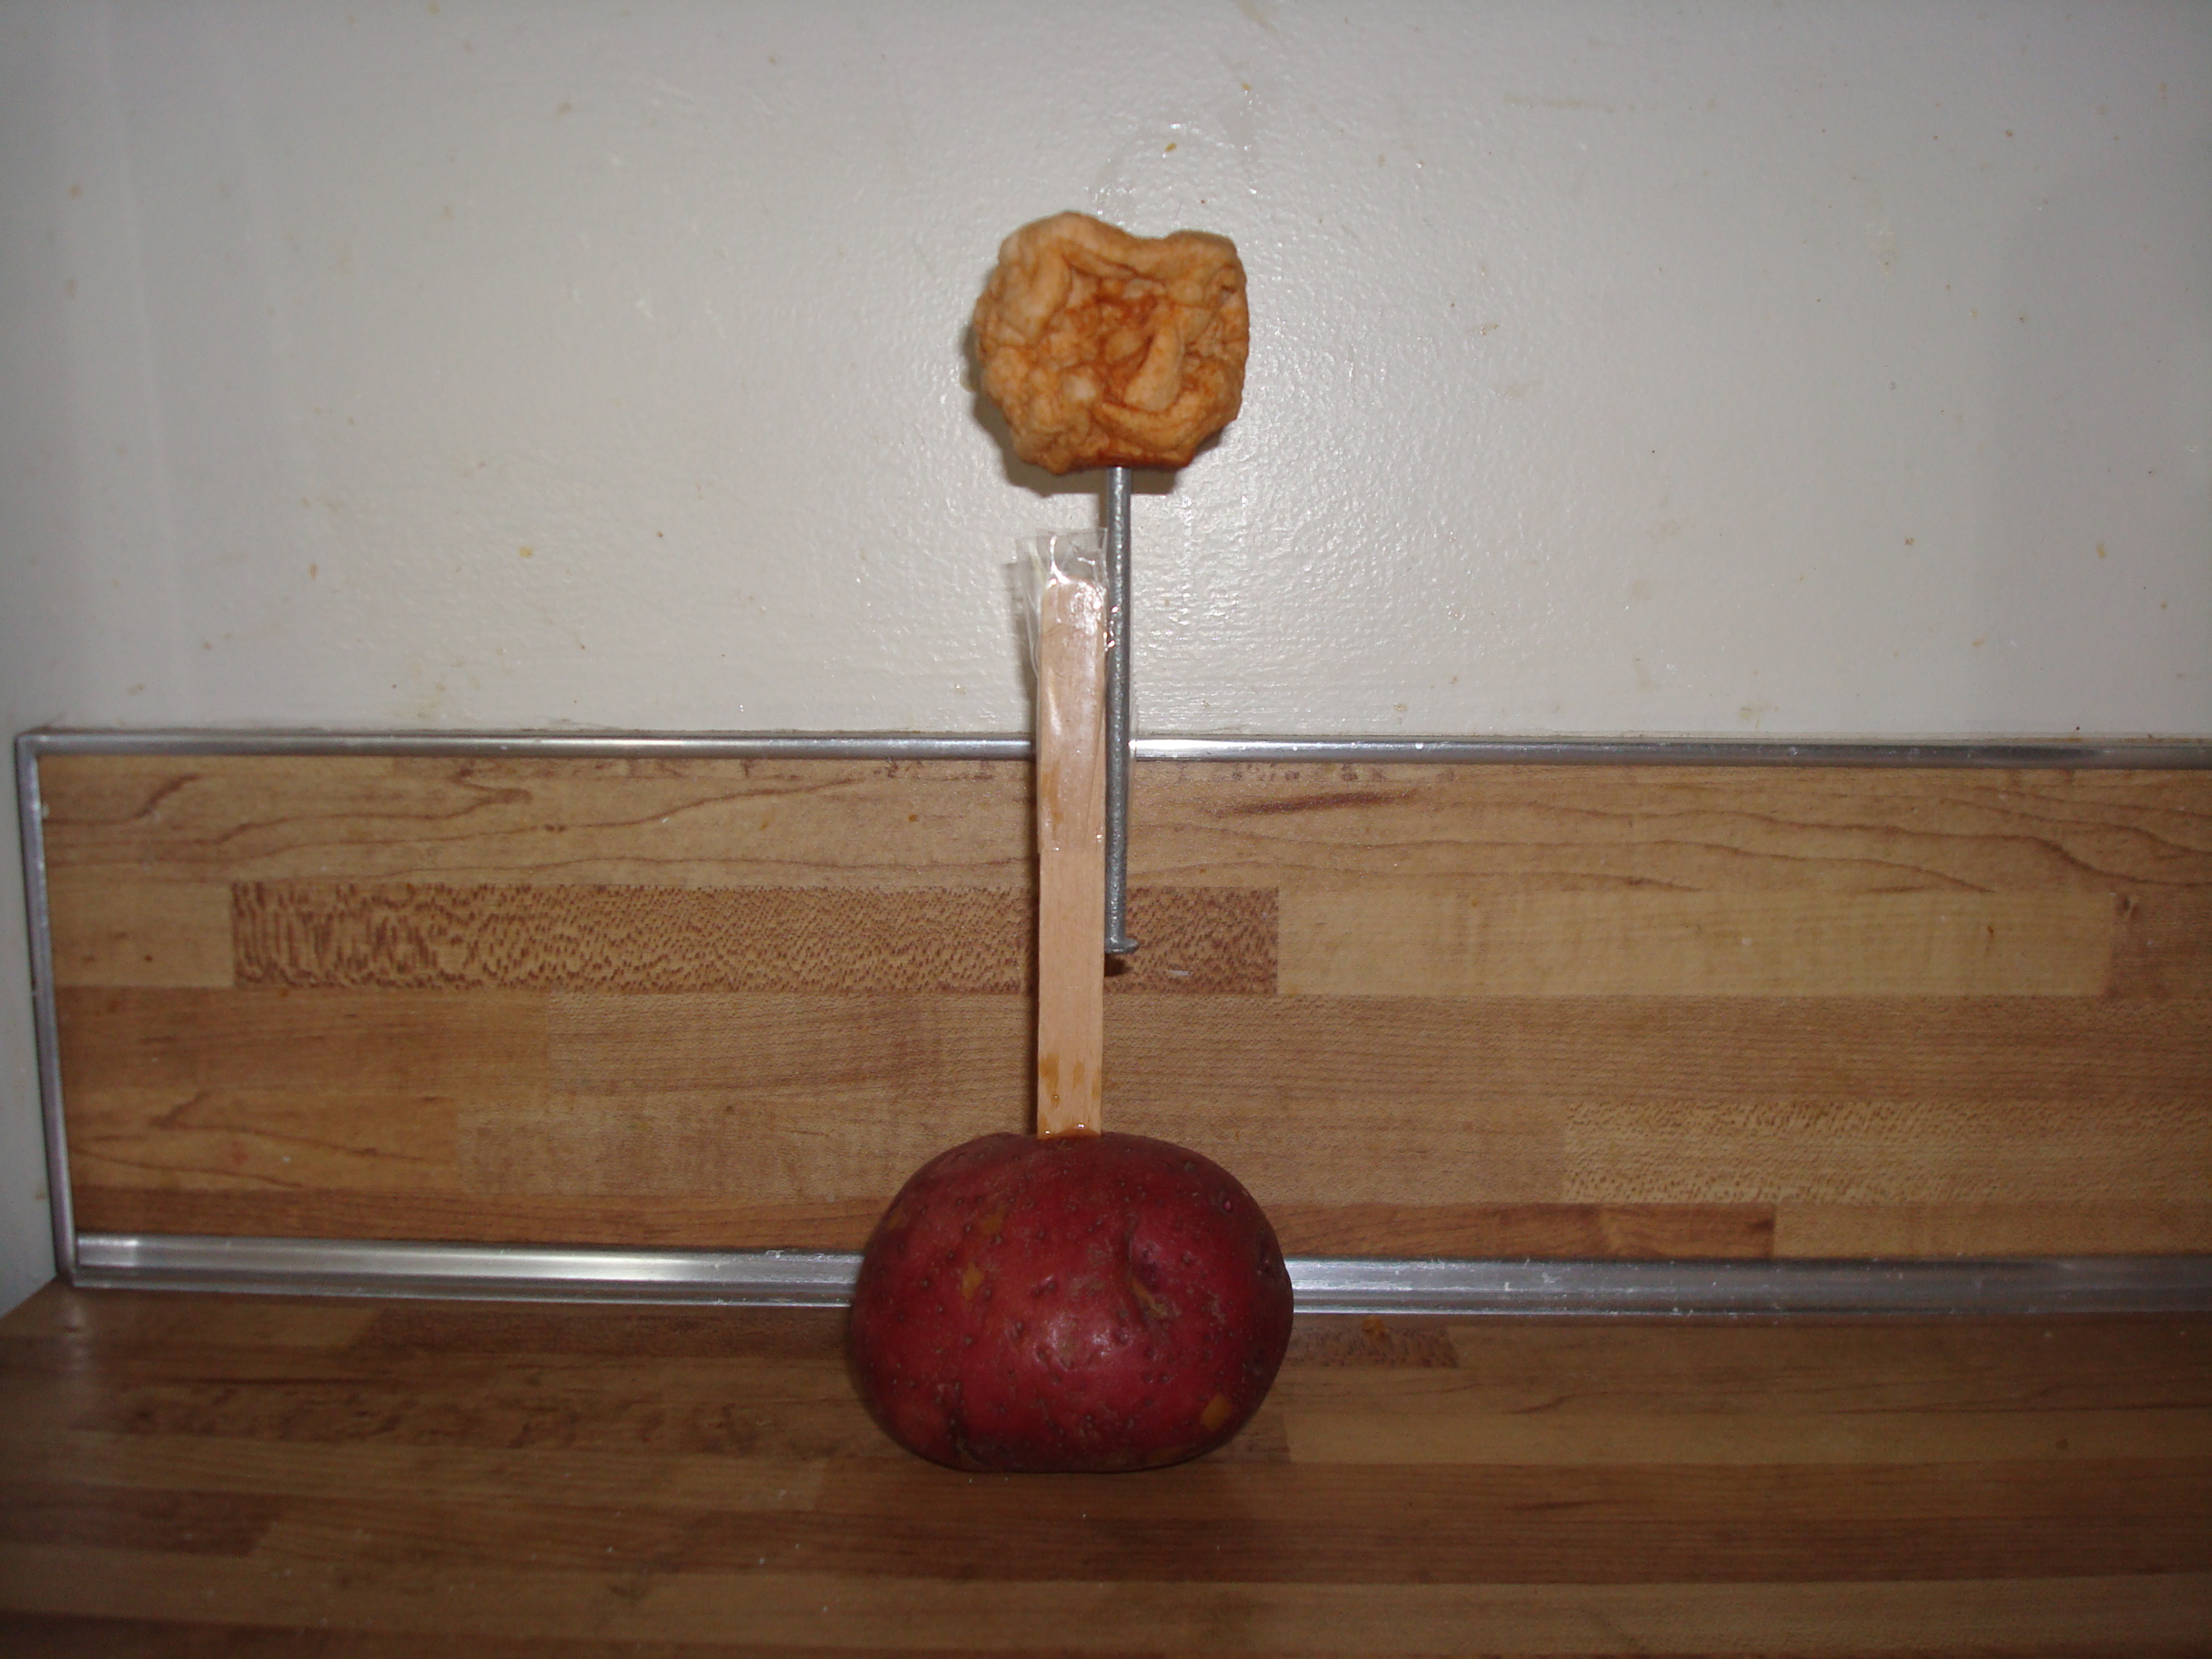
Since Grandma didn’t write anything a hundred years ago today, I’m going to share how I made a shrunken apple-head witch.
The October, 1913 issue of Ladies Home Journal had an article with suggestions for Halloween parties. It included the following picture.
Unfortunately the magazine didn’t provide directions for making the apple head witch, and instead said that if you wanted directions for making the “novelties” shown that you should send a stamped self-addressed envelope to the Entertainment Editor—so I was on my own when it came to interpreting the picture.
Here’s how I made the apple head witch:
First I made the shrunken apple head face. To make it I followed the directions in a wonderful YouTube video on how to carve apple heads. It also showed how to dry them in the oven.
I used a popsicle stick and nail that I taped together to create the skeleton. I stuck the sharp end of the nail into the base of the dried apple, and the popsicle stick into a potato.
I then made the outfit using felt and staples. I didn’t like the way it looked when the potato based stuck out beneath the clothes—so I made the dress longer than in the old picture.
I used a part of a cotton ball to make the witch’s hair, and made the hat out of black construction paper.
The hat didn’t want to stay in place when I put it on the witch, so I broke a tooth pick in half and inserted it into the top of the head. I then placed the hat over the tooth pick.
—
Last year I made the carrot bogeyman that is in the old Ladies Home Journal picture. Click on the link to see that post.
18-year-old Helena Muffly wrote exactly 100 years ago today:
Monday, January 5, 1914: Tried my hand at some sewing this afternoon. Teased my mother. (She simply has to take it, when I get busy.) So passed the afternoon.
Took a header on the porch tonight, but managed to go no further than my one knee.
Source of drawings: The Dressmaker by The Butterick Publishing Company (1911)
Her middle-aged granddaughter’s comments 100 years later:
I’d love to know what Grandma teased her mother about. In spite of the tumble–Was there ice on the porch?–, it sounds like a good day.
Did Grandma sew any seams? Here’s some hundred-year-old advice for making high-quality seams.
The Importance of Seams
When it comes to putting a garment together, many problems face the amateur seamstress, not least among these is the finishing of the joinings.
Here is something that needs almost an intuition to solve. Not only do different garments require different finishings but different parts of the same garment require different treatment.
Suppose for example you are making a princess slip-on with a flounce. Now for the body seams of the garment you will want something at once dainty and durable, something that isn’t “bunching,” and yet will be strong enough to withstand strain. For this then the French seam is best adapted. This you make by joining the pieces with a narrow seam on the right side, then turn and make another seam directly over this on the wrong side. Thus you have the raw edges covered up and have a double sewing to give strength to the seam.
The French seam is used also on lingerie waists and children’s dresses, and may be moderately wide or very narrow, according to its place in the garment and the material used. Care must be taken to trim off ravelings before turning the first seam.
In making up heavier goods such as a petticoat of sateen, you will find felled seams are the best. There are two different kinds of these. One is made by opening out an ordinary seam of three-fourths to one inch on the wrong side, turn under the edges and sew down. This is a good seam for baby’s night-gowns since it is the least bunglesome. However, it is not so strong as the single felled seam which is made as follows. Allow one-edge of an ordinary seam to extend out about one-fourth inch over the other. Turn a small hem on this and basted down over the other edge and sew firmly.
The bound seam is used to finish joinings in dresses or skirts of heavy material and is made by binding the edges of an ordinary seam with seam binding which comes for this purpose.
For baby’s flannel petticoats or woolen shirts baste open an ordinary raw seam and feather stitch on the right side. The raw edges on the inside are left unfinished so that the seam will be as flat as possible and there is no danger of chafing baby’s tender skin.
One of the essential things that many amateurs neglect in finishing a garment is a careful pressing of all seams, as the garment is put together and also when it is a finished product. Many a garment loses that “homemade” look and assumes quite a professional air when treated to a good pressing.
In the Homecraft on the Farm section of Kimball’s Dairy Farmer Magazine (February 1, 1914)
18-year-old Helena Muffly wrote exactly 100 years ago today:
Tuesday, December 23, 1913:Made some more today. It wasn’t so bad. You see I know more about the making from experience.
Her middle-aged granddaughter’s comments 100 years later:
Practice makes perfect. The previous day Grandma tried to make taffy, but it didn’t turn out right.
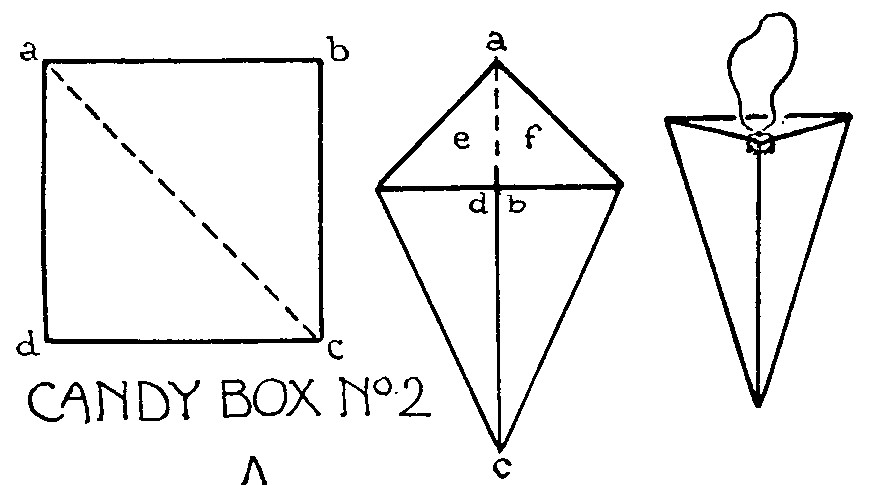
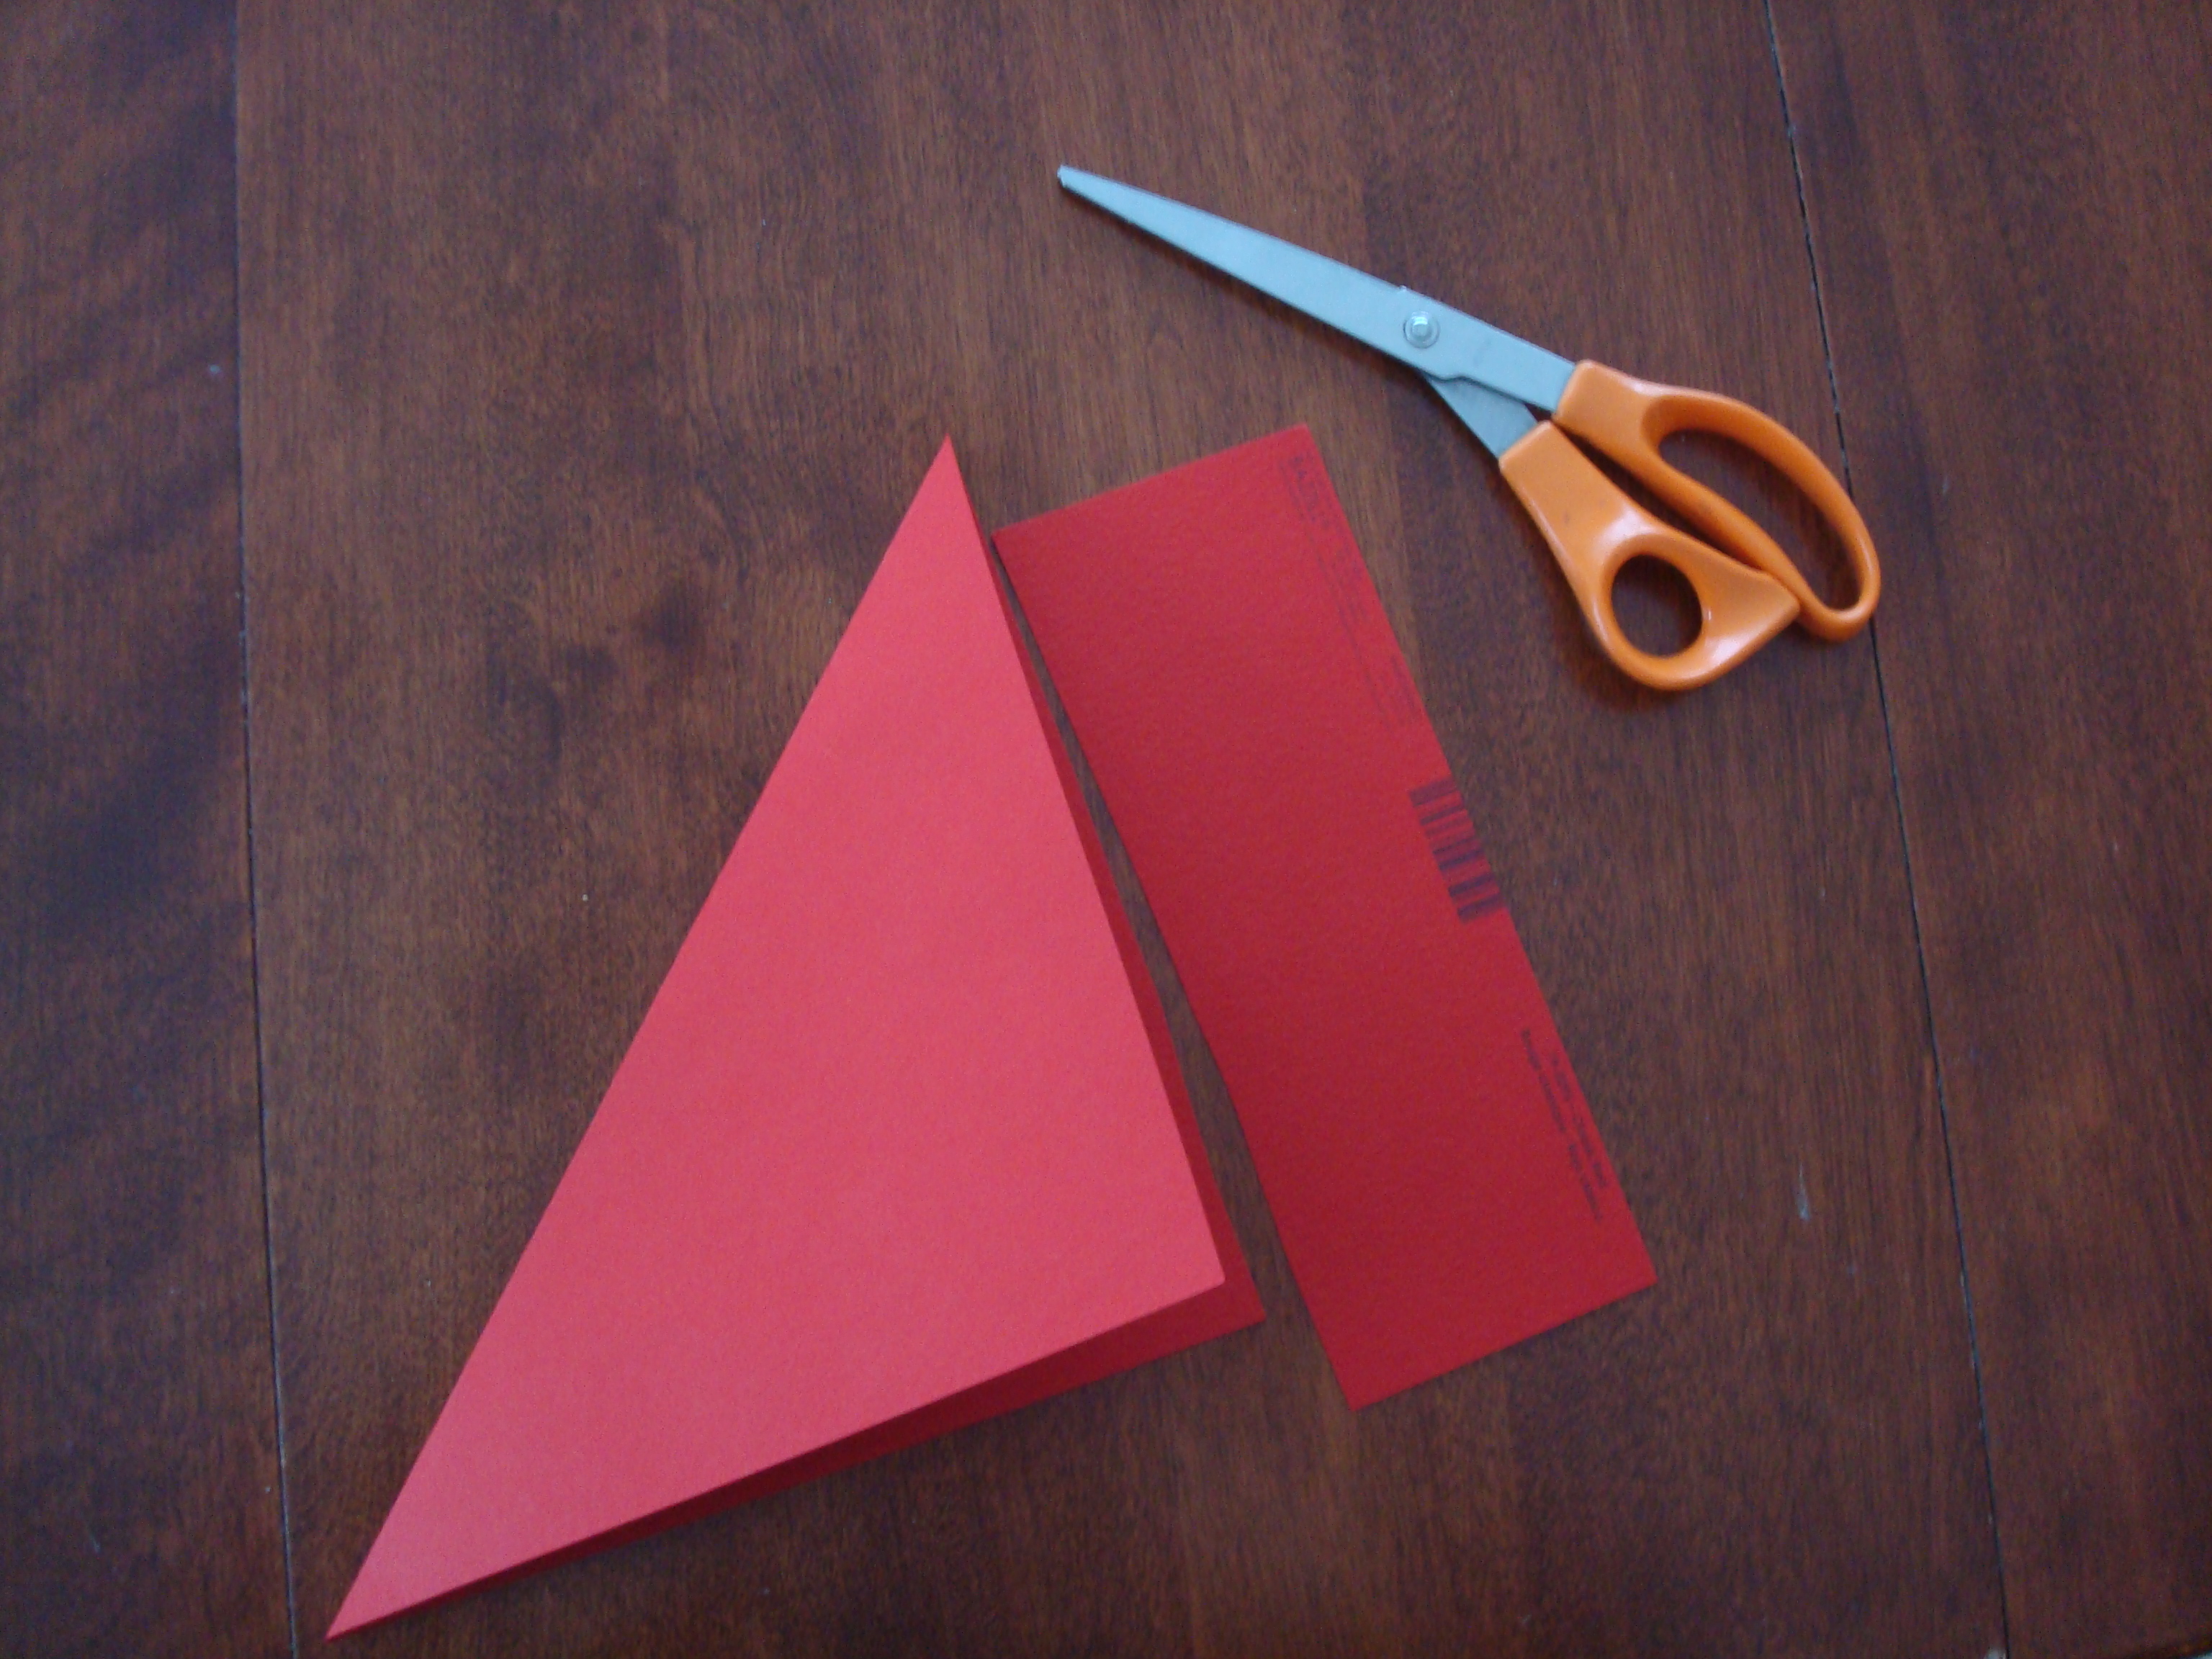
Since my Black Walnut Taffy turned out perfectly yesterday, I’ve moved on to making gift boxes for my candy. The December, 1912 issue of The School Arts Magazine had directions for making a triangular candy box.
Source: The School Arts Magazine (December, 1912)
A square piece of heavy craft paper is used to make the box. To measure a square, take one corner of the paper and fold to the opposite side. Cut the paper to create the square.
Unfold paper, and fold on the other diagonal. Then, fold one corner of the paper to the crease made by the previous folding. Unfold paper, and cut a slit to the new fold.
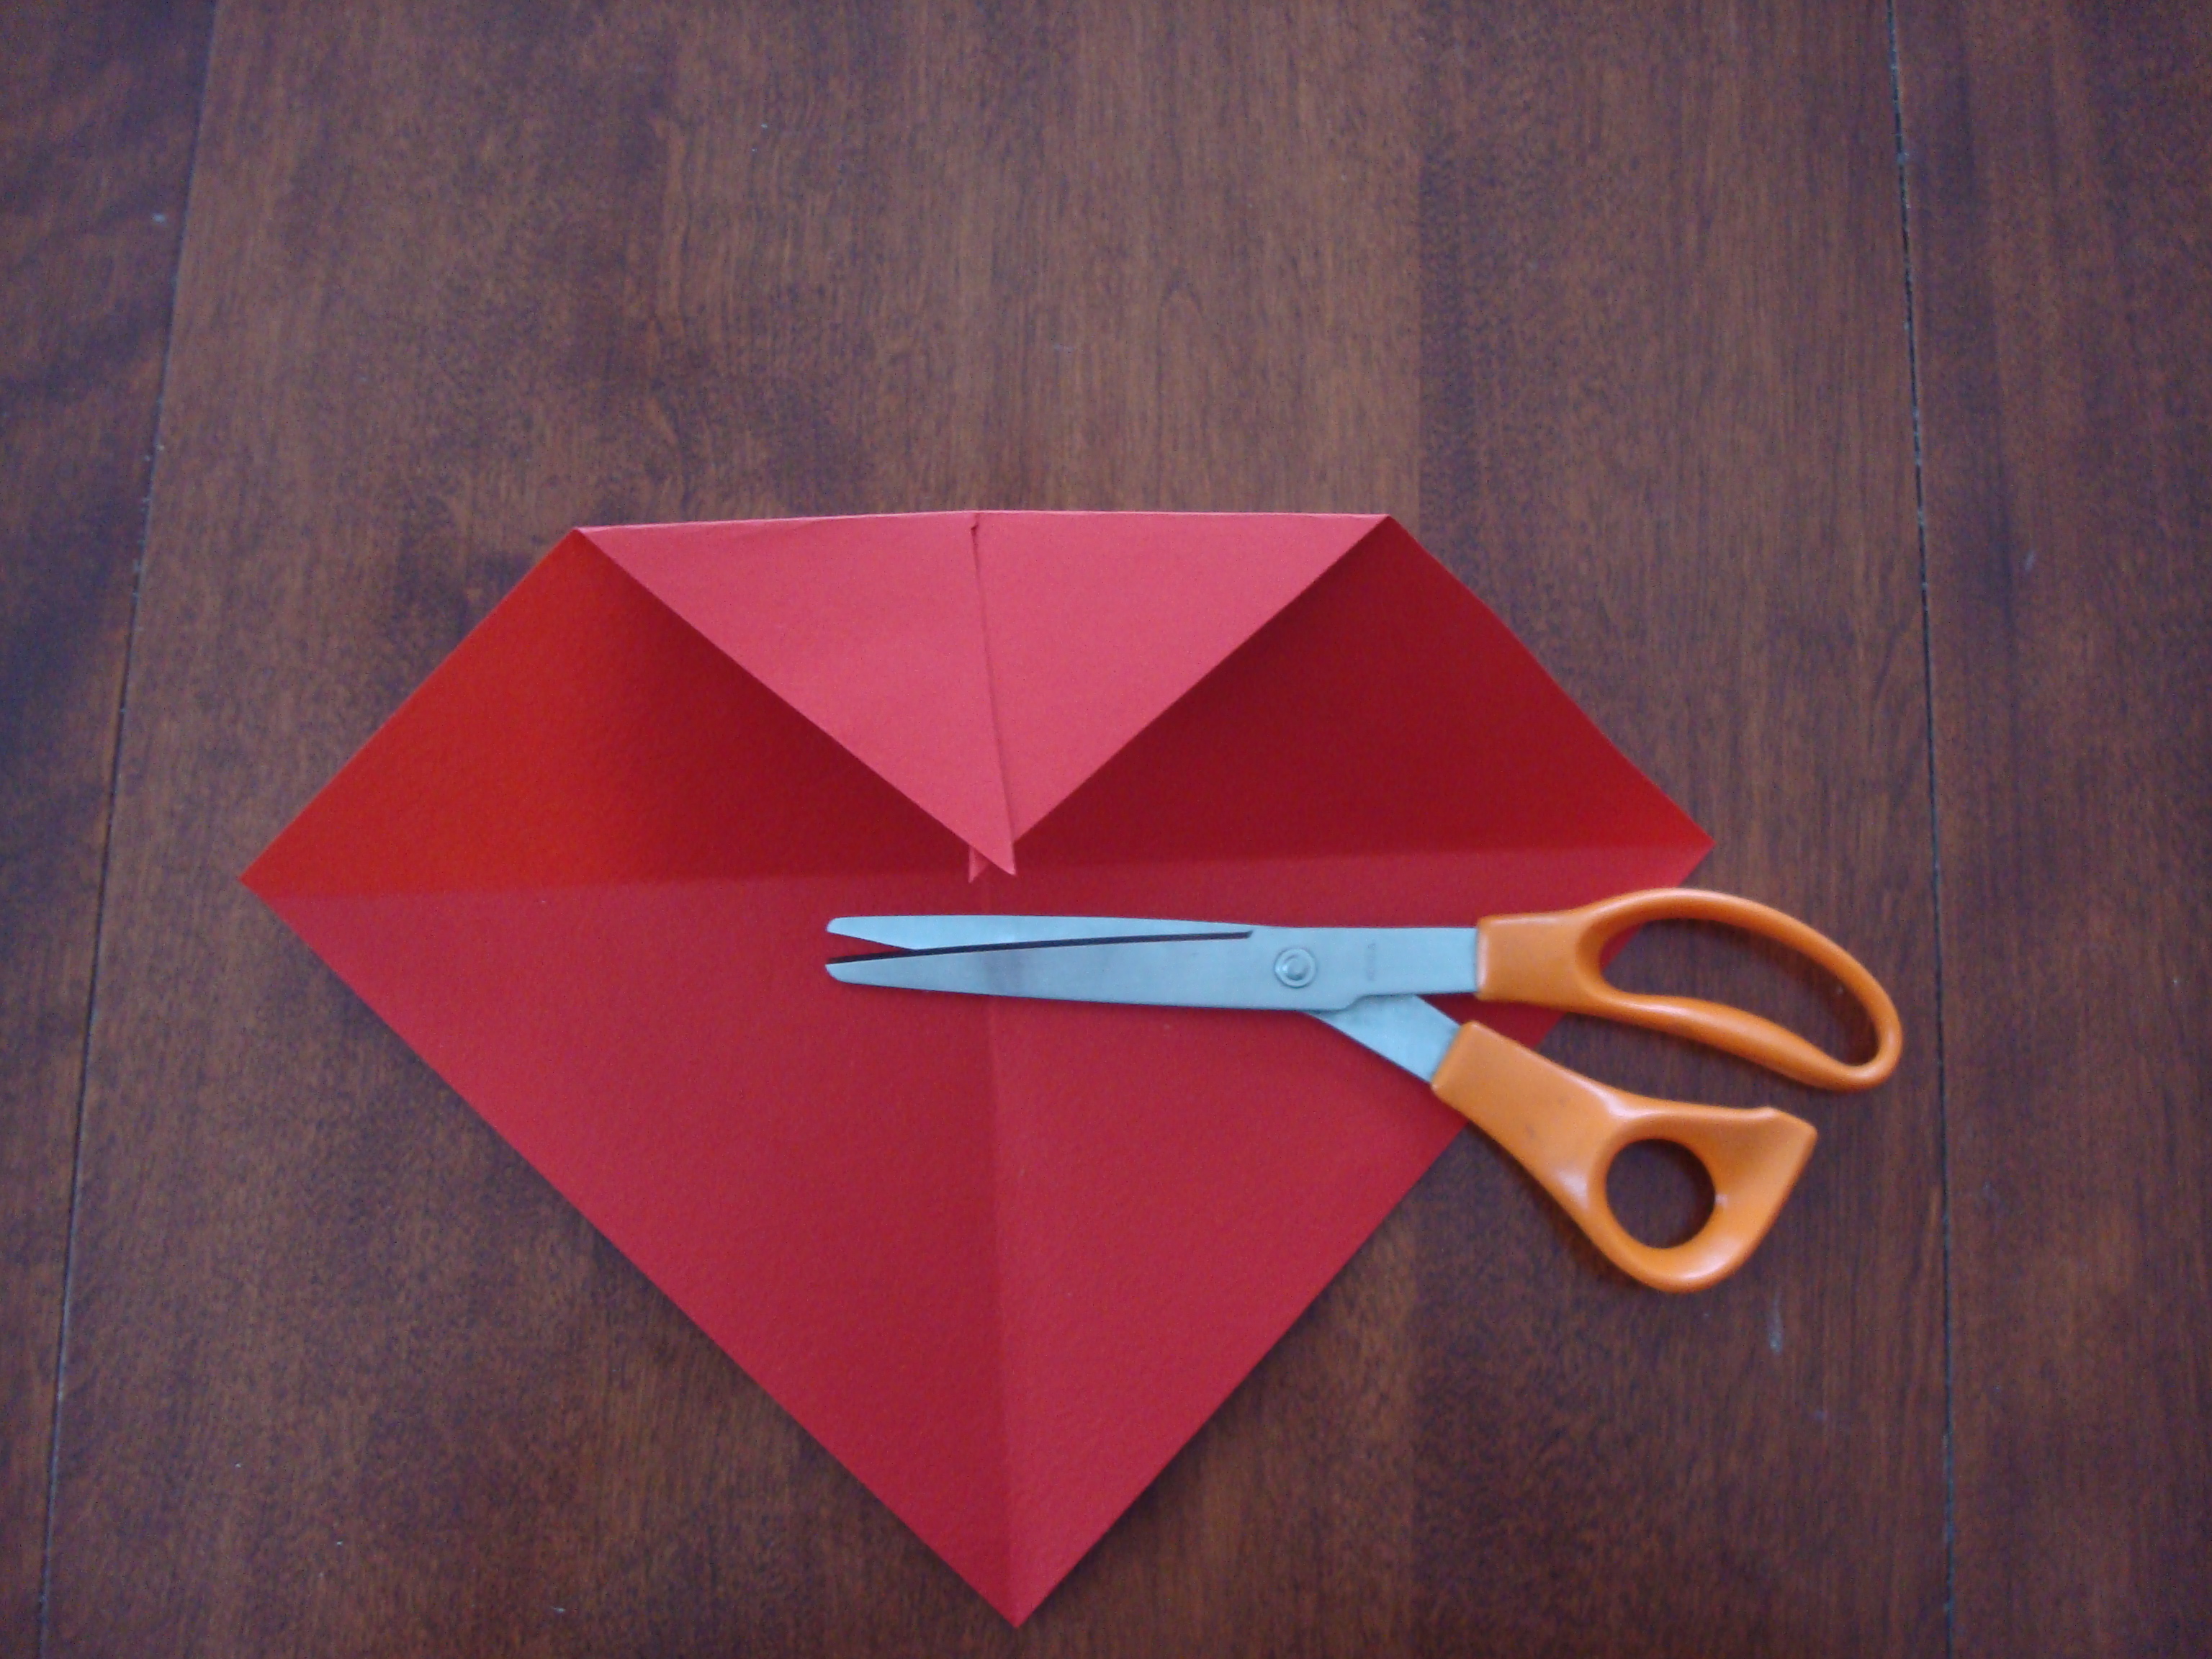
Bring a corner to the center of the paper and then fold. Repeat with the opposite corner.
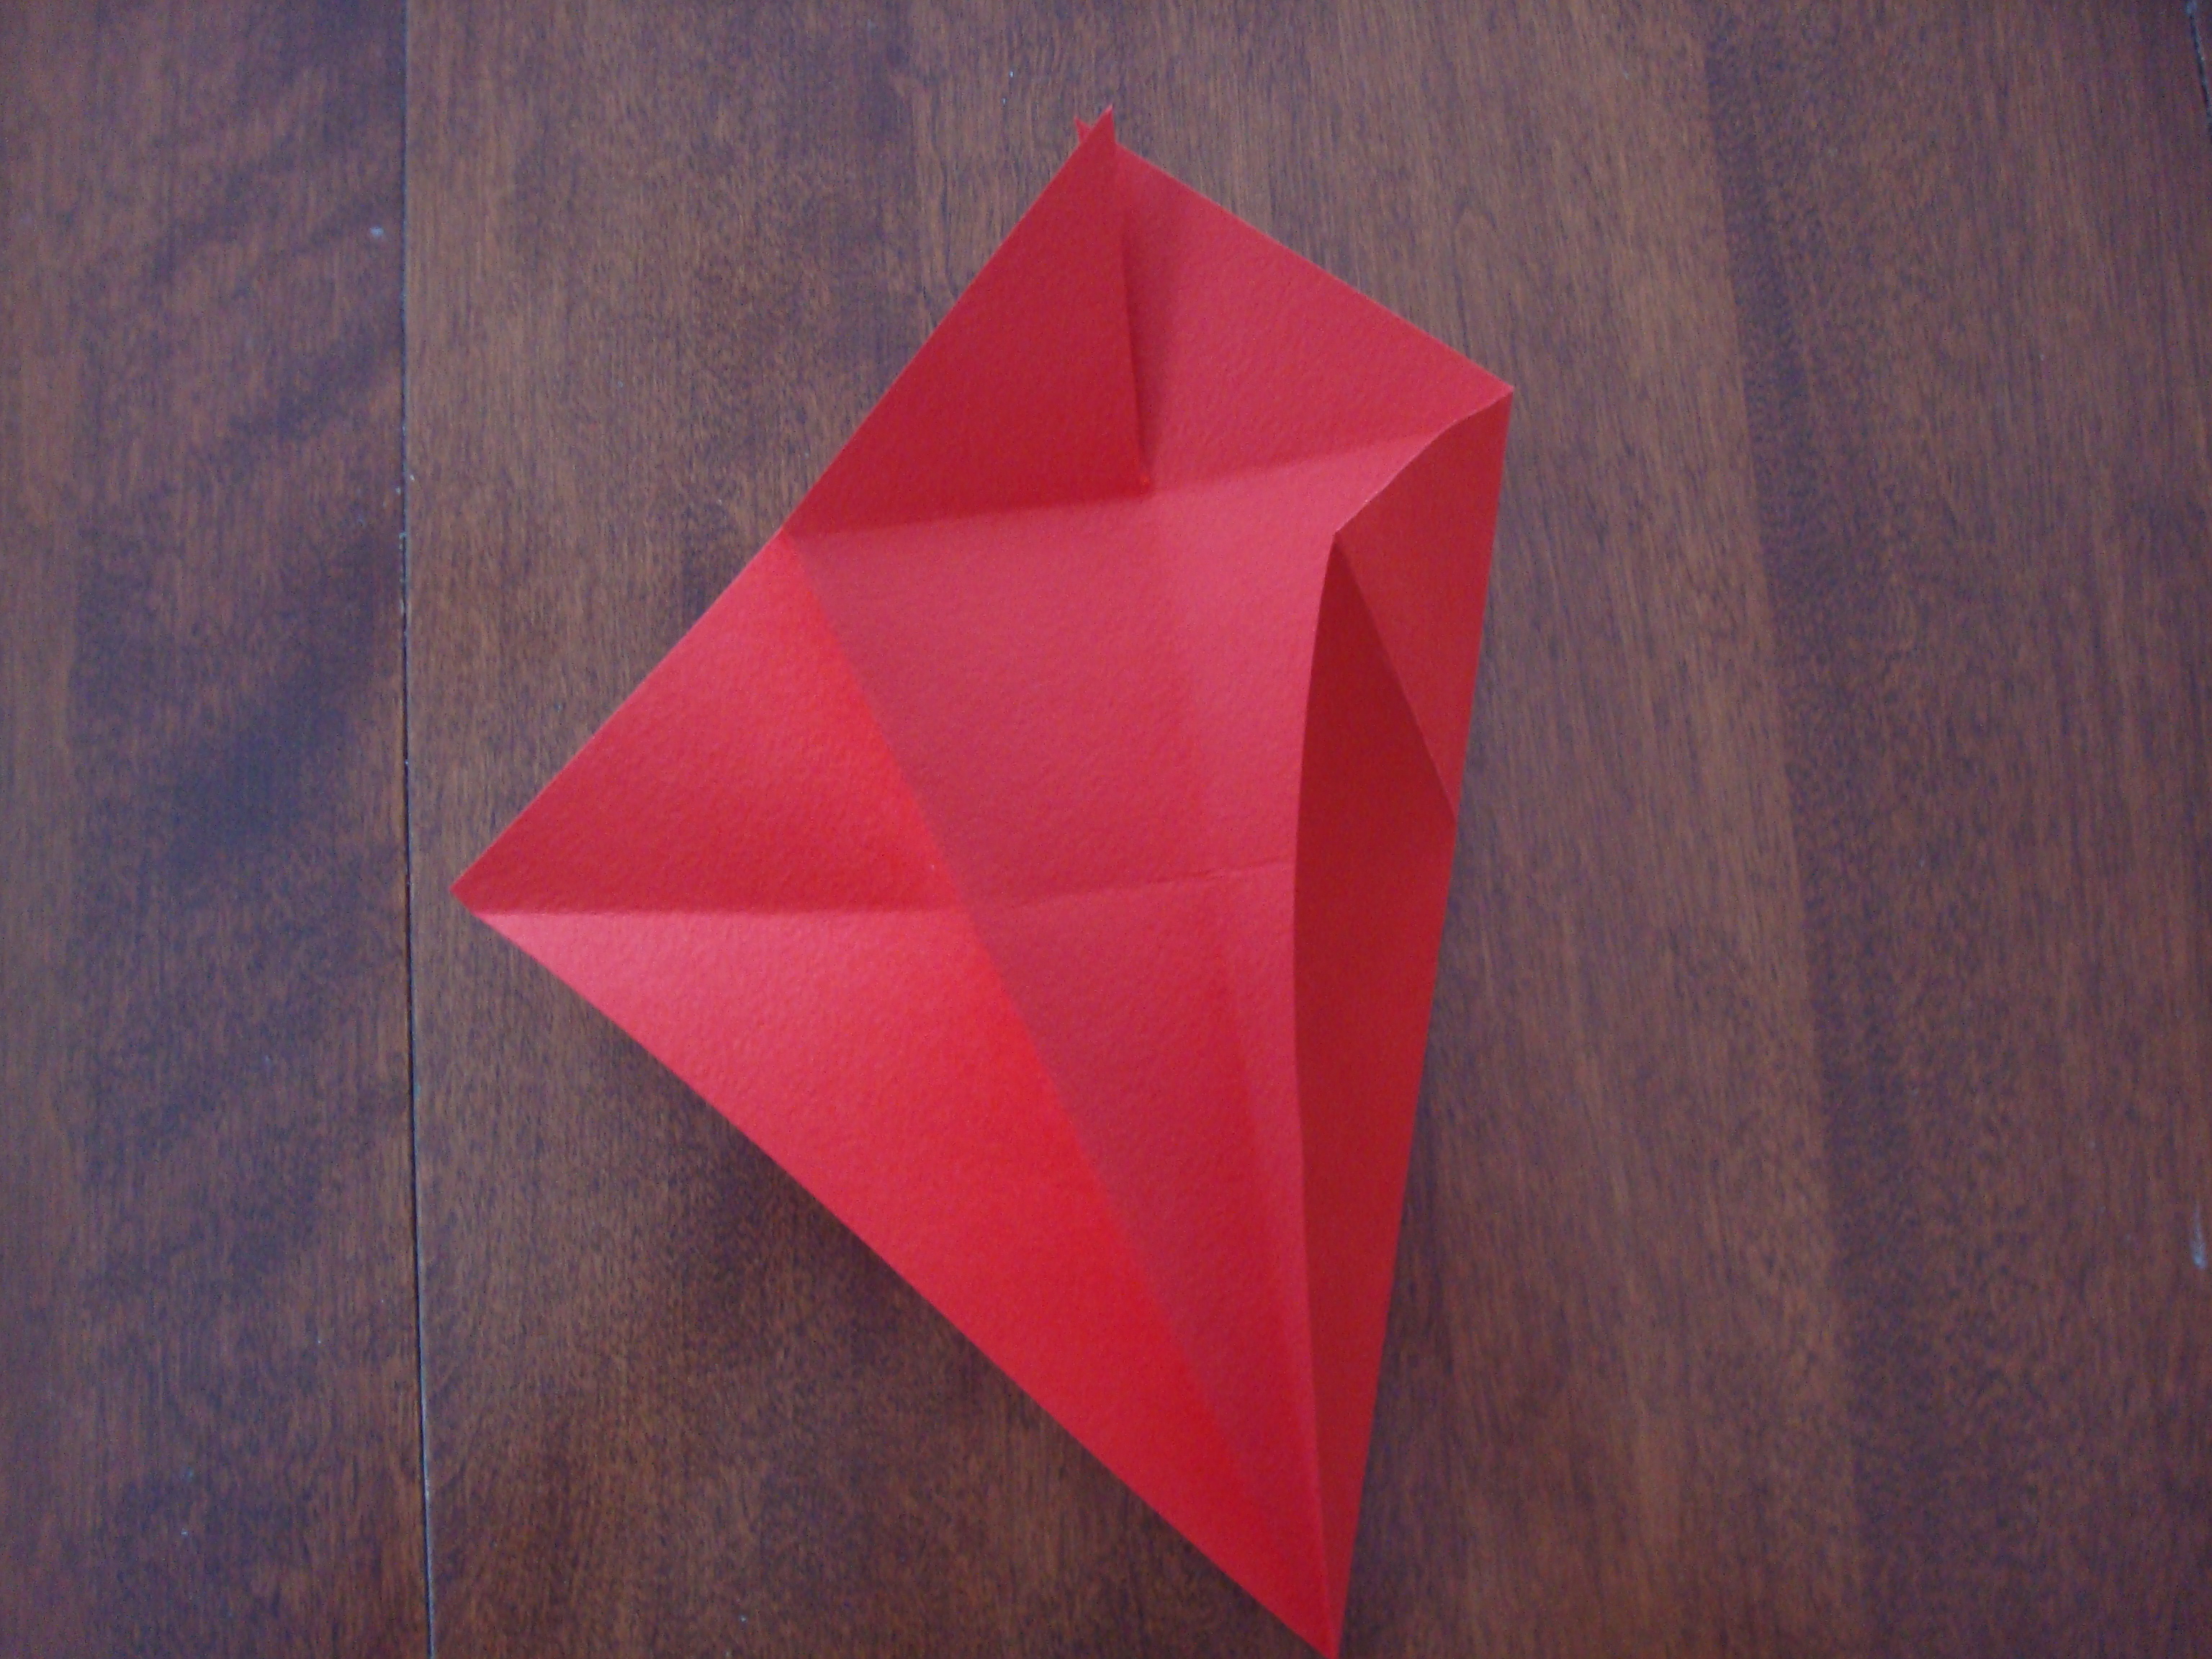
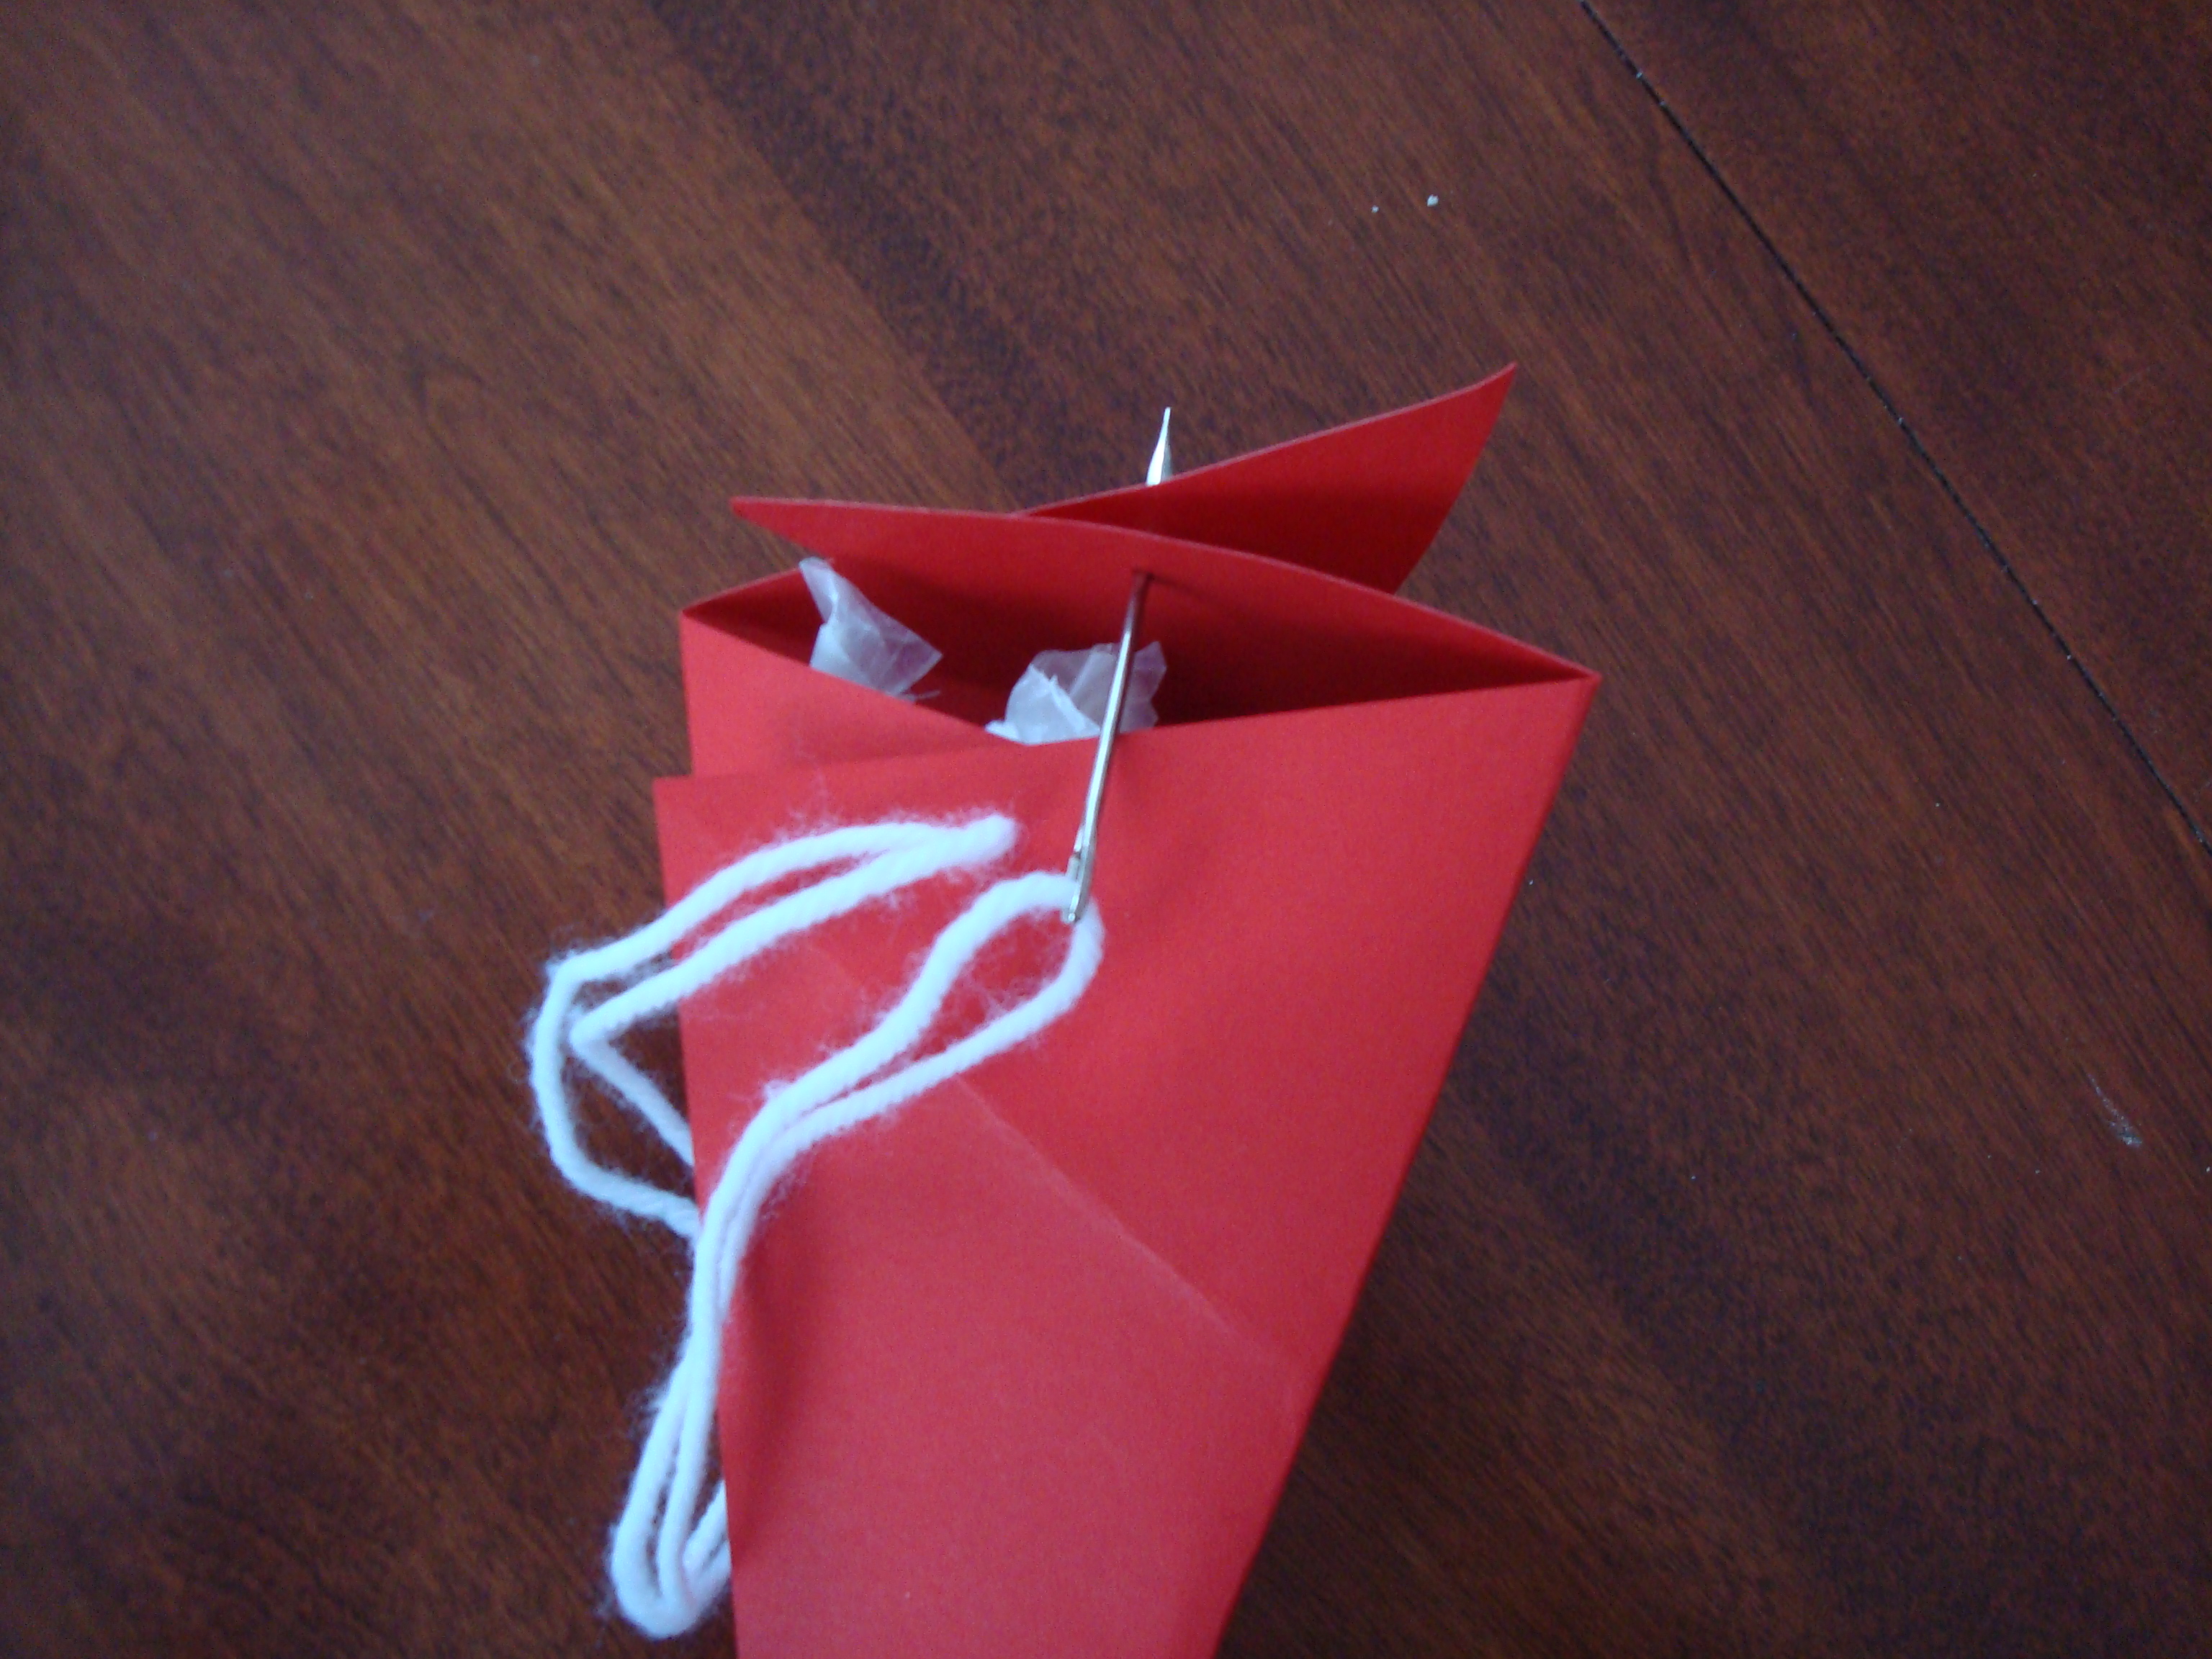
Fold the paper into the triangular shape. Thread a craft needle with yarn. Tie a knot at the end of the double strand, then pull the yarn through the two layers of paper to fasten them together. Fill with candy, then sew through the top of the box to close. Clip the yarn to remove the needle, and tie bow.
These boxes are easy to make, and very attractive. I like them so much that I ended up making several, and used them for small gifts.
18-year-old Helena Muffly wrote exactly 100 years ago today:
Tuesday, October 28, 1913: Working away as usual.
Her middle-aged granddaughter’s comments 100 years later:
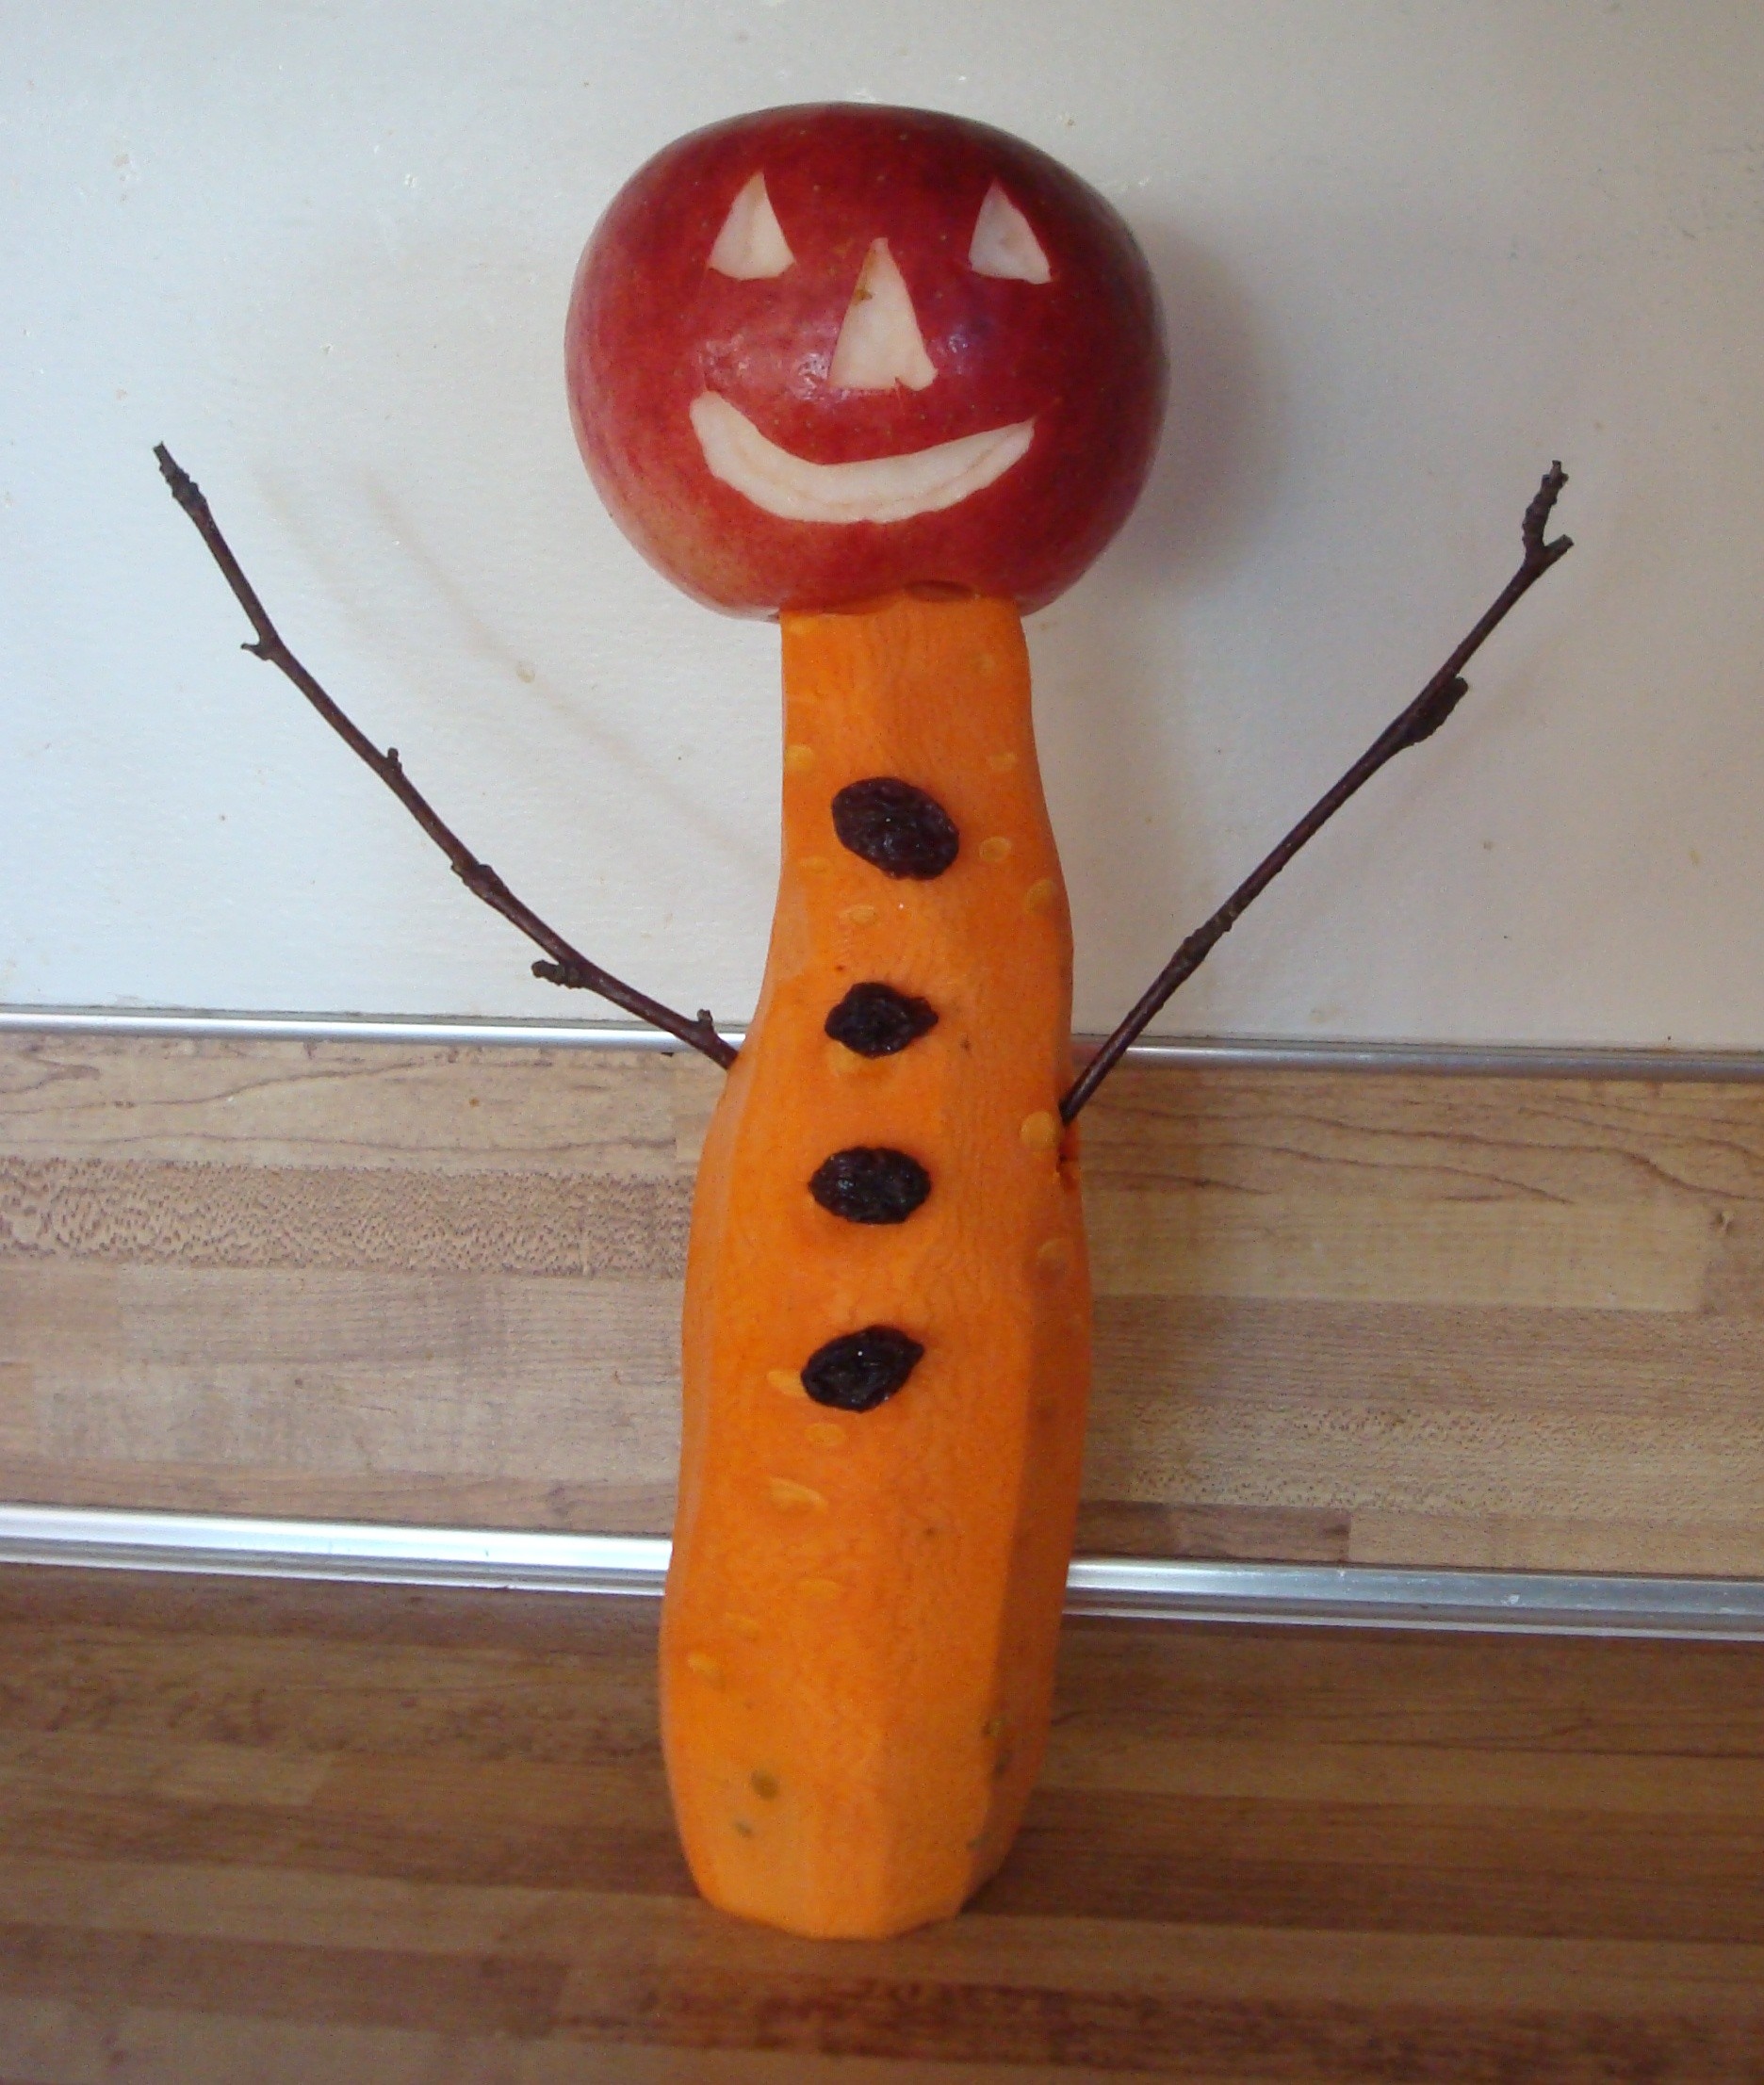
Hmm. . . Grandma wasn’t exactly doing her usual work. She and her sister Ruth were preparing to host a Halloween party. The previous day they sent invitations to friends.
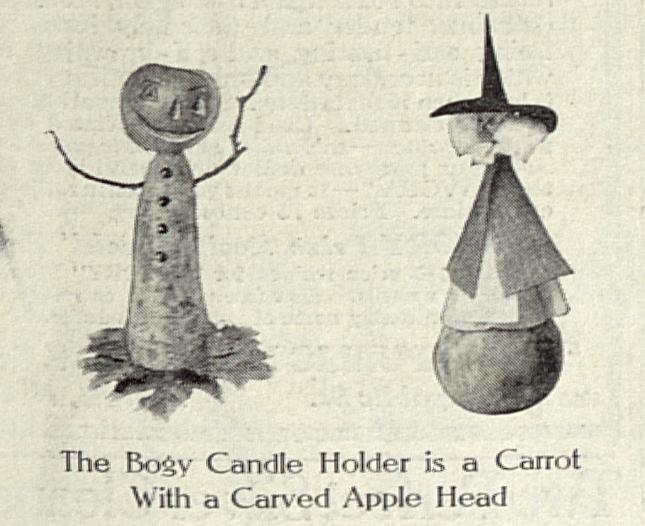
Were they making any Halloween decorations? . . . Maybe the carrot and apple head bogeyman shown in the October, 1913 issue of Ladies Home Journal?
Source: Ladies Home Journal (October, 1913)
I’m a bit foggy about why the magazine caption calls the bogeyman a candle holder since I don’t seen any candles in the picture.
The magazine didn’t provide directions for making the bogeyman, and instead said that if you wanted directions for making the “novelties” shown that you should send a stamped self-addressed envelope to the Entertainment Editor.
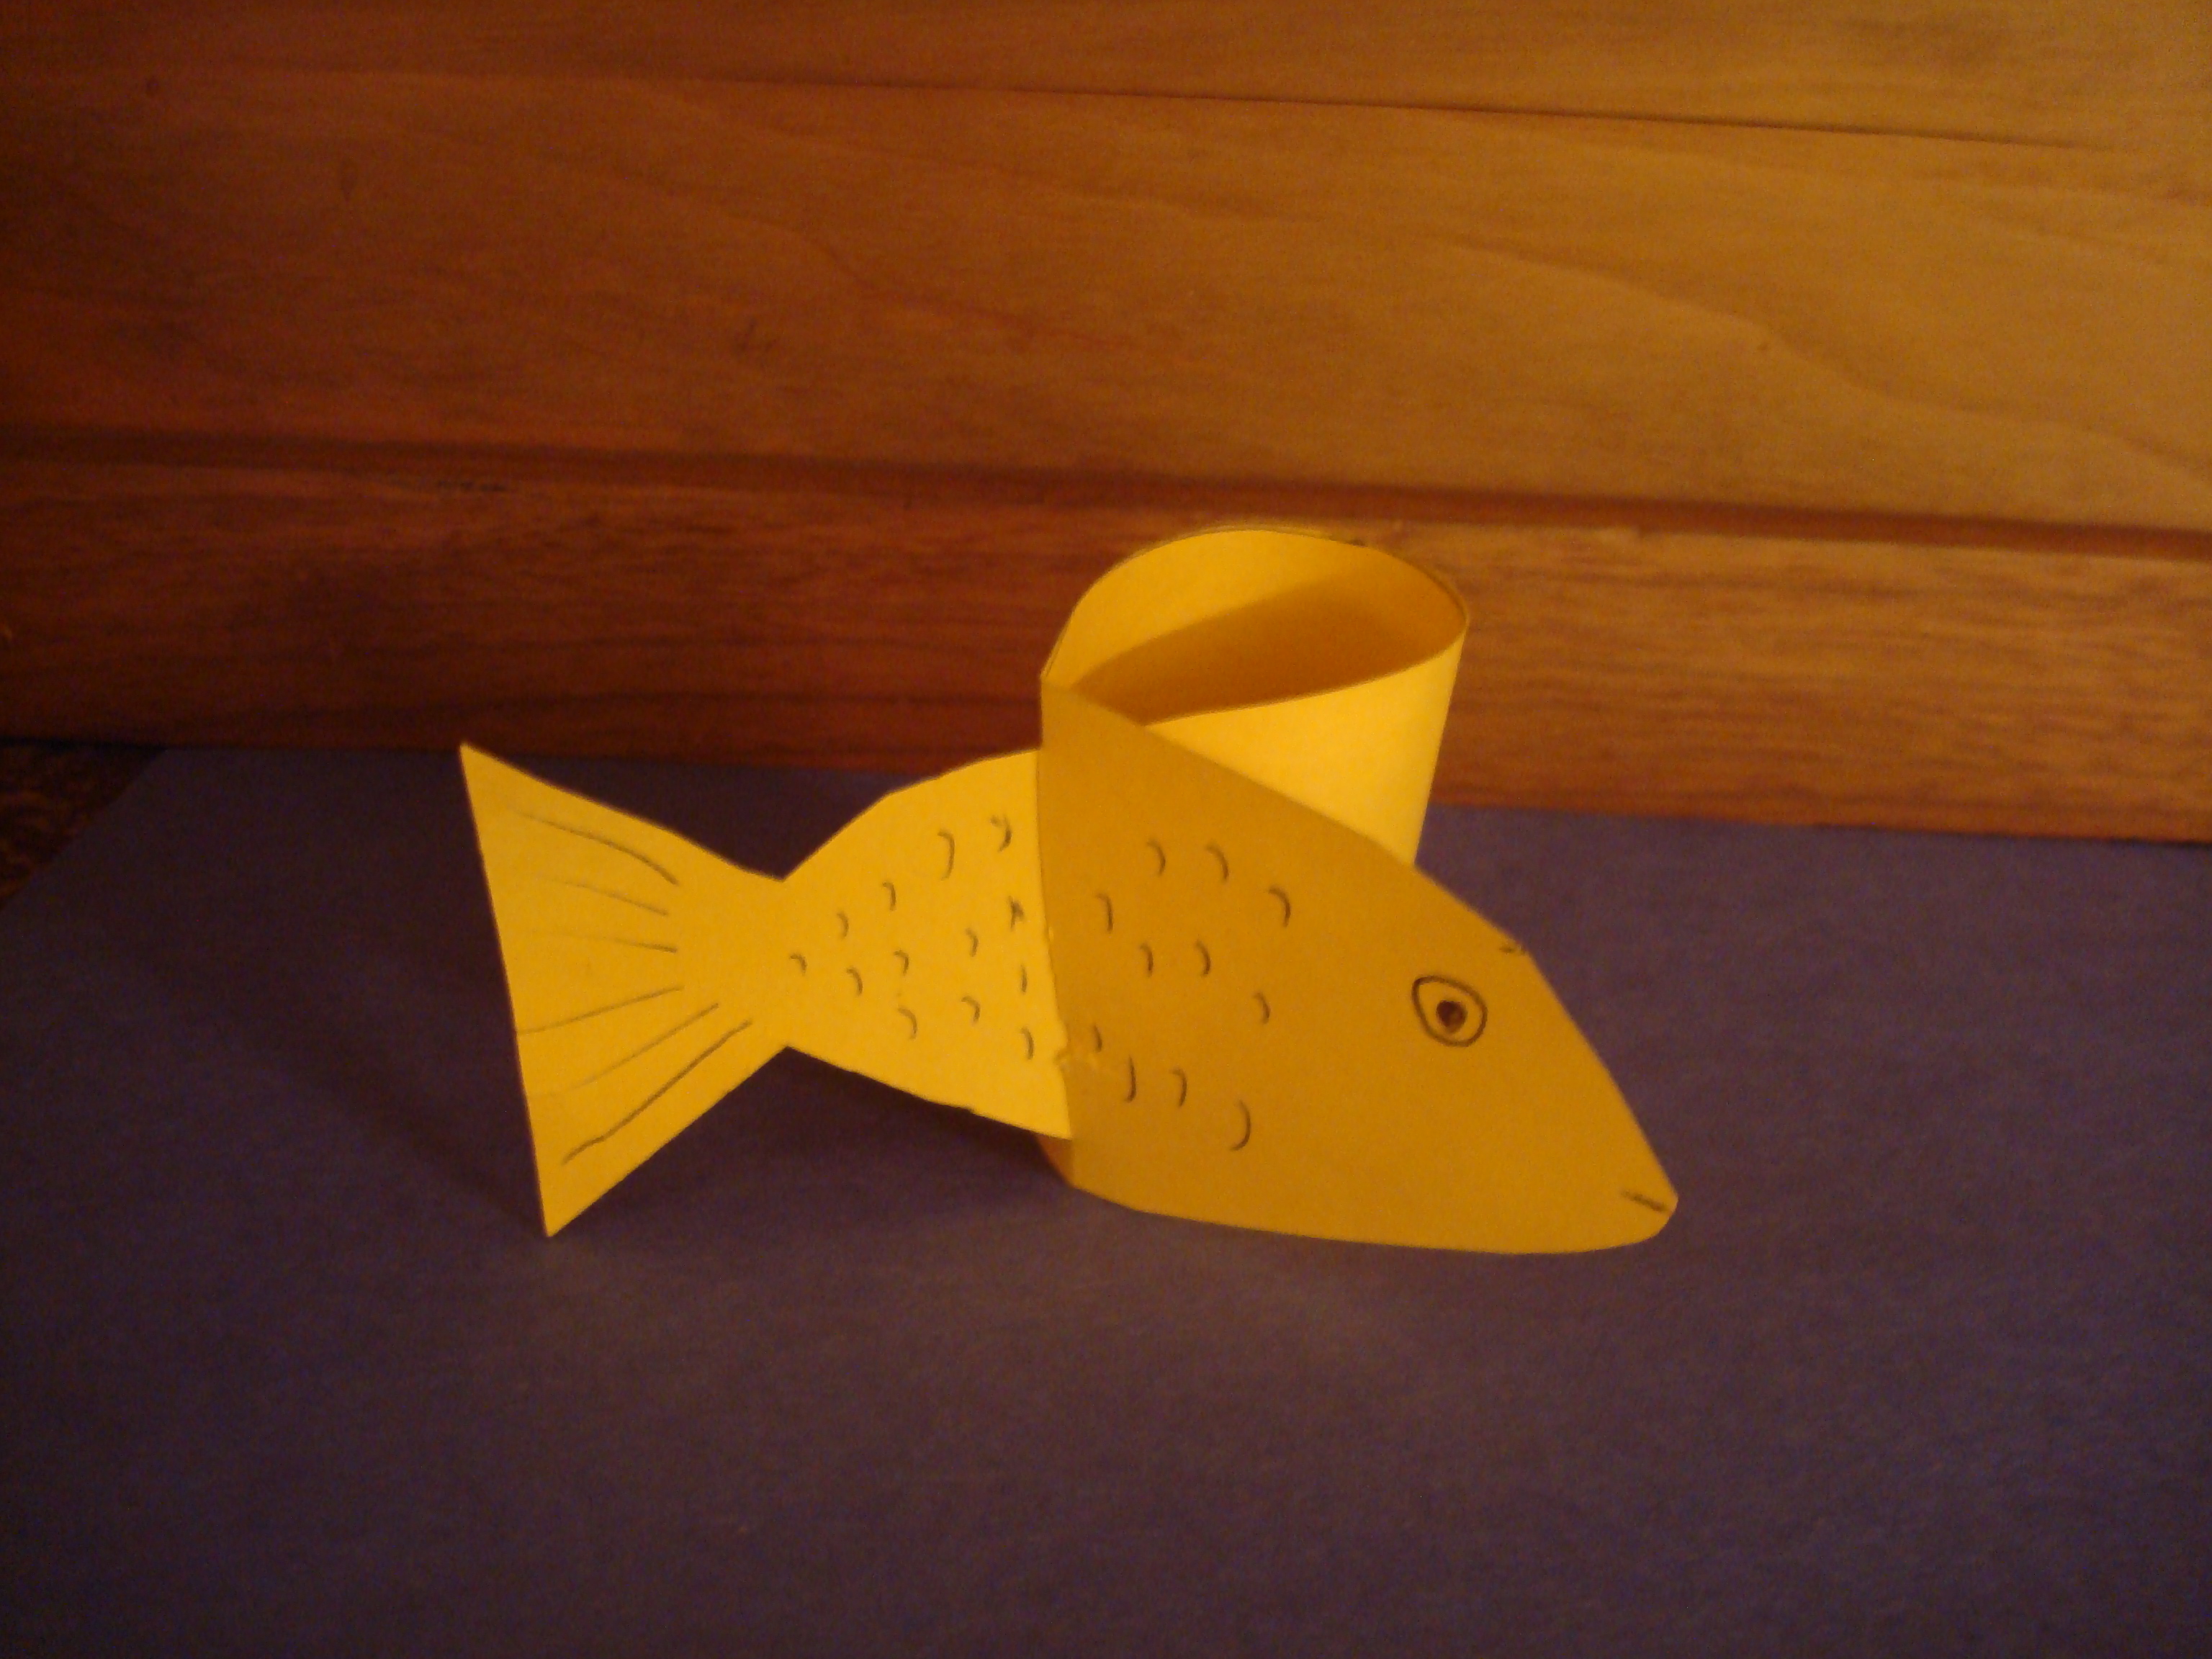
Here’s how I interpreted the picture when I made the bogeyman:
I bought some old-fashioned fat carrots (and some apples) at the farmer’s market.
I carved a jack-o-lantern face on the apple and then cut a round hole about 1-inch in diameter and 1-inch deep in the bottom of the apple. I dipped the carved face in lemon juice so that it wouldn’t turn brown.
I peeled the carrot and cut the bottom off so that it would sit flat. I then cut away part of the top of the carrot to create narrower piece that could be inserted into the bottom of the apple. I also cut notches on each side of the carrot for the twig arms.
I then assembled the bogeyman. The “buttons” on the front of the carrot are raisins that I attached using pins.
18-year-old Helena Muffly wrote exactly 100 years ago today:
Tuesday, May 27, 1913: It’s raining again like it did last week. Nothing much doing.
Her middle-aged granddaughter’s comments 100 years later:
Rainy days can be the perfect time to work on artwork or crafts. Did Grandma ever while away a rainy afternoon making pencil drawings?
I recently came across a hundred-year-old magazine for teachers called School Arts Magazine. The January, 1913 issue had an article about how to teach students to make pencil drawings.
Do children today still learn how to make pencil drawings in school? . . .or is that considered “so old-fashioned”?
The Possibilities of the Pencil
With the many new elements that are crowded into the topic of drawing in the public schools—it is easy to lose sight of the fact that after all the universal medium of expression is the pencil. Rightly employed the marvelous possibilities of the pencil are astonishing.
The proper teaching of pencil-rendering is not difficult if correctly approached. The tendency of every child is to make fine, hard lines instead of the broad, rich stroke which gives character to the result. With firm, smooth lines, much of color, texture, and light and shade can be pictured in a suggestive manner.
At first, detail should be almost entirely left out. The more a child “fusses” and “finishes” his drawing the more labored and unsatisfactory the results appear to be.
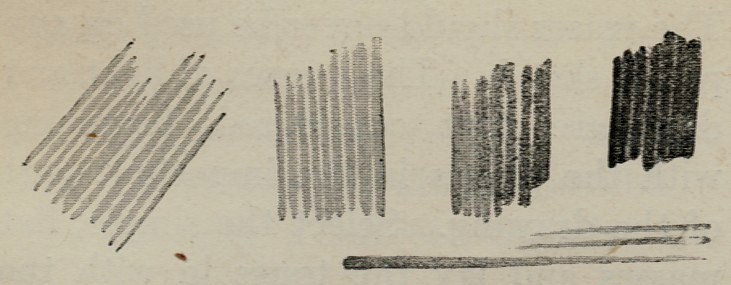
See to the condition of the pencil. It should be sharpened to a blunt point well supported by the wood, and the point flattened on one side to give it a form capable of making lines of all widths and qualities.
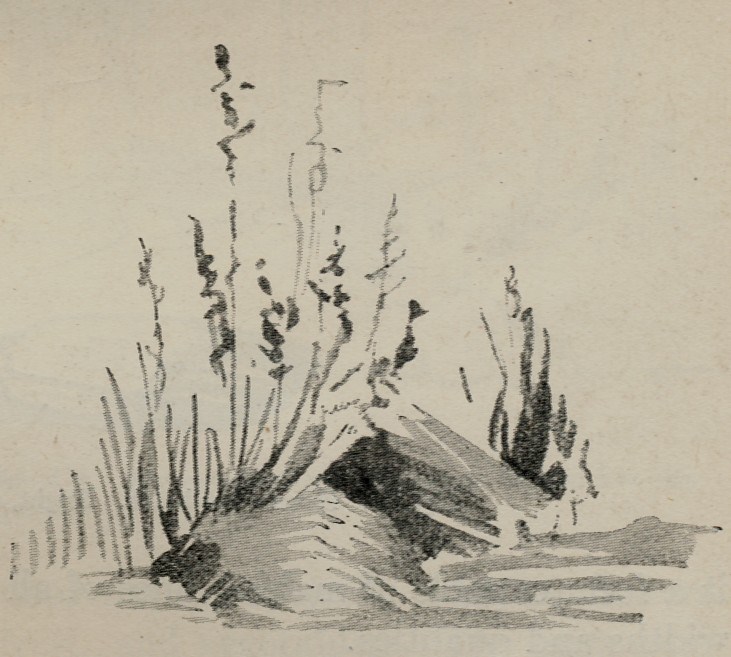
Fig. I
Before attempting a problem in drawing in light and shade, the pupil should gain some facility in handling the pencil—by practicing strokes and lines of varying width and color. The drill shown in Fig. 1 will give skill in laying tone flat and solid in appearance.
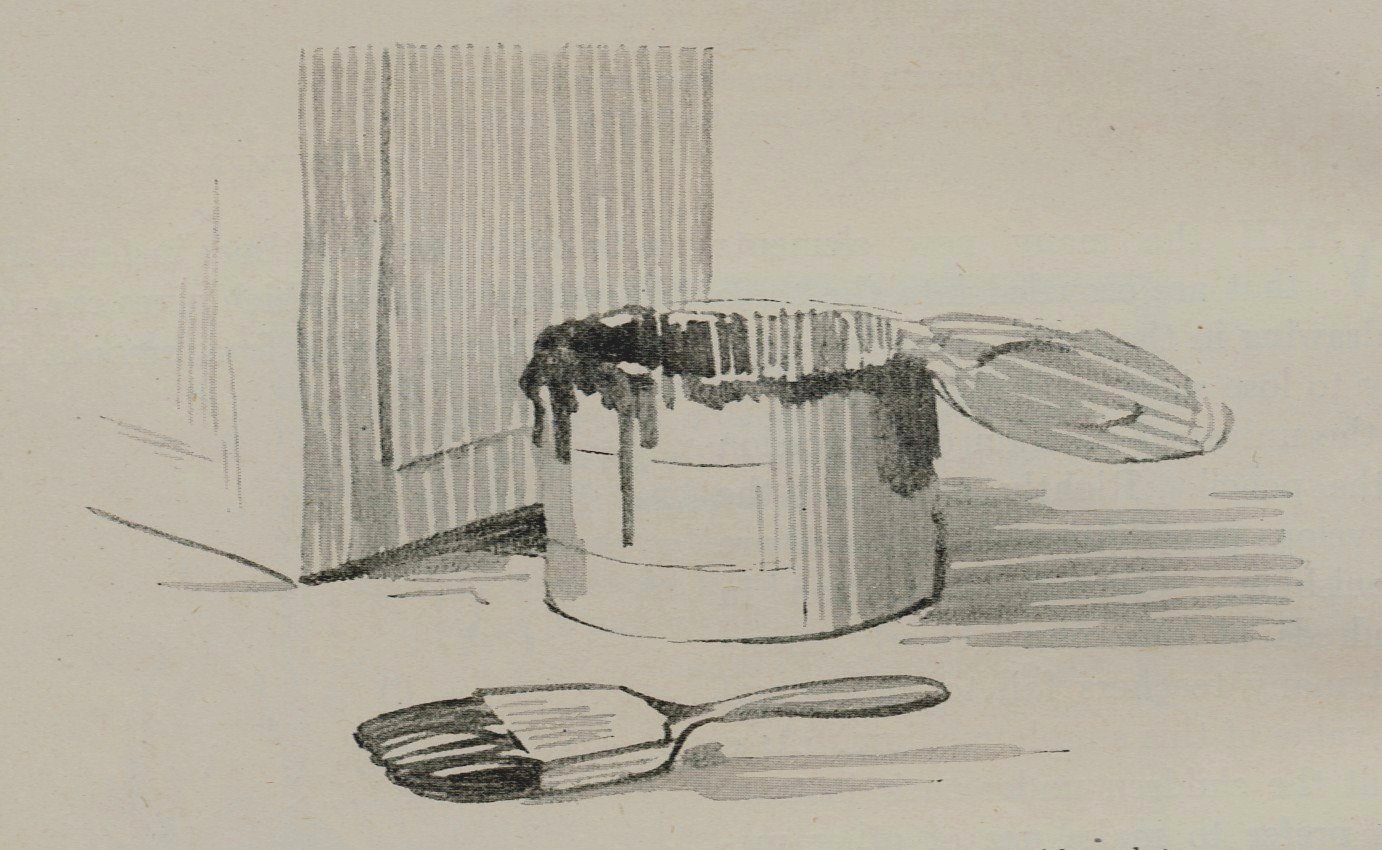
Fig. II
After this is accomplished the pictorial sketch may be attempted (Fig. II).
In beginning a sketch first decide upon the point of interest. Much must be omitted and many contrasts exaggerated in order to keep the attention centered upon this point.
After deciding what the central point is to be, a light sketch, in as few lines as possible, should be made. These first lines must be accurate, and no erasing should be done. The masses of light and dark are next considered, beginning with the planes in the important part of the drawing.
Fig. III
Select simple, flat masses and lay the tones in with the direct stroke already mastered in the preliminary practice (see Fig. III).
The direction of the stroke can be made to express contour and texture, and should be carefully studied from that viewpoint.
The sharp, vigorous accents of black will produce the contrast which brings out the light and sparkle of the sketch and adds so much to its beauty. The contrasts should be emphasized at the center of interest, and diminished into soft grays as they recede into the less important parts toward the background. .
It is easy to over-emphasize out-of-door nature subjects, such as flowers, fruit, and vegetables. The boys especially are more interested in the common objects of everyday life.
The pencil is by far the most convenient and best medium for most of the work that is included in a well-considered course of art instruction.

Youthful caricaturists need to be taught that kindness should be their guide in making a selection of the qualities which they exaggerate, and that the best sense of humor is that which we call good humor.